
One of the common issues when building modern infrastructure-as-code style systems is that whilst automation is great, it also has a habit of failing at the worst possible time. There’s nothing quite like the fun of trying to autoscale only to find that a newer version of a package breaks compatibility or the repository mirror or Puppet master has gone offline breaking the whole carefully tuned process.
Naturally this is an issue. And whilst I’ve seen some organisations simply ignore the issue and place trust in their repos and configuration management servers, I’m also too pessimistic about technology to trust numerous components for any mission critical applications.
Fortunately there is a solution – we can bake a machine image that has all the applications and configuration pre-applied, so that autoscaling has no third party dependencies (or as close to no dependencies as we can get).
Baking has negative connotations of the bad old days when engineers would assemble custom machine images by hand and then copy them to build new systems, but it doesn’t have to be that way. We can still respect infrastructure-as-code principals and use modern tools like Puppet and Packer to reliably build consistent images as needed.
These images could be as simple as a base AMI image for Amazon AWS which includes the stock OS image plus your Puppet setup. Or they could be as complex as a fully configured and provisioned application server ready-to-go at the first boot.
To make baking images easier, I’ve added support for generating Packer templates pre-loaded with bootstrap data into Pupistry, making it quick and easy to get started. Here’s how you can use it:
Assumptions/prerequisites:
- You’ve already got Pupistry setup and functional (No? Read the tutorial here)
- You’ve installed the third party Packer utility.
- You have an Amazon AWS account for doing the AMI build. Note that Packer isn’t exclusive to Amazon, so you can also use the same technique with other providers including Digital Ocean and OpenStack – but you’ll have to write your own template.
First we can list what Packer templates are available with Pupistry. If the OS/platform of your choice isn’t included, it’s not particularly hard to add it – these are mostly intended to provide a good starting point for customising your own.
pupistry packer

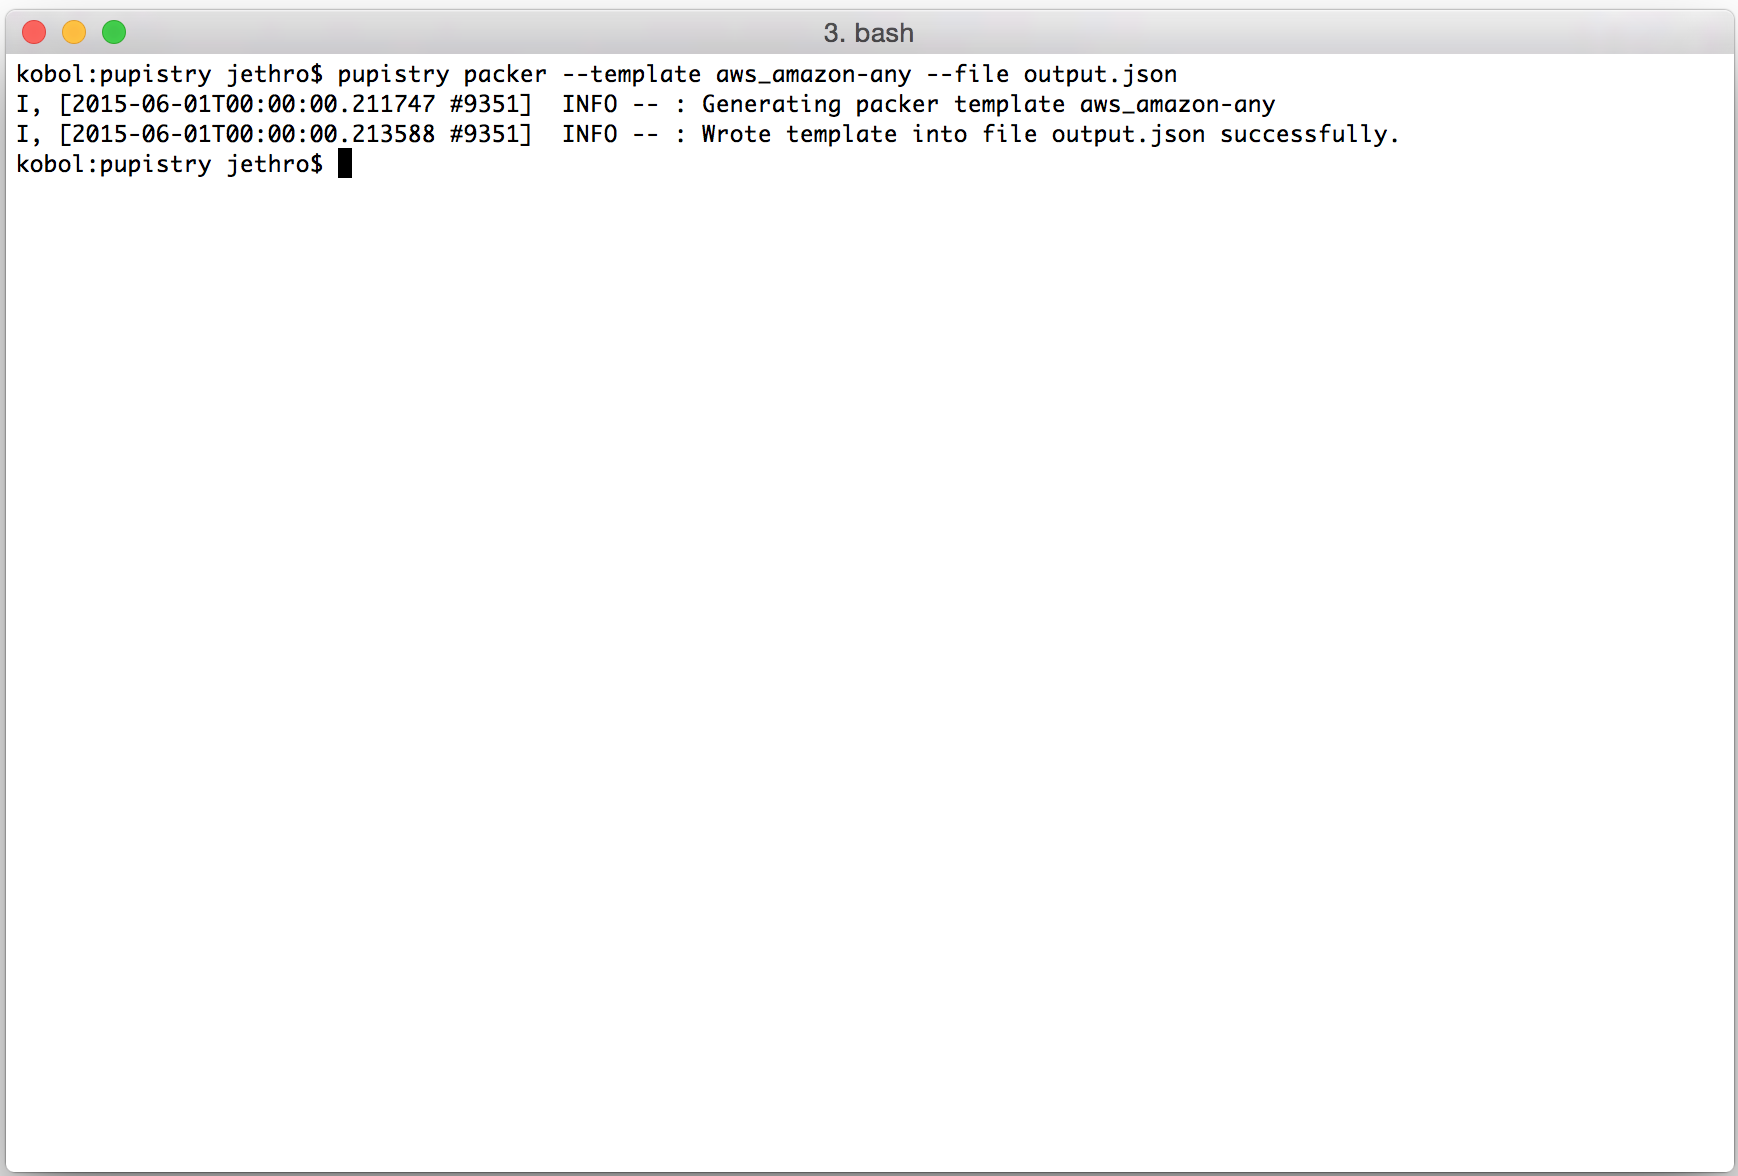
We can select a template with –template NAME and also pass the resulting output to a file with –file NAME. The following will build an Amazon Linux template pre-loaded with Pupistry and the default manifest applied:
pupistry packer --template aws_amazon-any --file output.json
The generated template is a JSON file that includes various instructions to Packer on how to build the image, as well as the bootstrap data that can also be generated independently with pupistry bootstrap. Various variables can be tweaked, we can export out the variables available and see their default settings with:
packer inspect output.json
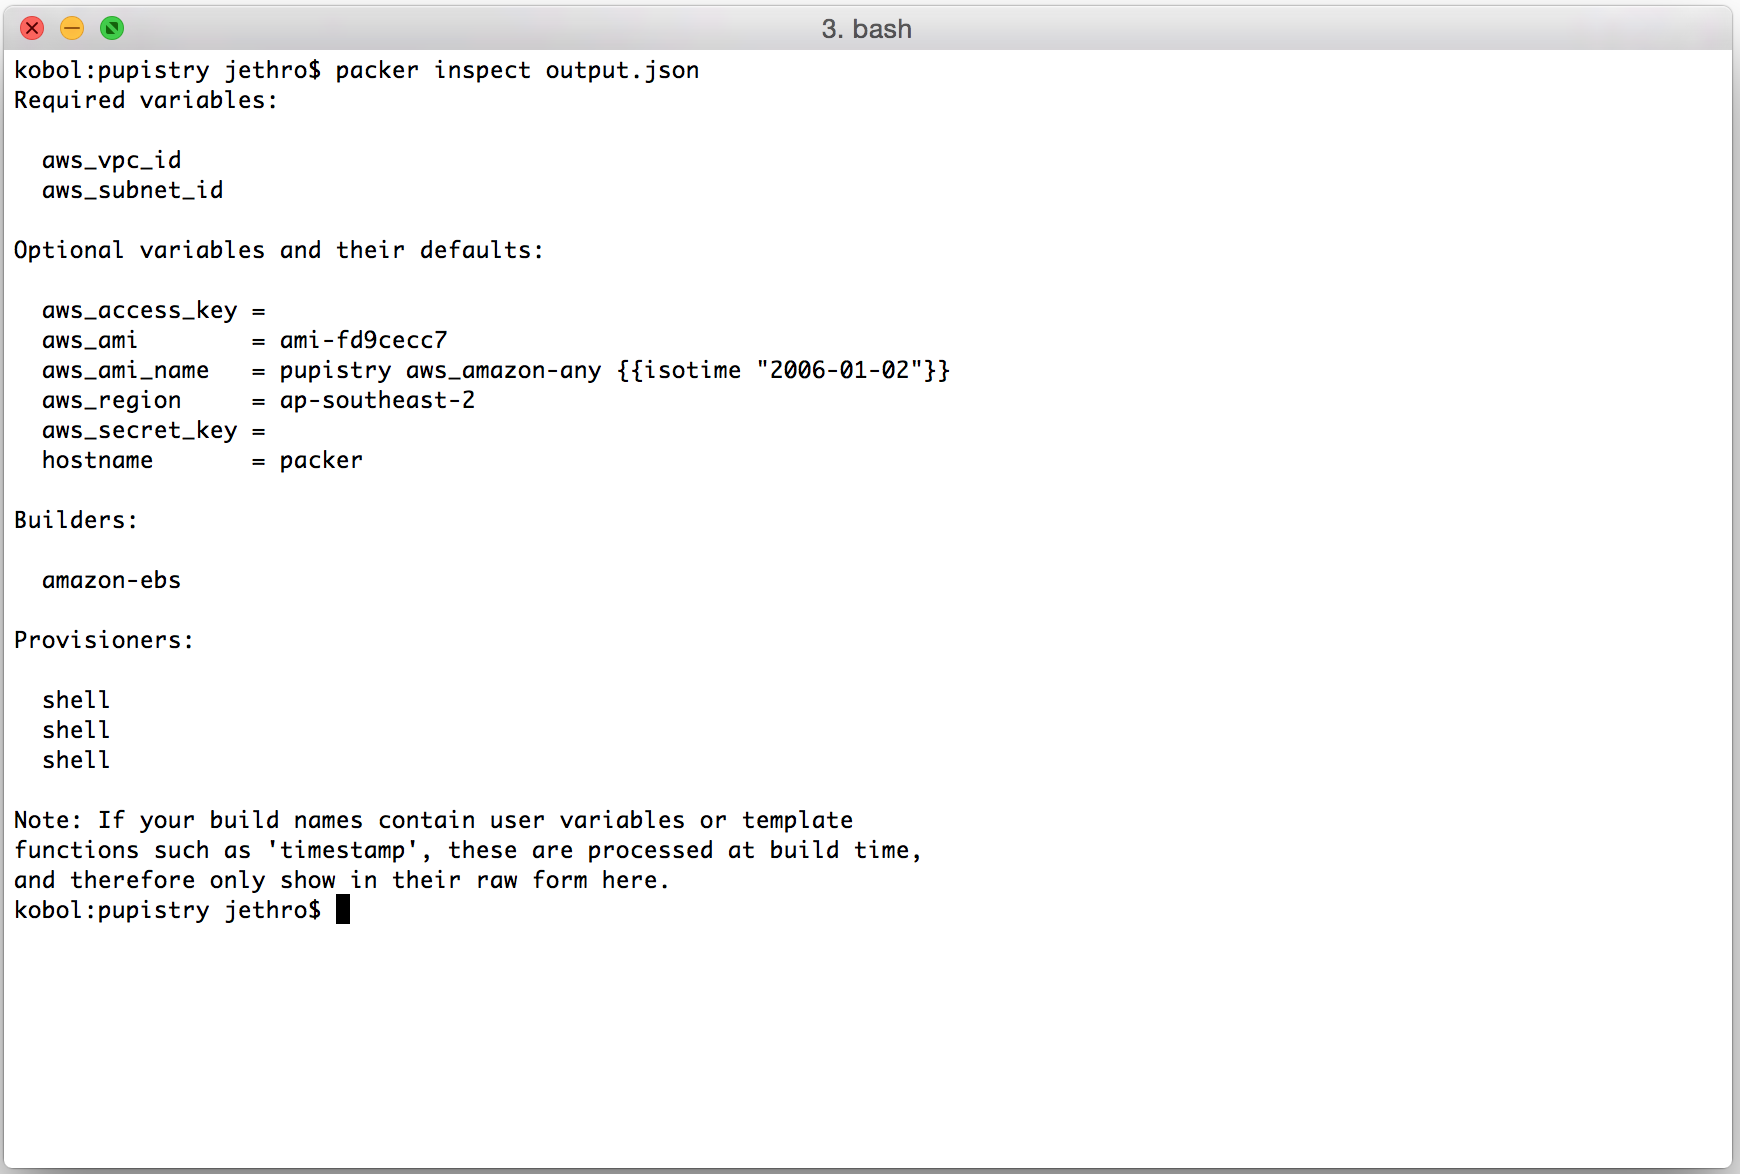
You can see here that we must set a VPC ID and Subnet ID – this is because they differ per AWS account and need to be provided. (Side note: technically you can do EC2 classic with Packer and avoid this, but the VPC instance types like t2 are cheaper to run… and we like cheap :-).
The AWS Region and AWS AMI values are interlinked. If you choose to build for a different region, eg us-west-1, you will need to lookup the appropriate AMI ID for that region and change both the aws_ami and aws_region variables when you bake your image. For some reason Amazon chose to make their AMI IDs specific to a particular region which really does make life a bit more difficult than it really needs to be. :-(
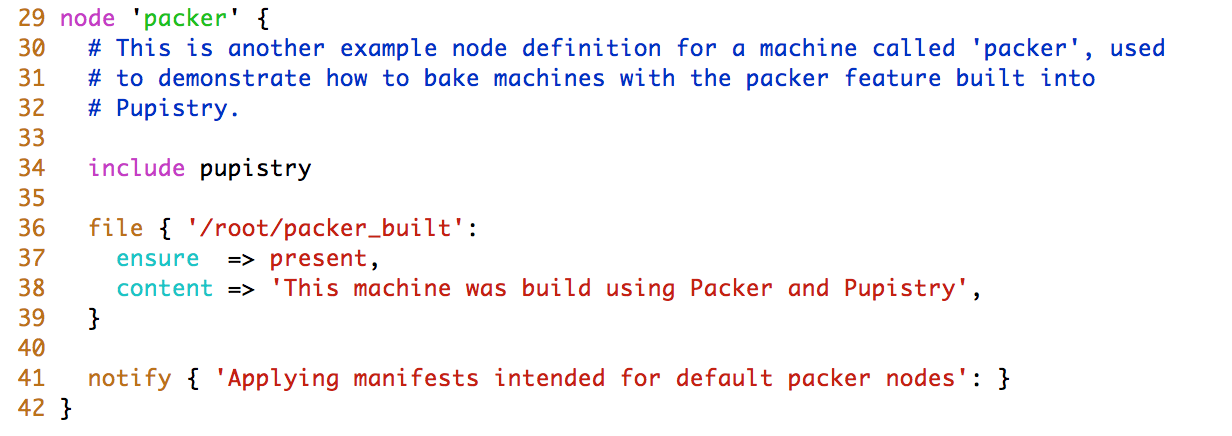
The hostname is worth noting. By default we set it to “packer” so you can target your manifests to handle it specifically, but you could make this anything you wanted such as a particular machine or application type. When using the sample puppet repo that ships by default with Pupistry, we have defined specific configuration to run on the Packer built images:
Assuming we are happy with the defaults, we just have to set the VPC and Subnet IDs to launch the current image in ap-southeast-2.
packer build \
 -var 'aws_vpc_id=vpc-example' \
 -var 'aws_subnet_id=subnet-example' \
 output.json
As soon as we kick off, we can see that Packer has built a machine in our AWS account to use for the image generation process.

It can take up to a minute for the machine to become available via SSH. Once this happens, Packer opens a connection and starts to feed in the bootstrap commands that have been added into the template by Pupistry.
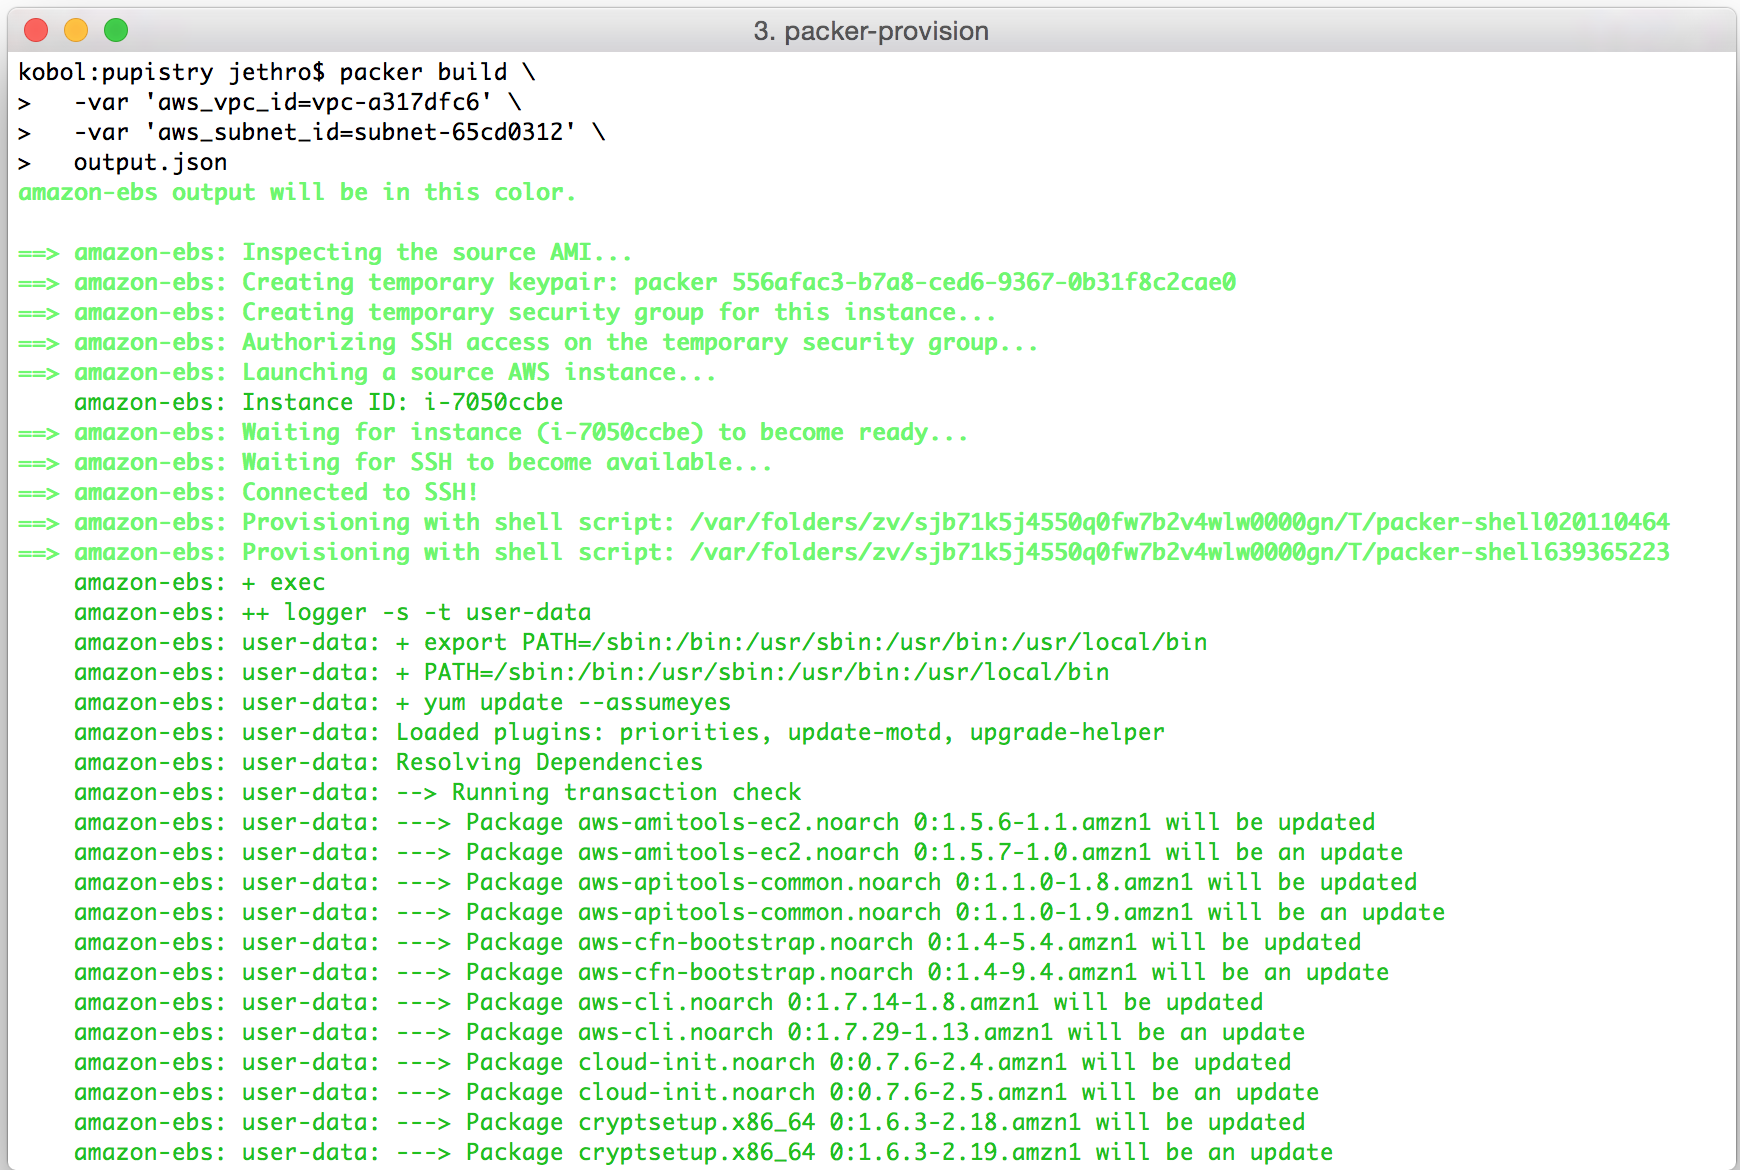
This process can take a number of minutes – remember you’re having to install all the various OS updates and then packages and dependencies needed to run Puppet and of course Pupistry itself.
Once all the dependencies are done, Pupistry will run and provision the machine with your Puppet manifests and then return the ID of the AMI that has been generated:
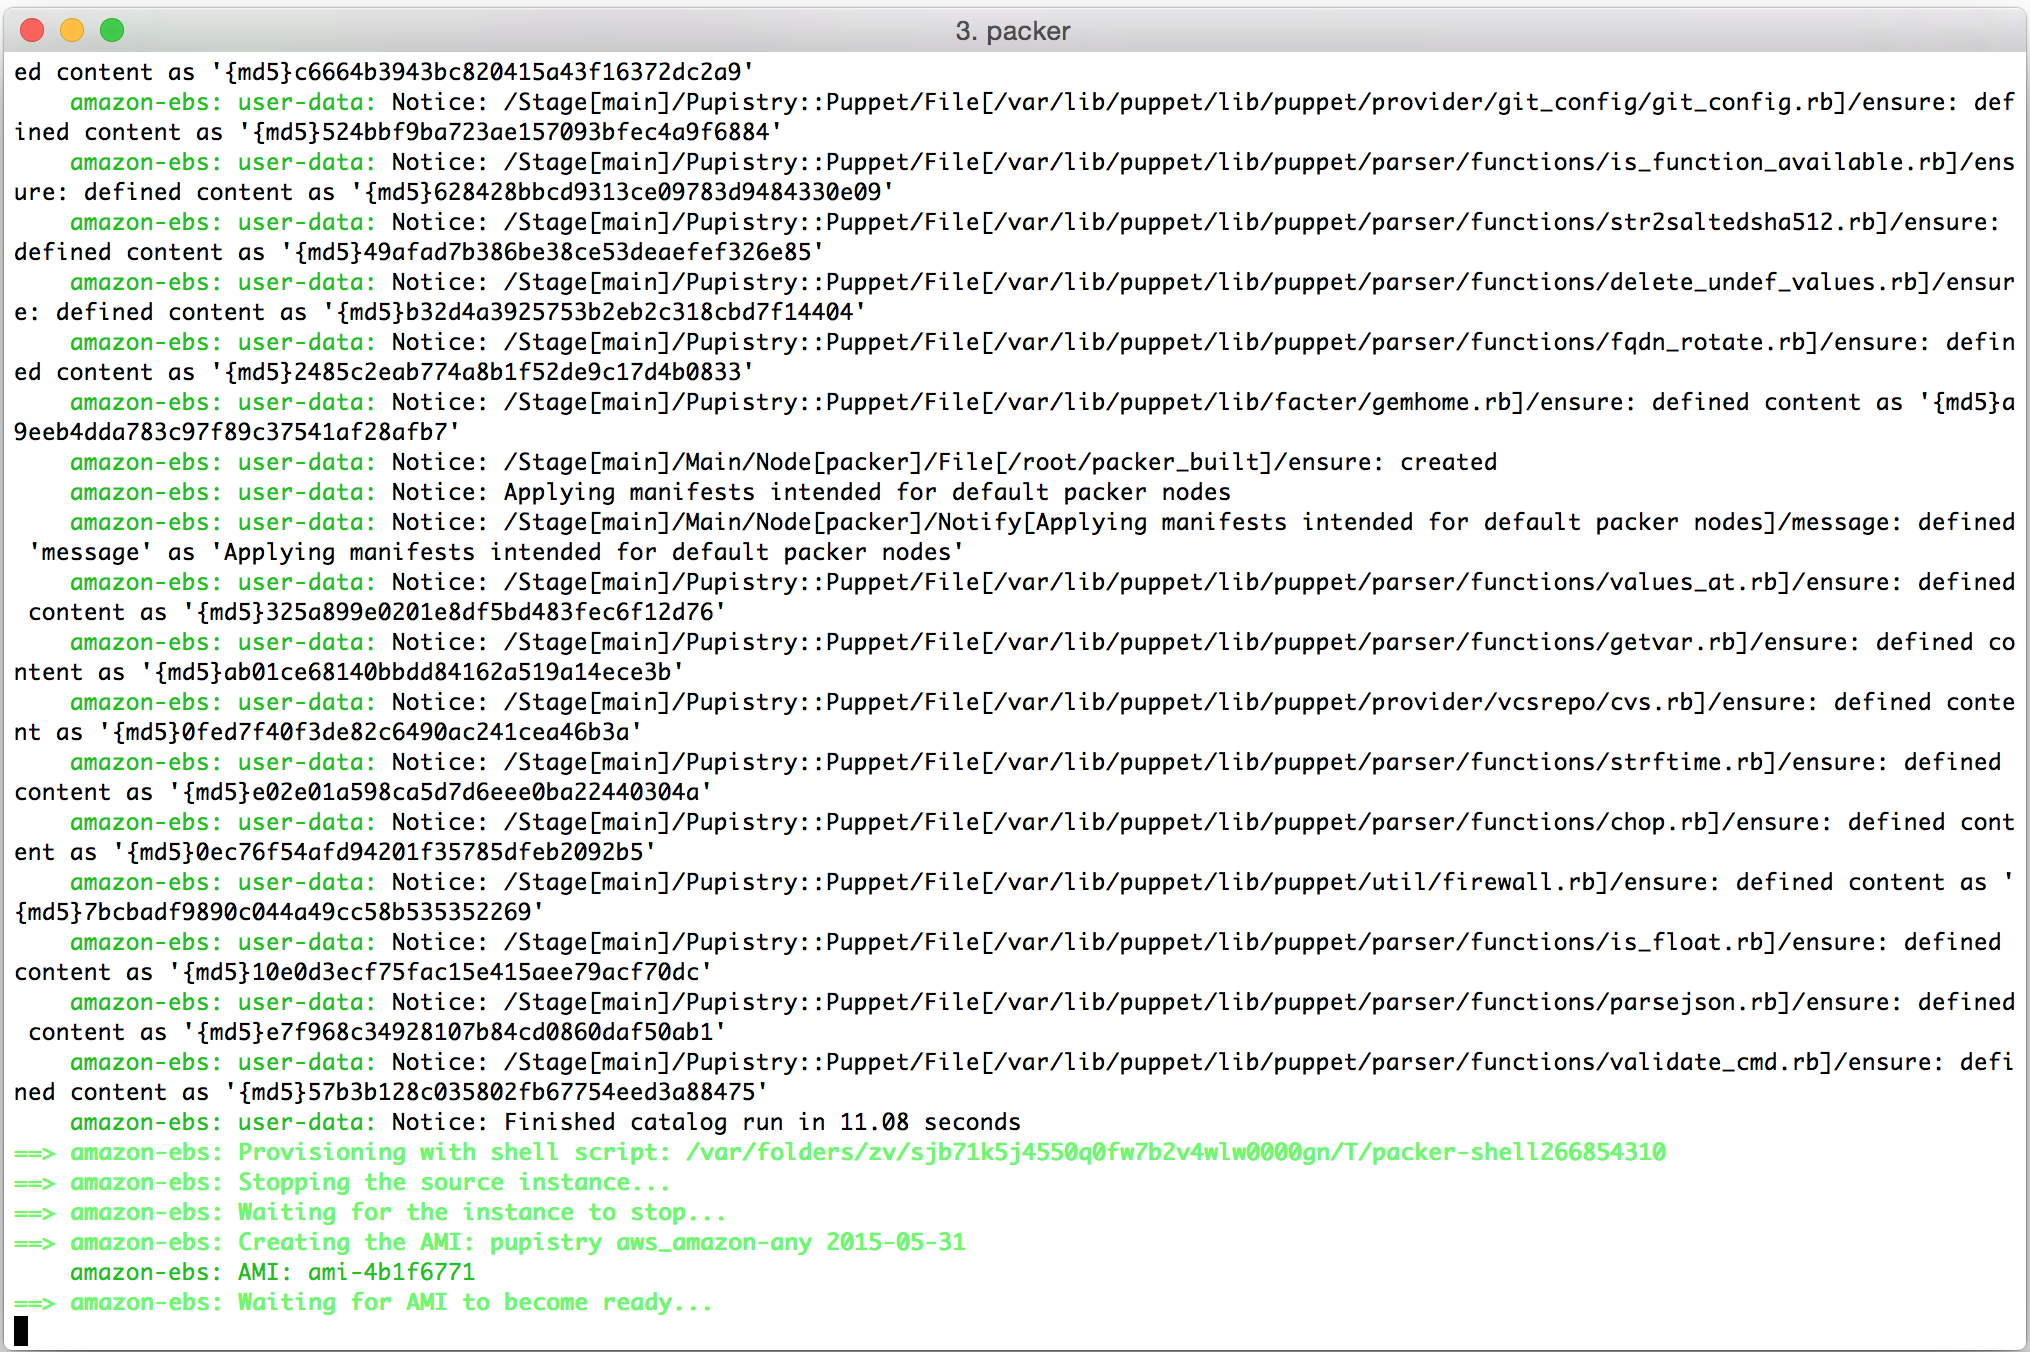
We can see that Packer has now terminated our temporary machine:

And given us a shiny new AMI in return:

We can now use that AMI to launch a new machine and check out what Pupistry did. For convenience, there is a launch button on the AMI page that will build a new machine for the selected AMI, however you can also take the AMI ID and use it in CloudFormation, from the API or from the usual instance creation screen.
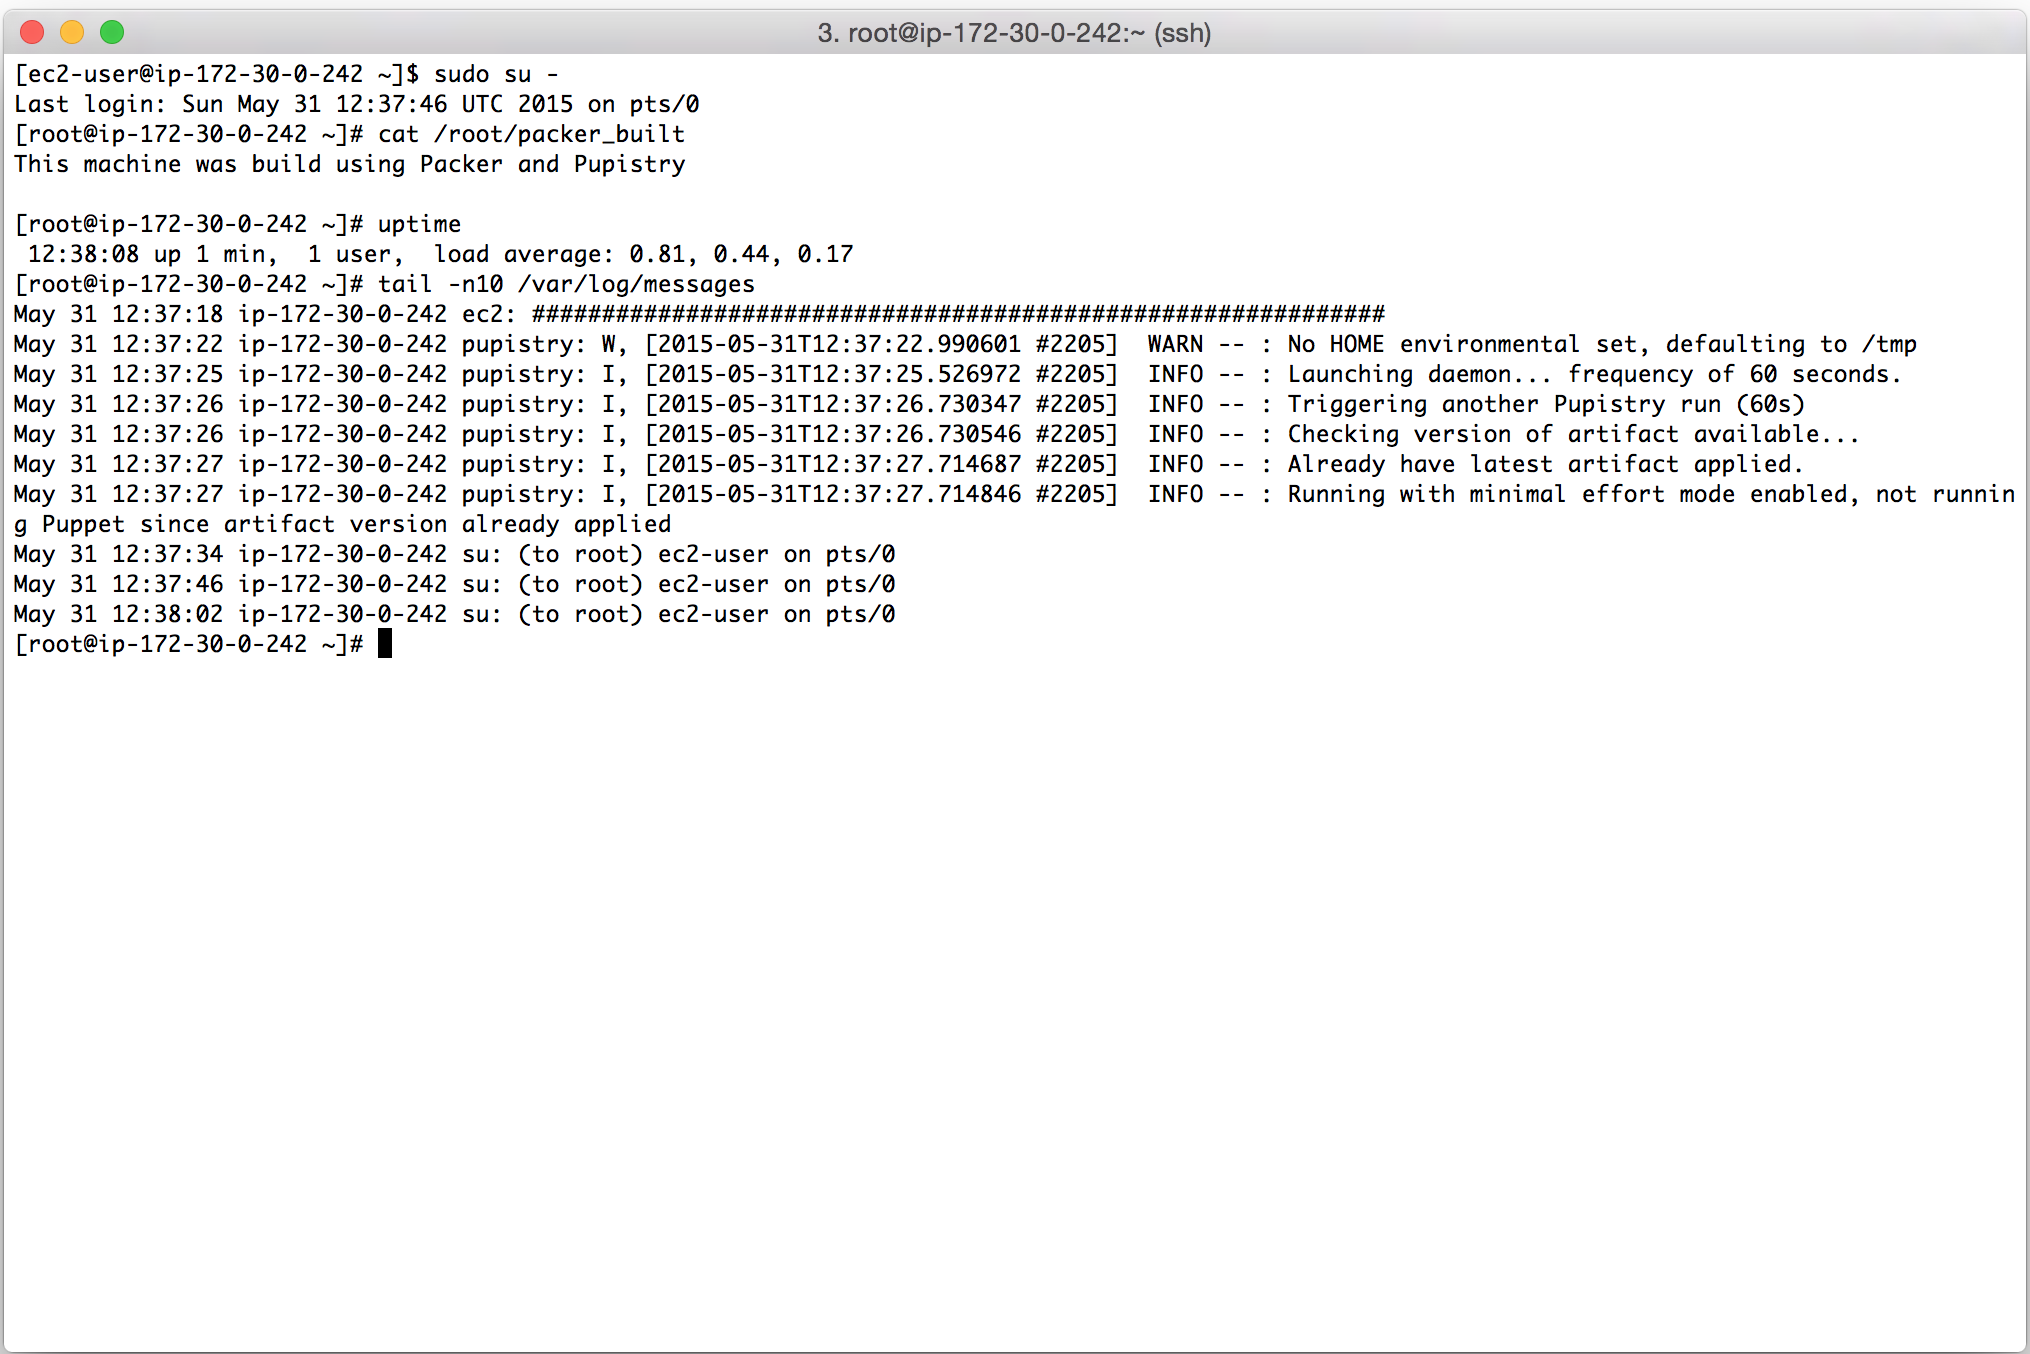
Connecting to the newly spun up instance using our fresh AMI, we can see that it has had the Pupistry rules for the packer node applied and we can also set that the daemon is configured and running in the background.
Except that it took less than 1 minute, rather than needing 5+ minutes to do all the usual updates and dependency installation. And there was no risk of a broken repository or package preventing the launch of our machine. If it was an application server, we could have preloaded it and thrown it right into an ELB within 1 minute after it starting up – that’s ideal for autoscaling!
Packer supports a number of different options and different providers, so don’t be afraid to pull it down and experiment. You can even write your own custom providers if needed.
Sure you could always just write a script that does all the same things as Packer for your cloud provider of choice, but Packer provides a solid framework for doing this stuff in a reliable and reproducible way saving you time and keeping complexity down.


