As mentioned in my previous post, I’ve been working on an application called Pupistry to help make masterless Puppet deployments a lot easier.
If you’re new to Pupistry, AWS, Git and Puppet, I’ve put together this short walk through on how to set up the S3 bucket (and IAM users), the Pupistry application, the Git repo for your Puppet code and building your first server using Pupistry’s bootstrap feature.
If you’re already an established power user of AWS, Git and Puppet, this might still be useful to flick through to see how Pupistry fits into the ecosystem, but a lot of this will be standard stuff for you. More technical details can be found on the application README.
Note that this guide is for Linux or MacOS users. I have no idea how you do this stuff on a Windows machine that lacks a standard unix shell.
1. Installation
Firstly we need to install Pupistry on your computer. As a Ruby application, Pupistry is packaged as a handy Ruby gem and can be installed in the usual fashion.
sudo gem install pupistry
pupistry setup
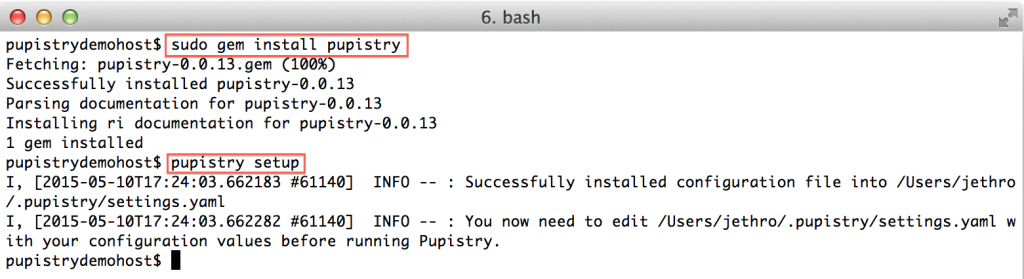 The gem installs the application and any dependencies. We run `pupistry setup` in order to generate a template configuration file, but we will still need to edit it with specific settings. We’ll come back to that.
You’ll also need Puppet available on your computer to build the Pupistry artifacts. Install via the OS package manager, or with:
sudo gem install puppet
2. Setting up AWS S3 bucket & IAM accounts
We need to use an S3 bucket and IAM accounts with Pupistry. The S3 bucket is essentially a cloud-based object store/file server and the IAM accounts are logins that have tight permissions controls.
It’s a common mistake for new AWS users to use the root IAM account details for everything they do, but given that the IAM details will be present on all your servers, you probably want to have specialised accounts purely for Pupistry.
Firstly, make sure you have a functional installation of the AWS CLI (the modern python one, not the outdated Java one). Amazon have detailed documentation on how to set it up for various platforms, refer to that for information.
Now you need to create:
- An S3 bucket. S3 buckets are like domain names -they have a global namespace across *all* AWS accounts. That means someone might already have a bucket name that you want to use, so you’ll need to choose something unique… and hope.
- An IAM account for read-only access which will be used by the servers running Pupistry.
- An IAM account for read-write access for your workstation to make changes.
To save you doing this all manually, Pupistry includes a CloudFormation template, which is basically a defined set of instructions for AWS to execute to build infrastructure, in our case, it will do all the above steps for you. :-)
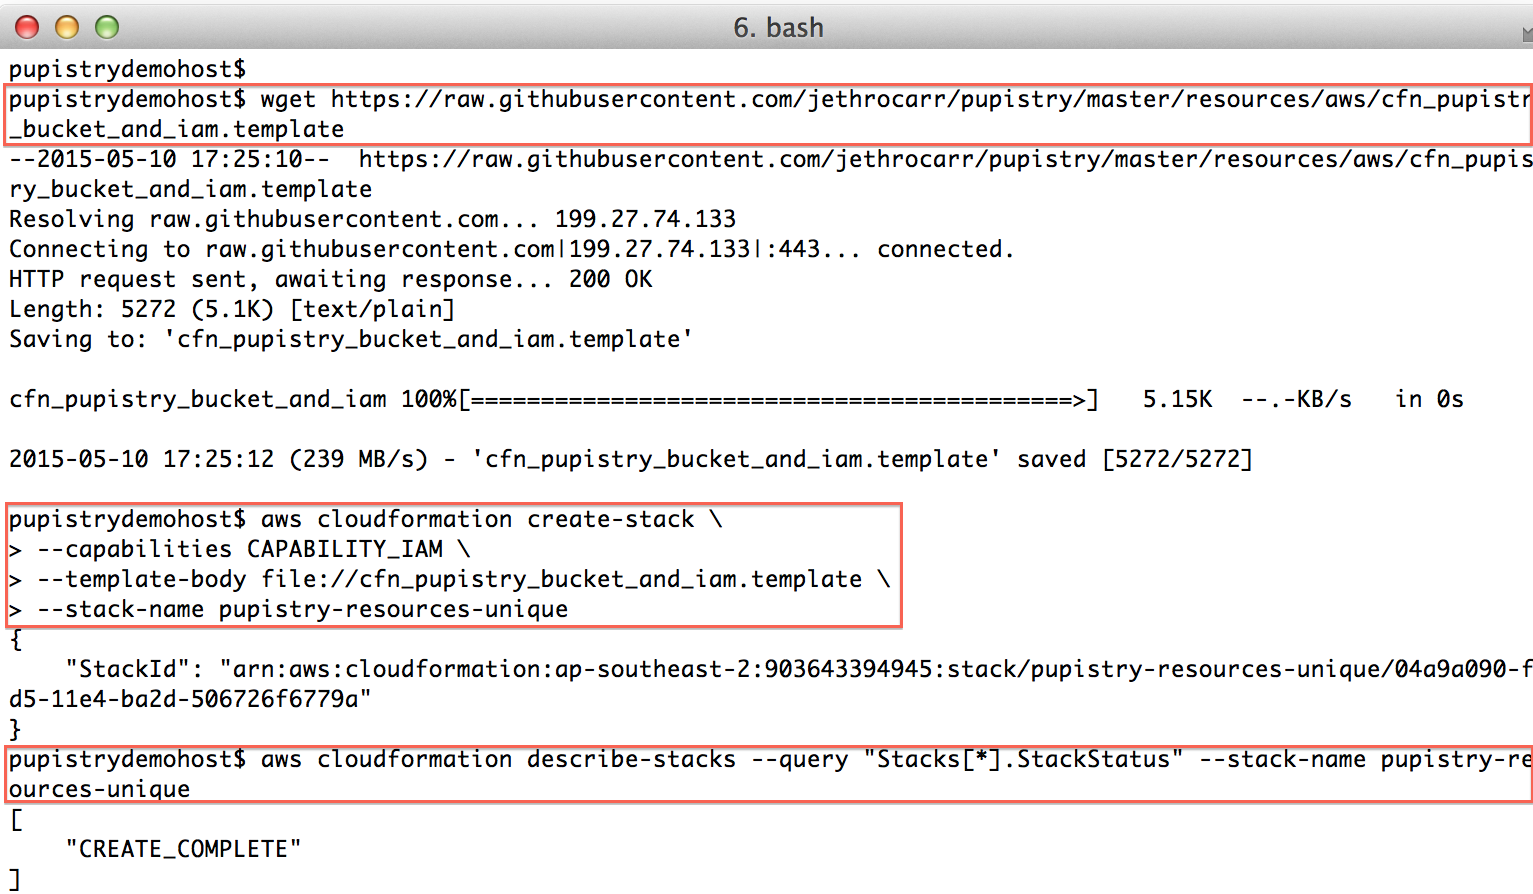
Because of the need for a globally unique name, please replace “unique” with something unique to you.
wget https://raw.githubusercontent.com/jethrocarr/pupistry/master/resources/aws/cfn_pupistry_bucket_and_iam.template

aws cloudformation create-stack \
--capabilities CAPABILITY_IAM \
--template-body file://cfn_pupistry_bucket_and_iam.template \
--stack-name pupistry-resources-unique
Once the create-stack command is issued, you can poll the status of the stack, you need it to be in “CREATE_COMPLETE” state before you can continue.
aws cloudformation describe-stacks --query "Stacks[*].StackStatus" --stack-name pupistry-resources-unique

If something goes wrong and your stack status is an error eg “ROLLBACK”, the most likely cause is that you chose a non-unique bucket name. If you want easy debugging, login to the AWS web console and look at the event details of your stack. Once you determine and address the problem, you’ll need to delete & re-create the stack again.
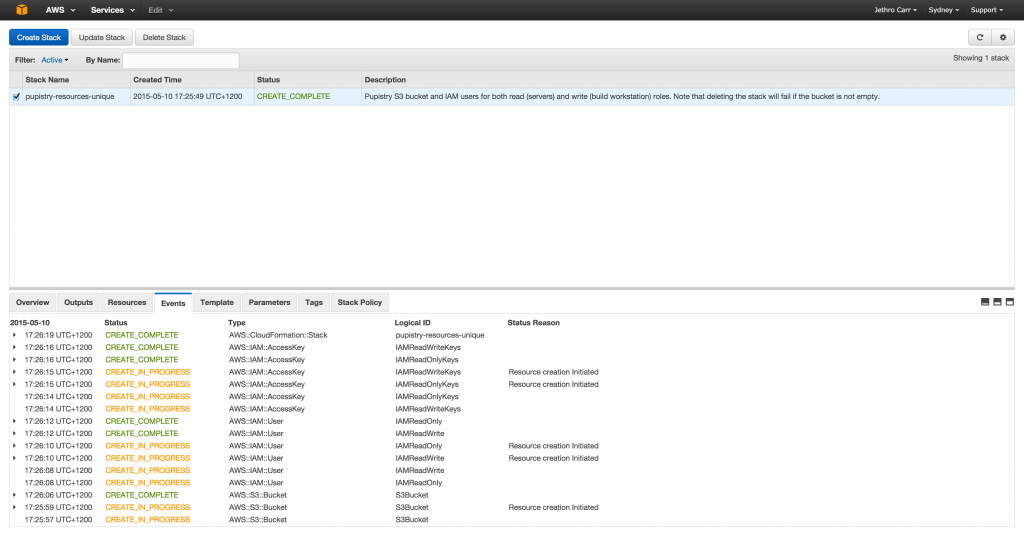
AWS’s web UI can make debugging CFN a bit easier to read than the CLI tools thanks to colour coding and it not all being in horrible JSON.
Once you have a CREATE_COMPLETE stack, you can then get the stack outputs, which tell you what has been built. These outputs we then pretty much copy & paste into pupistry’s configuration file.
aws cloudformation describe-stacks --query "Stacks[*].Outputs[*]" --stack-name pupistry-resources-unique

Incase you’re wondering – yes, I have changed the above keys & secrets since doing this demo!! Never share your access and secret keys and it’s best to avoid committing them to any repo, even if private.
Save the output, you’ll need the details shortly when we configure Pupistry.
3. Setup your Puppetcode git repository
Optional: You can skip this step if you simply want to try Pupistry using the sample repo, but you’ll have to come back and do this step if you want to make changes to the example manifests.
We use the r10k workflow with Pupistry, which means you’ll need at least one Git repository called the Control Repo.
You’ll probably end up adding many more Git repositories as you grow your Puppet manifests, more information about how the r10rk workflow functions can be found here.
To make life easy, there is a sample repo to go with Pupistry that is a ready-to-go Control Repo for r10k, complete with Puppetfile defining what additional modules to pull in, a manifests/site.pp defining a basic example system and base Hiera configuration.
You can use any Git service, however for this walkthrough, we’ll use Bitbucket since it’s free to setup any number of private repos as their pricing model is on the number of people in a team and is free for under 5 people.
Github’s model of charging per-repo makes the r10k puppet workflow prohibitively expensive, since we need heaps of tiny repos, rather than a few large repos. Which is a shame, since Github has some nice features.
Head to https://bitbucket.org/ and create an account if you don’t already have one. We can use their handy import feature to make a copy of the sample public repo.
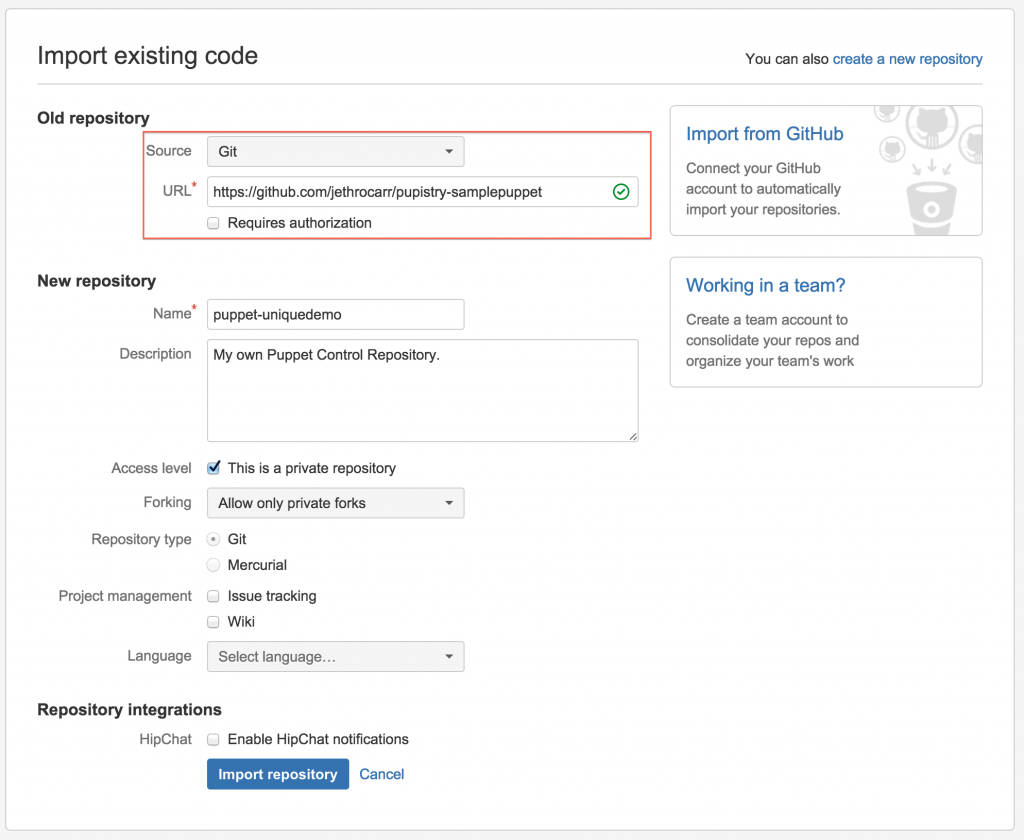
Select “Create Repository” and then click the “Import” in the top right corner of the window.

Now you just need to select “GitHub” as a source with the URL of https://github.com/jethrocarr/pupistry-samplepuppet.git and select a name for your new repo:
Once the import completes, it will look a bit like this:
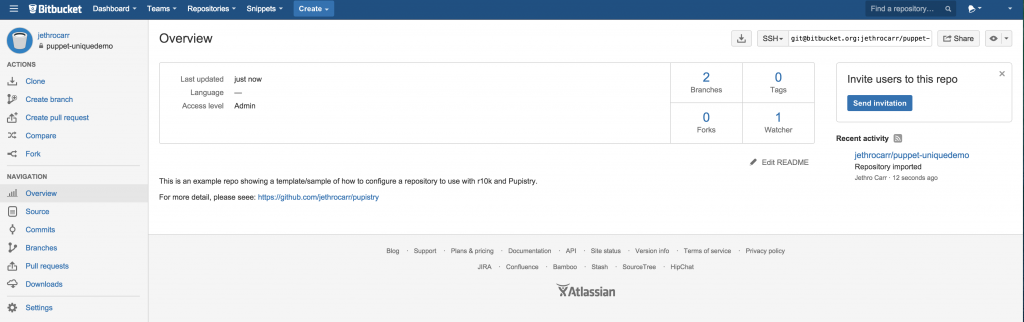
The only computers that need to be able to access this repository is your workstation. The servers themselves never use any of the Git repos, since Pupistry packages up everything it needs into the artifact files.
Finally, if you’re new to Bitbucket, you probably want to import their key into your known hosts file, so Pupistry doesn’t throw errors trying to check out the repo:
ssh-keyscan bitbucket.org >> ~/.ssh/known_hosts
4. Configuring Pupistry
At this point we have the AWS S3 bucket, IAM accounts and the Git repo for our control repo in Bitbucket. We can now write the Pupistry configuration file and get started with the tool!
Open ~/.pupistry/settings.yaml with your preferred text editor:
vim ~/.pupistry/settings.yaml

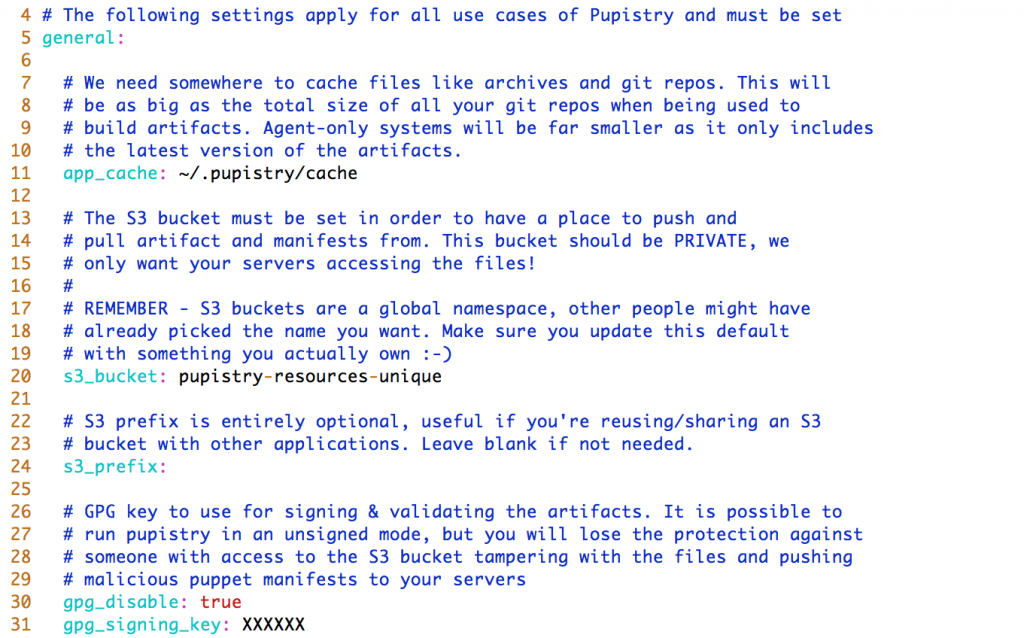
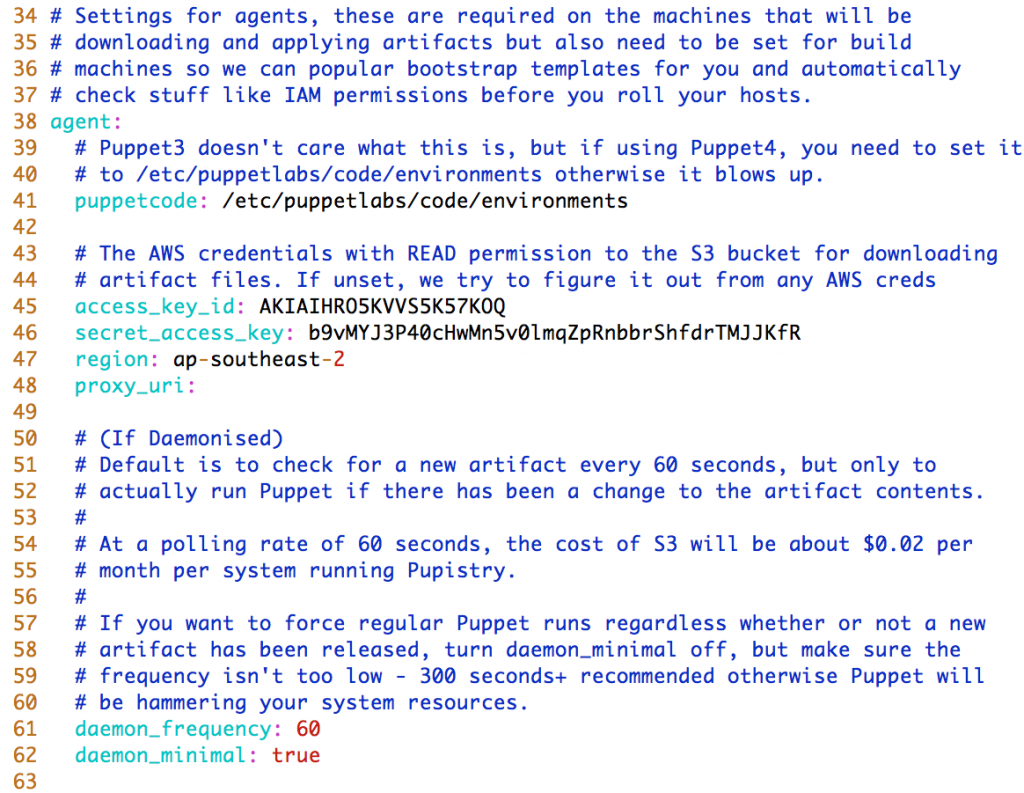
There are three main sections to configure in the file:
- General – We need to define the S3 bucket here. (For our walk though, we are leaving GPG signing disabled, it’s not mandatory and GPG is beyond the scope for this walkthrough):
- Agent – These settings impact the servers that will be running Pupistry, but you need to set them on your workstation since Pupistry will test them for you and pre-seed the bootstrap data with the settings:
- Build – The settings that are used on your workstation to generate artifacts. If you create your own repository in Bitbucket, you need to change the puppetcode variable to the location of your data. If you skipped that step, just leave it on the default sample repo for testing purposes.
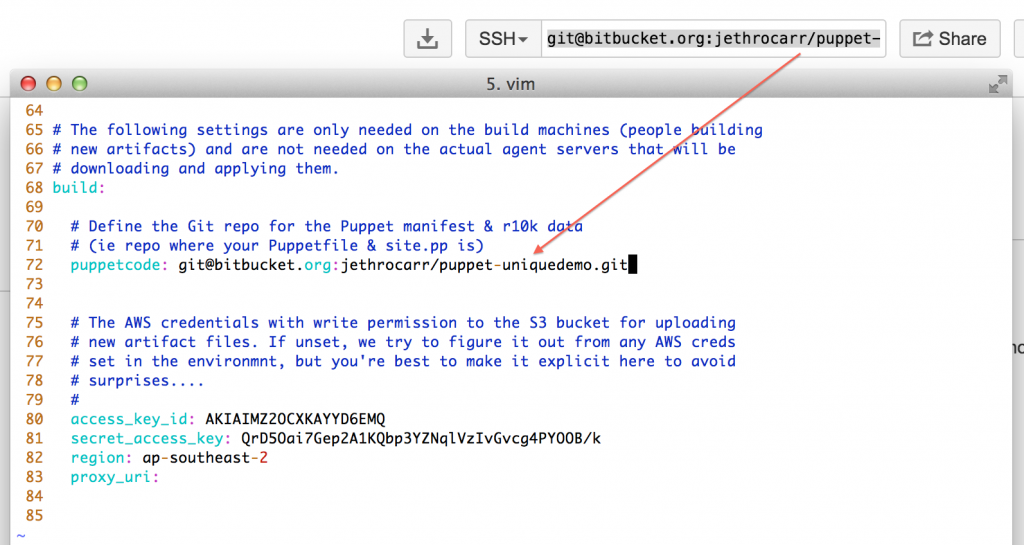
Make sure you set BOTH the agent and the build section access_key_id and secret_access_key using the output from the CloudFormation build in step 2.
5. Building an artifact with Pupistry
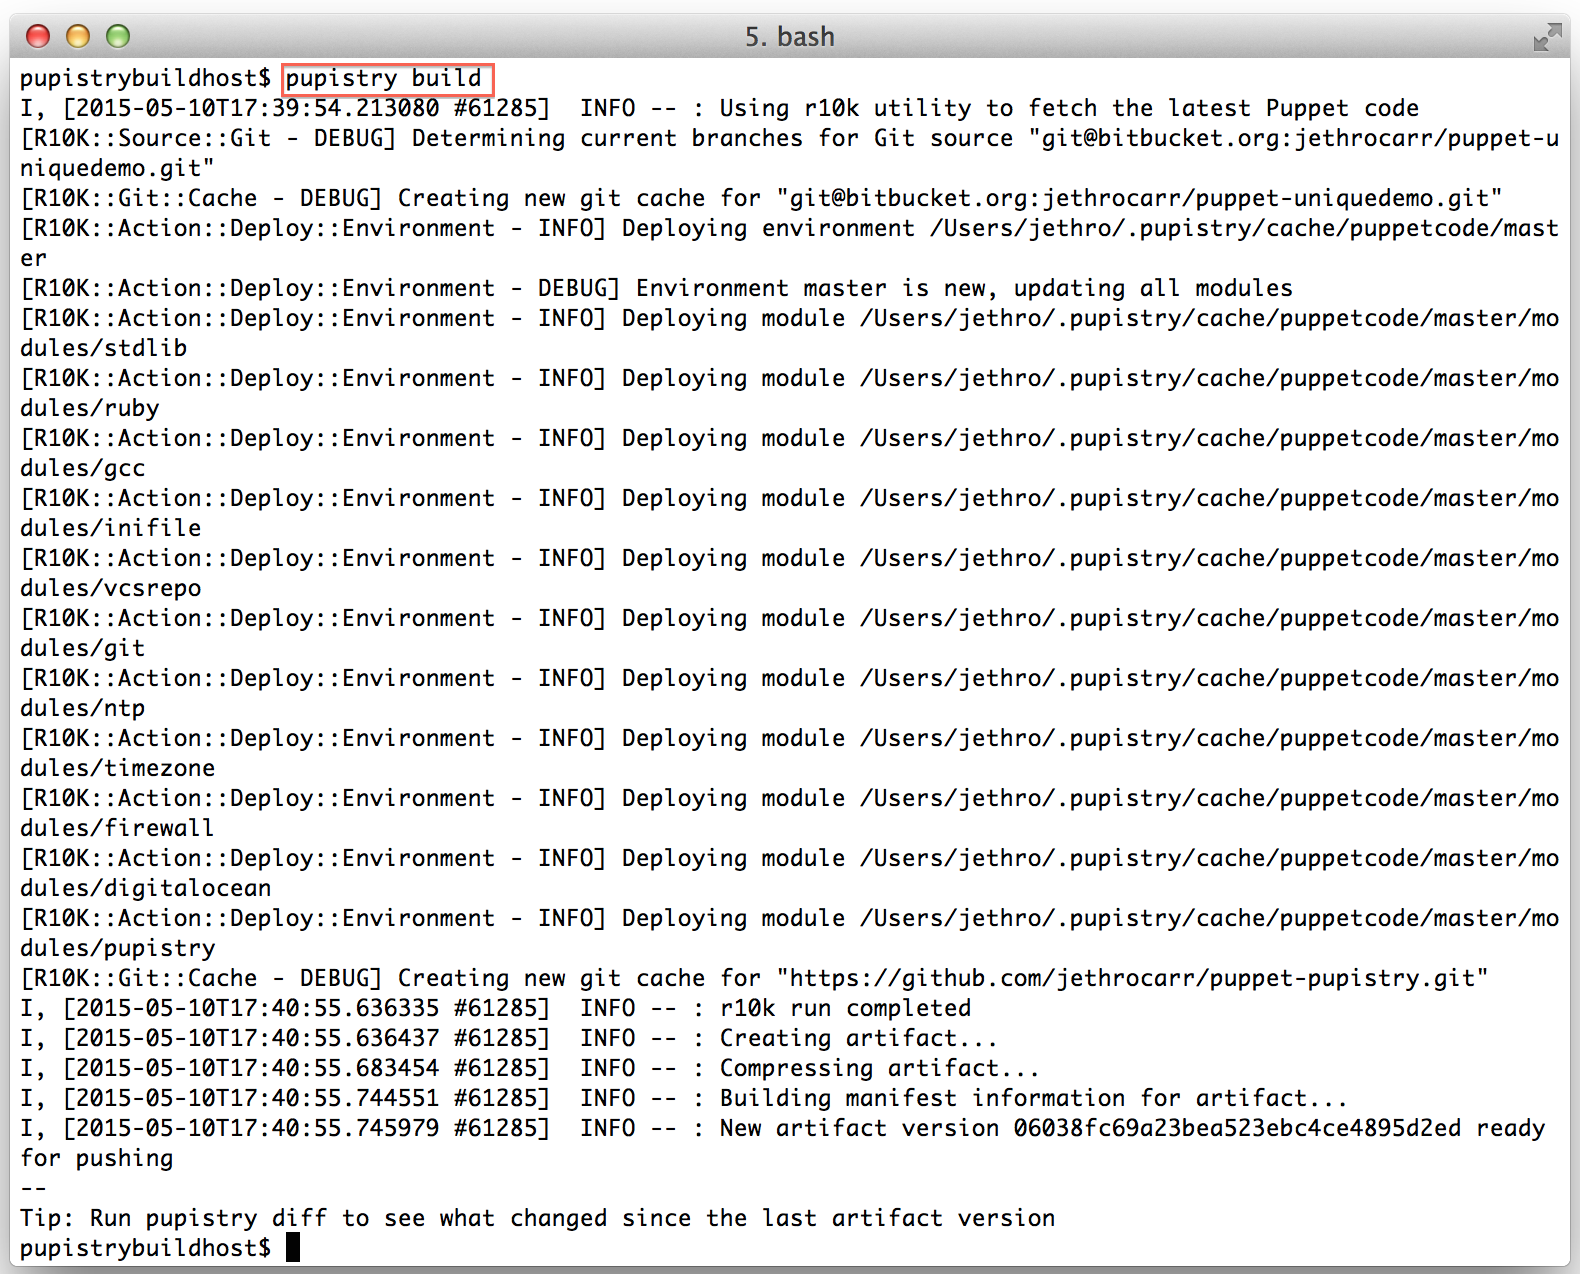
Now we have our AWS resources, our control repository and our configuration – we can finally use Pupistry and build some servers!
pupistry build

Since this our first artifact, there won’t be much use to running diff, however as part of diff Pupistry will verify your agent AWS credentials are correct, so it’s worth doing.
pupistry diff

We can now push our newly built artifact to S3 with:
pupistry push

In regards to the GPG warning – Pupistry interacts with AWS via secure transport and the S3 bucket can only be accessed via authorised accounts, however the weakness is that if someone does manage to break into your account (because you stuck your AWS IAM credentials all over a blog post like a muppet), an attacker could replace the artifacts with malicious ones and exploit your servers.
If you do enable GPG, this becomes impossible, since only signed artifacts will be downloaded and executed by your servers – an invalid artifact will be refused. So it’s a good added security benefit and doesn’t require any special setup other than getting GPG onto your workstation and setting the ID of the private key in the Pupistry configuration file.
We’ve now got a valid artifact. The next step is building our first server with Pupistry!
6. Building a server with Pupistry
Because having to install Pupistry and configure it on every server you ever want to build wouldn’t be a lot of fun manually, Pupistry automates this for you and can generate bootstrap scripts for most popular platforms.
These scripts can be run as part of user data on most cloud providers including AWS and Digital Ocean, as well as cut & paste into the root shell of any running server, whether physical, virtual or cloud-based.
The bootstrap process works by:
- Using the default OS tools to download and install Pupistry
- Write Pupistry’s configuration file and optionally install the GPG public key to verify against.
- Runs Pupistry.
- Pupistry then pulls down the latest artifact and executes the Puppetcode.
- In the case of the sample repo, the Puppetcode includes the puppet-pupistry module. This modules does some clever stuff like setting up a pluginsync equalivent for master-less Puppet and installs a system service for the Pupistry daemon to keep it running in the background – just like the normal Puppet agent! This companion module is strongly recommended for all users.
You can get a list of supported platforms for bootstrap mode with:
pupistry bootstrap
Once you decide which one you’d like to install, you can do:
pupistry bootstrap --template NAME
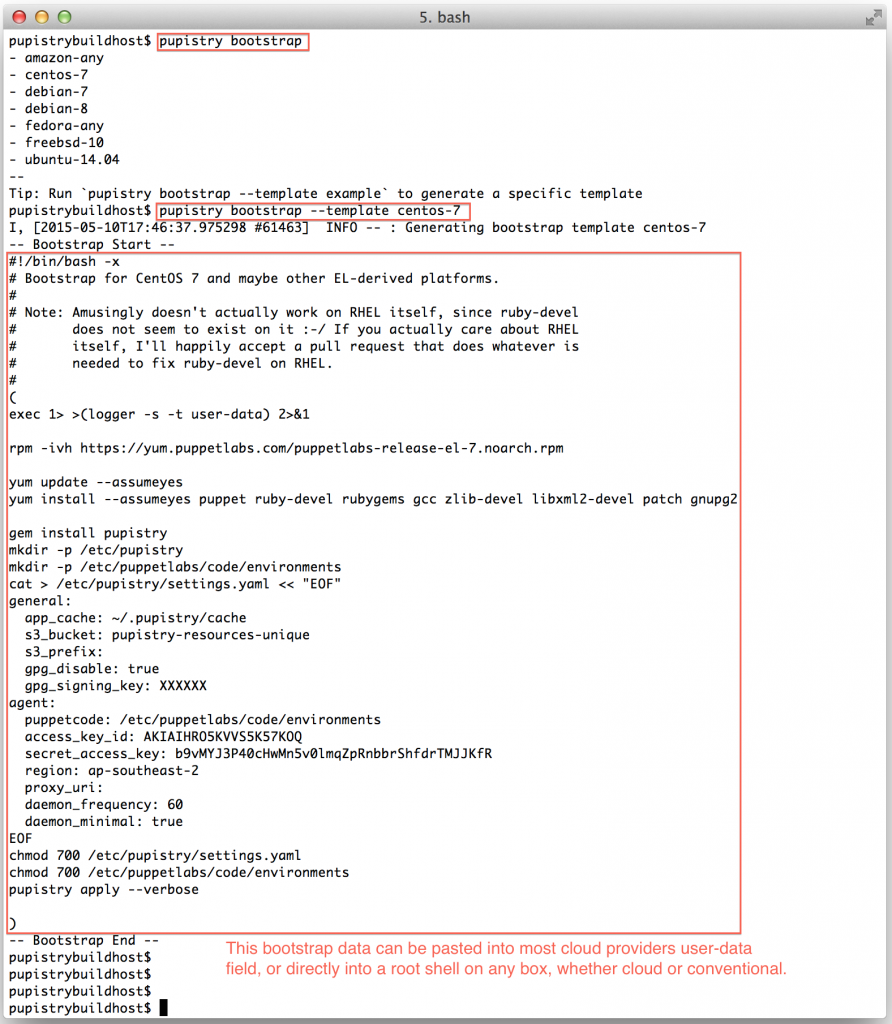
Pupistry cleverly fills in all the IAM account details and seeds the configuration file based on the settings defined on your workstation. If you want to change behaviours like disabling the daemon, change it in your build host config file and it will be reflected in the bootstrap file.
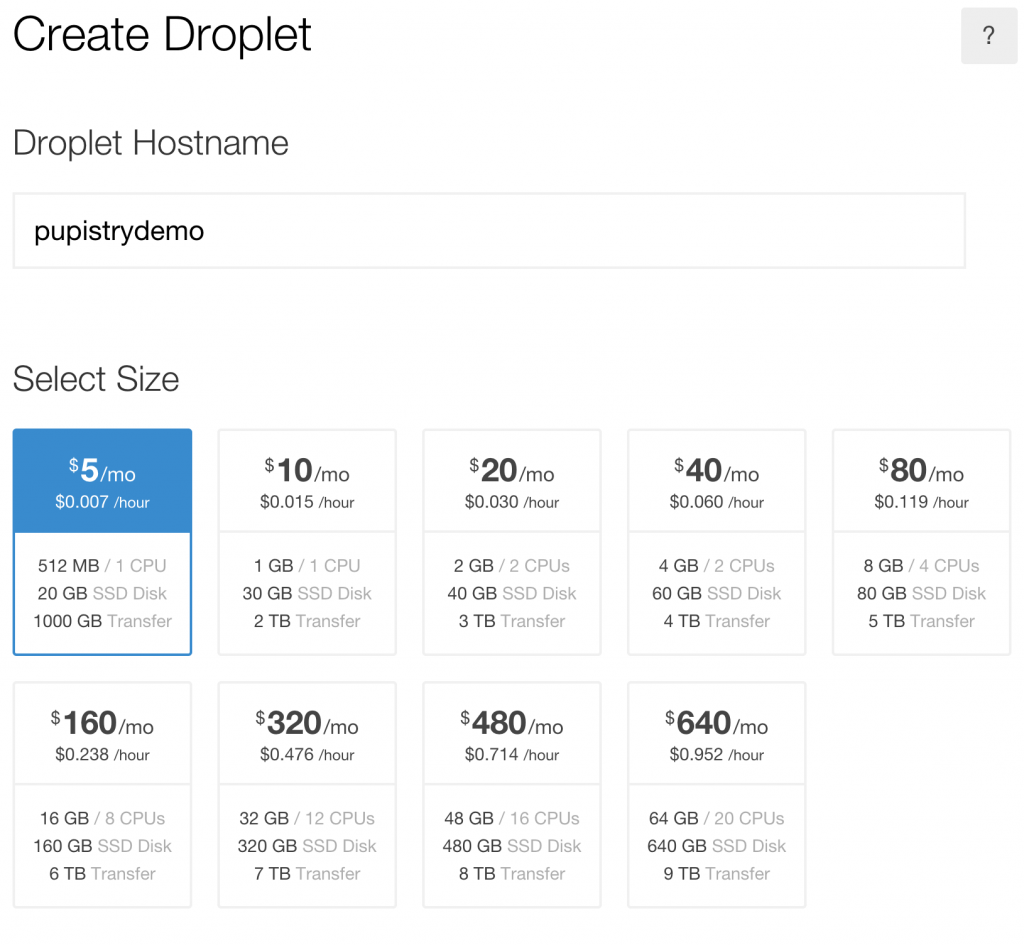
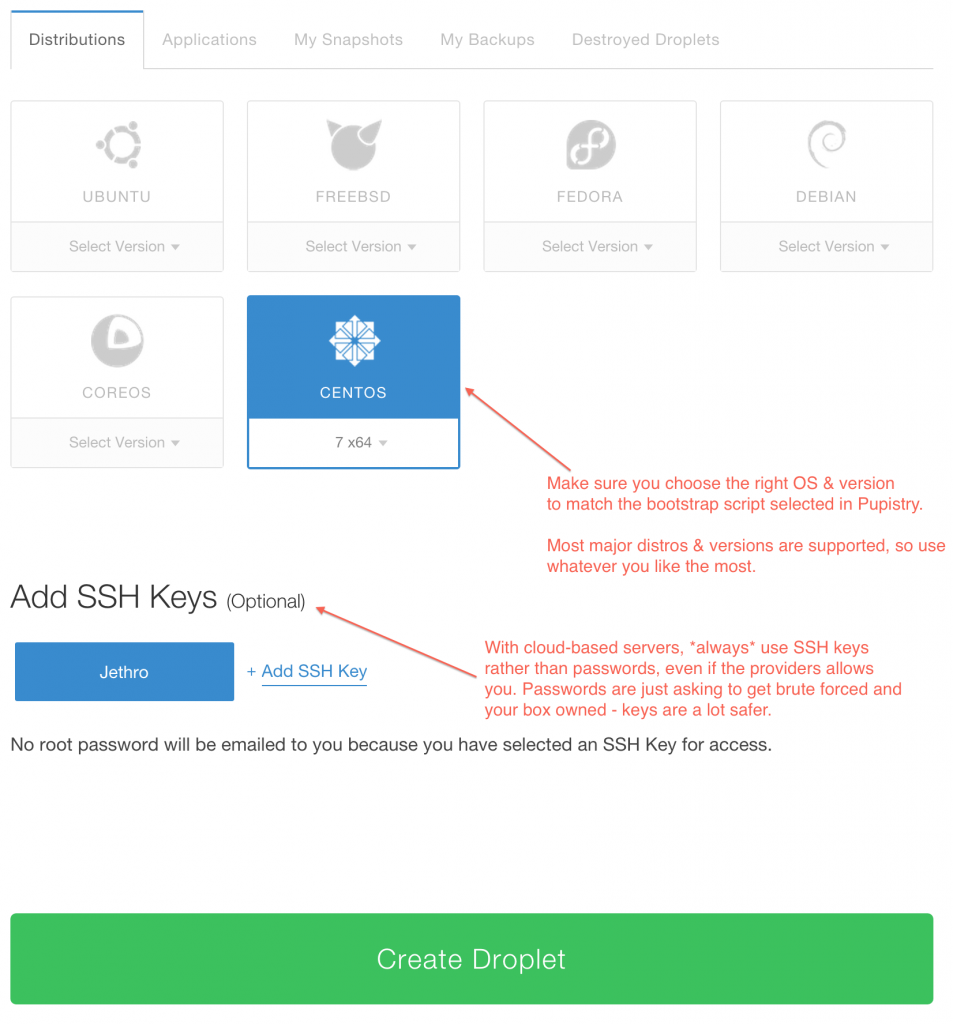
To test Pupistry you can use any server you want, but this walkthrough shows an example using Digital Ocean which is a very low cost cloud compute provider with a slick interface and much easier learning curve than AWS. You can sign up and use them here, shamelessly clicking on my referrer link so my hosting bill gets paid – but also get yourself $10 credit in the process. Sweetas bru!
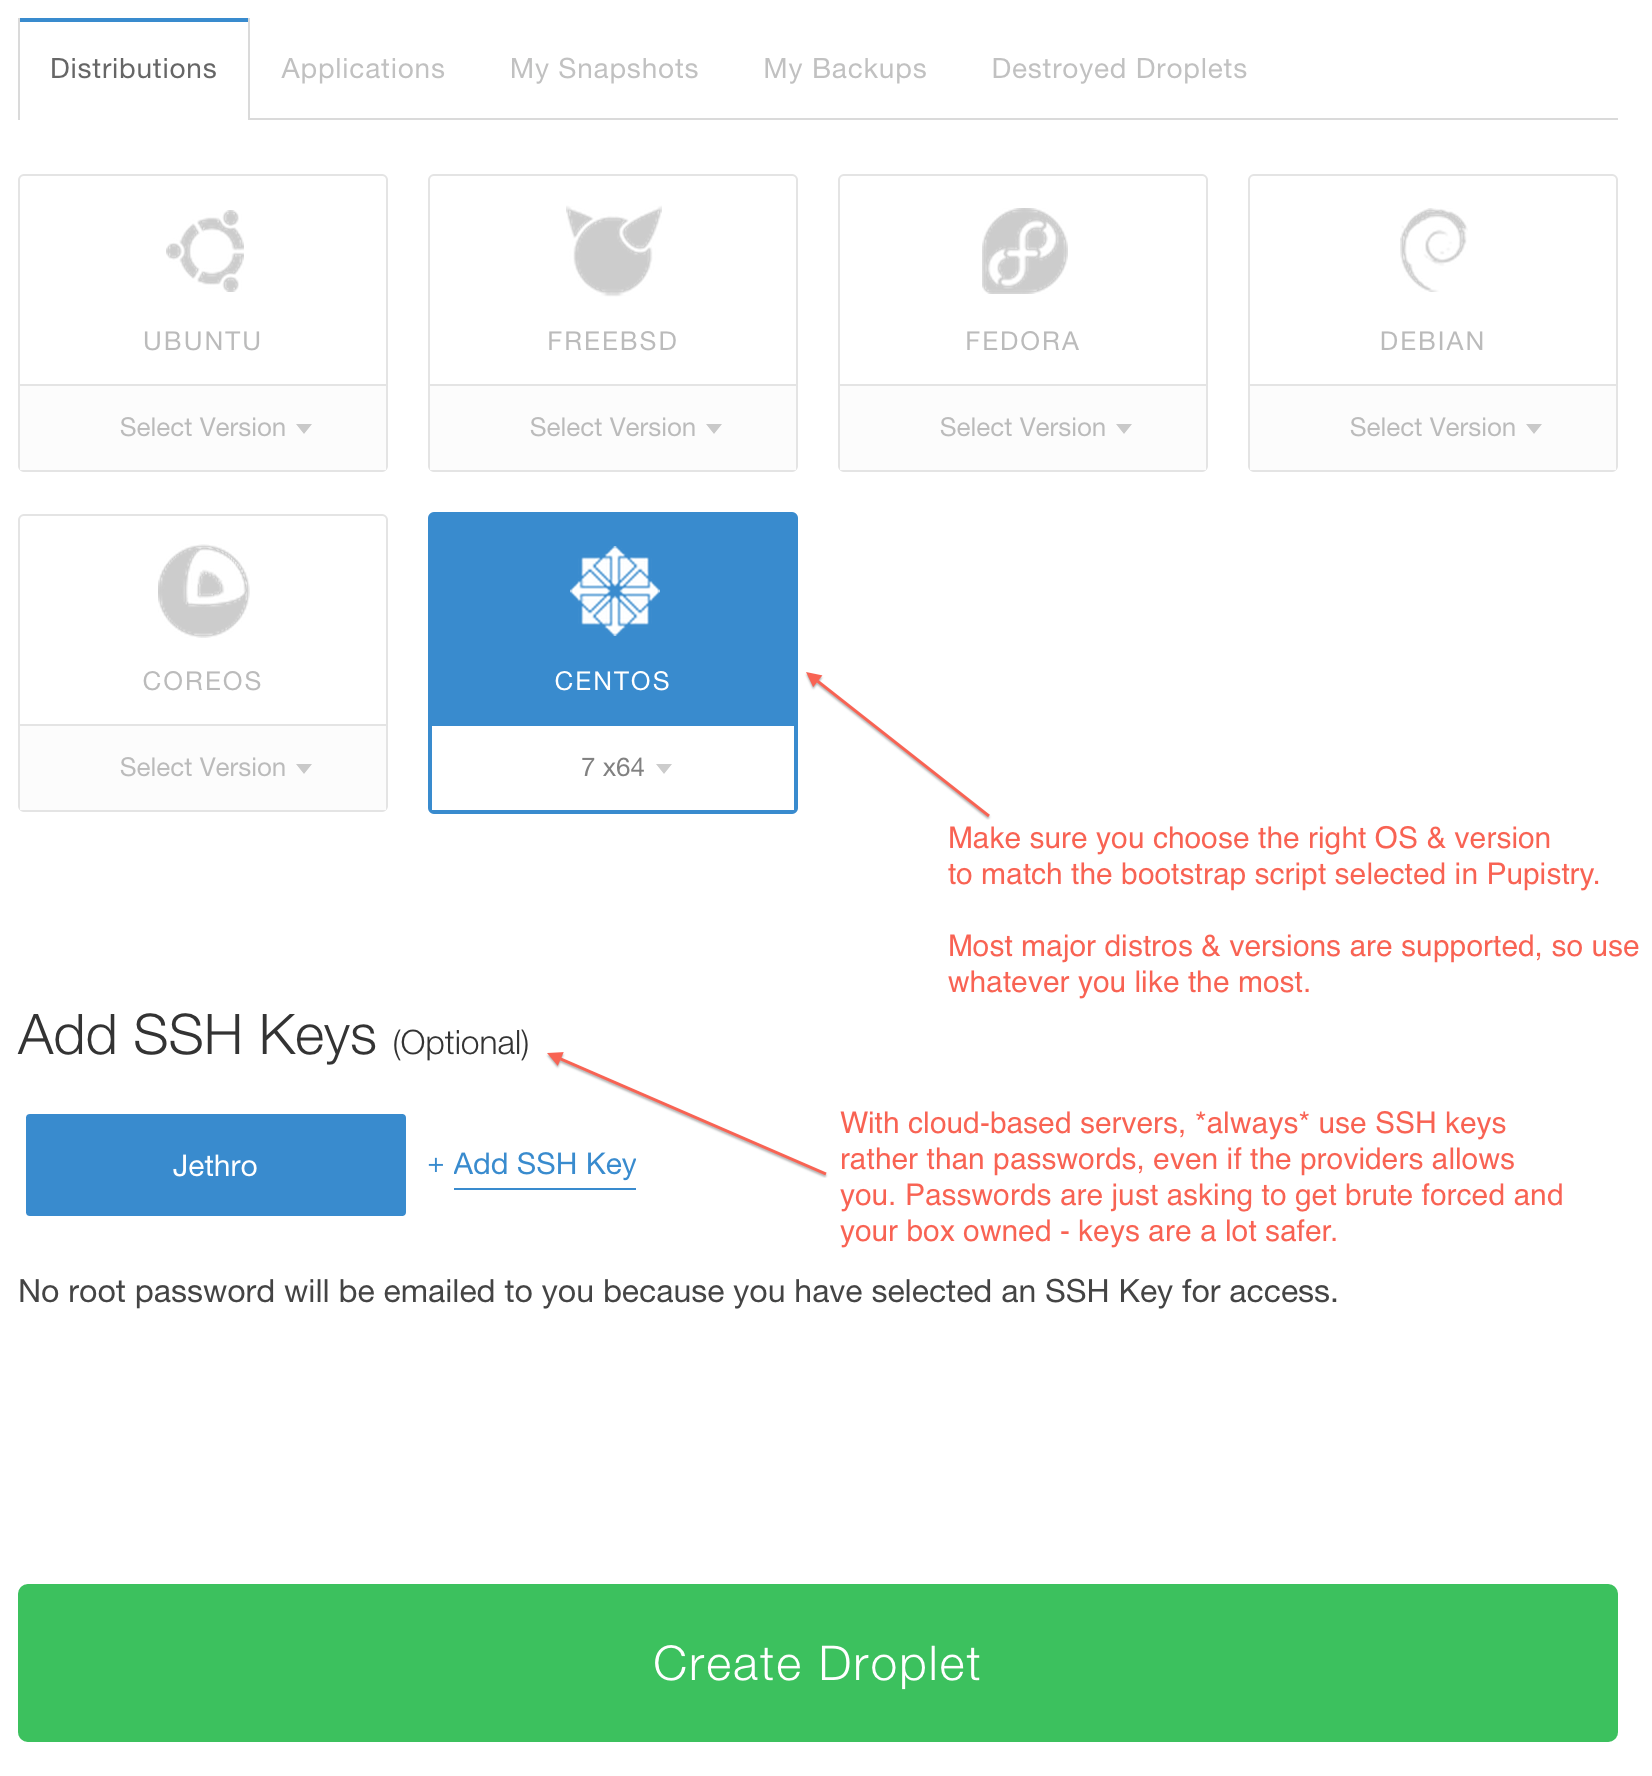
Once you have setup/logged into your DigitalOcean account, you need to create a new droplet (their terminology for a VM – AWS uses “EC2 Instance”). It can be named anything you want and any size you want, although this walkthrough is tight and suggests the cheapest example :-)
Now it is possible to just boot the Digital Ocean droplet and then cut & paste the bootstrap script into the running machine, but like most cloud providers Digital Ocean supports a feature called User Data, where a script can be pasted to have it execute when the machine starts up.
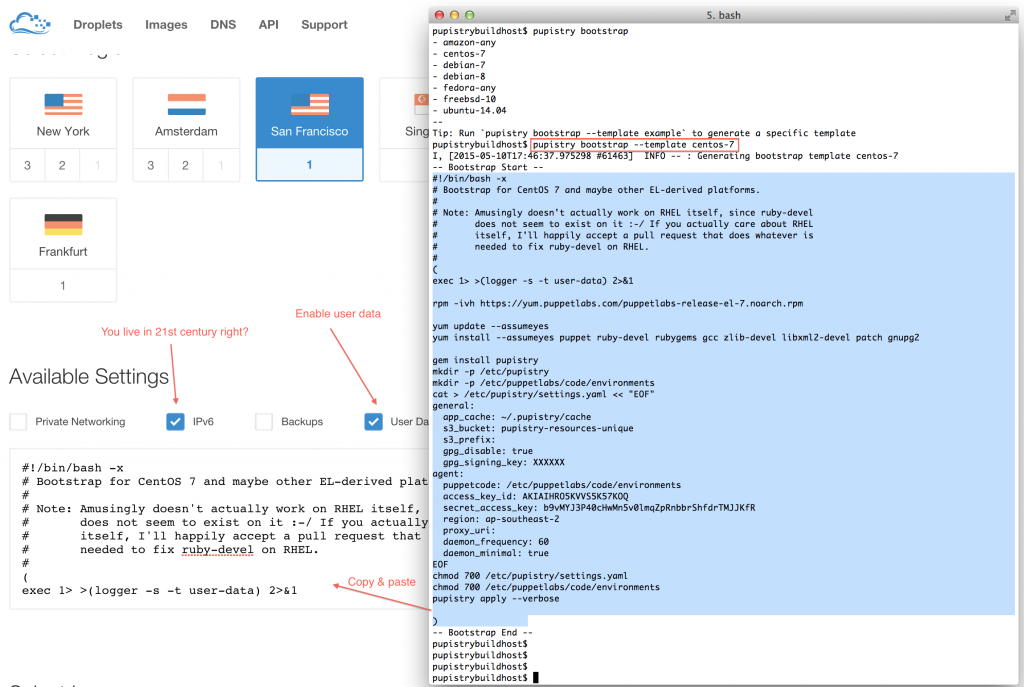
AWS users can get their user data in base64 version as well by calling pupistry bootstrap with the –base64 parameter – handy if you want to copy & paste the user data into other files like CloudFormation stacks. Digital Ocean just takes it in plain text like above.
Make sure you use the right bootstrap data for the right distribution. There are variations between distributions and sometime even between versions, hence various different bootstrap scripts are provided for the major distributions. If you’re using something else/fringe, you might have to do some of your own debugging, so recommend testing with a major distribution first.
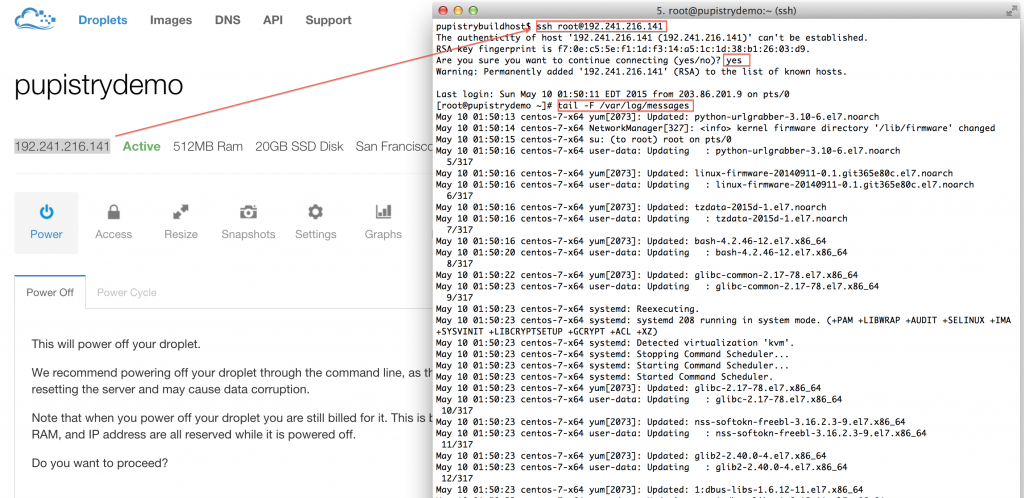
Once you create your droplet, Digital Ocean will go away for 30-60 seconds and build and launch the machine. Once you SSH into it, tail the system log to see the user data executing in the background as the system completes it’s inaugural startup. The bootstrap script echos all commands it’s running and output into syslog for debugging purposes.
Watch the log file until you see the initial Puppet run take place. You’ll see Puppet output followed by Notice: Finished catalog run at some stage of the process. You’ll also see the Pupistry daemon has launched and is now running in the background checking for updates every minute.
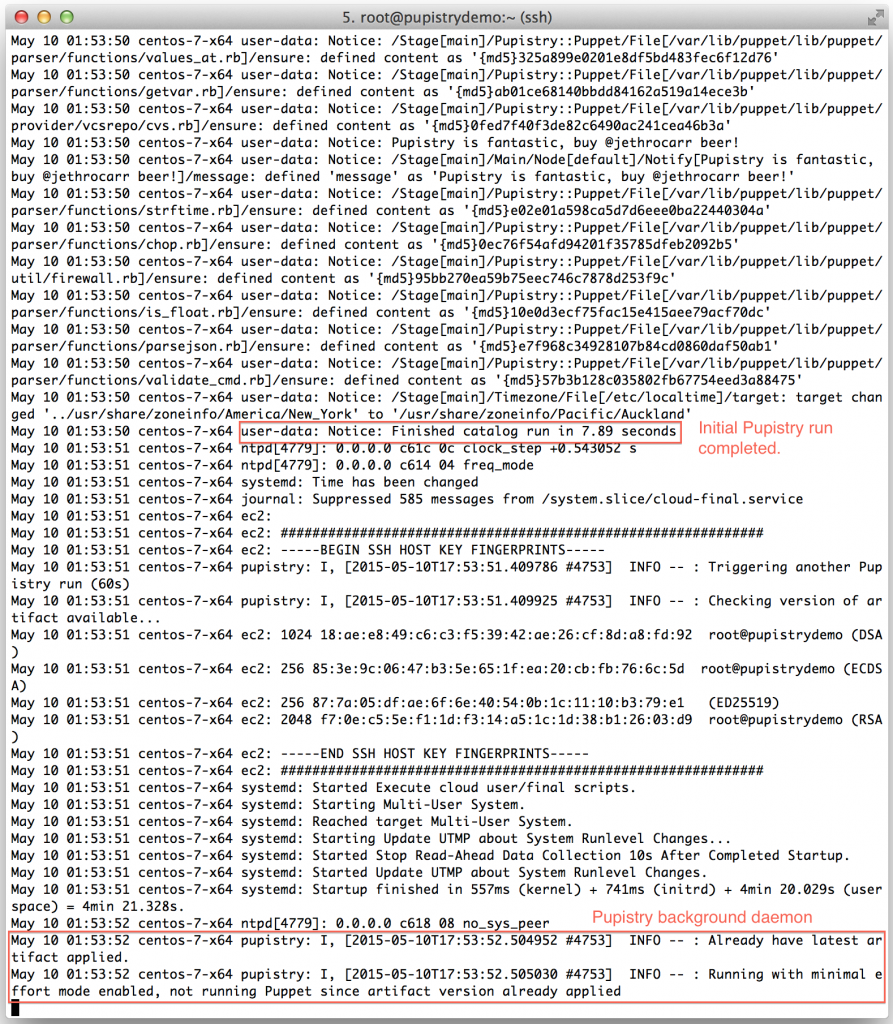
If you got this far, you’ve just done a complete build and proven that Pupistry can run on your server without interruption – because of the user data feature, you can easily automate machine creation & pupistry run to complete build servers without ever needing to login – we only logged in here to see what was going on!
7. Using Pupistry regularly
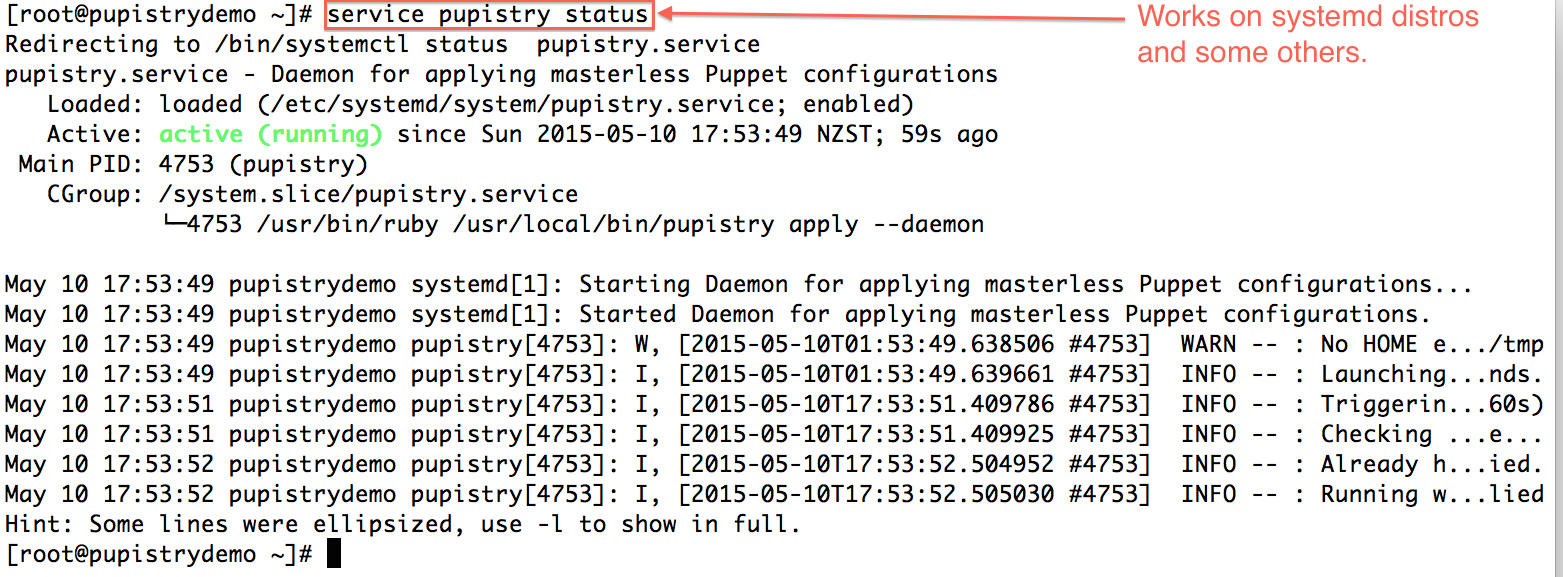
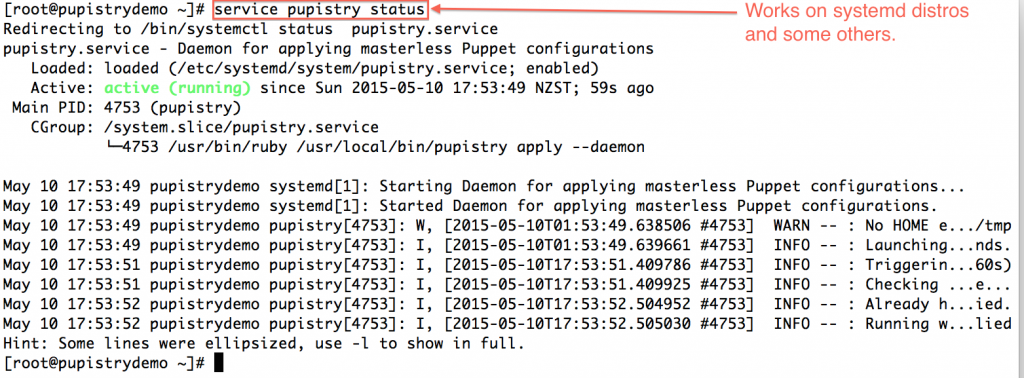
To make rolling out Puppet changes quick and simply, Pupistry sets up a background daemon job via the puppet-pupistry companion module which installs init config for most distributions for systemd, upstart and sysvinit. You can check the daemon status and log output on systemd-era distributions with:
service pupistry status
If you want to test changes, then you probably may want to stop the daemon whilst you do your testing. Or you can be *clever* and use branches in your control repo – Pupistry daemon defaults to the master branch.
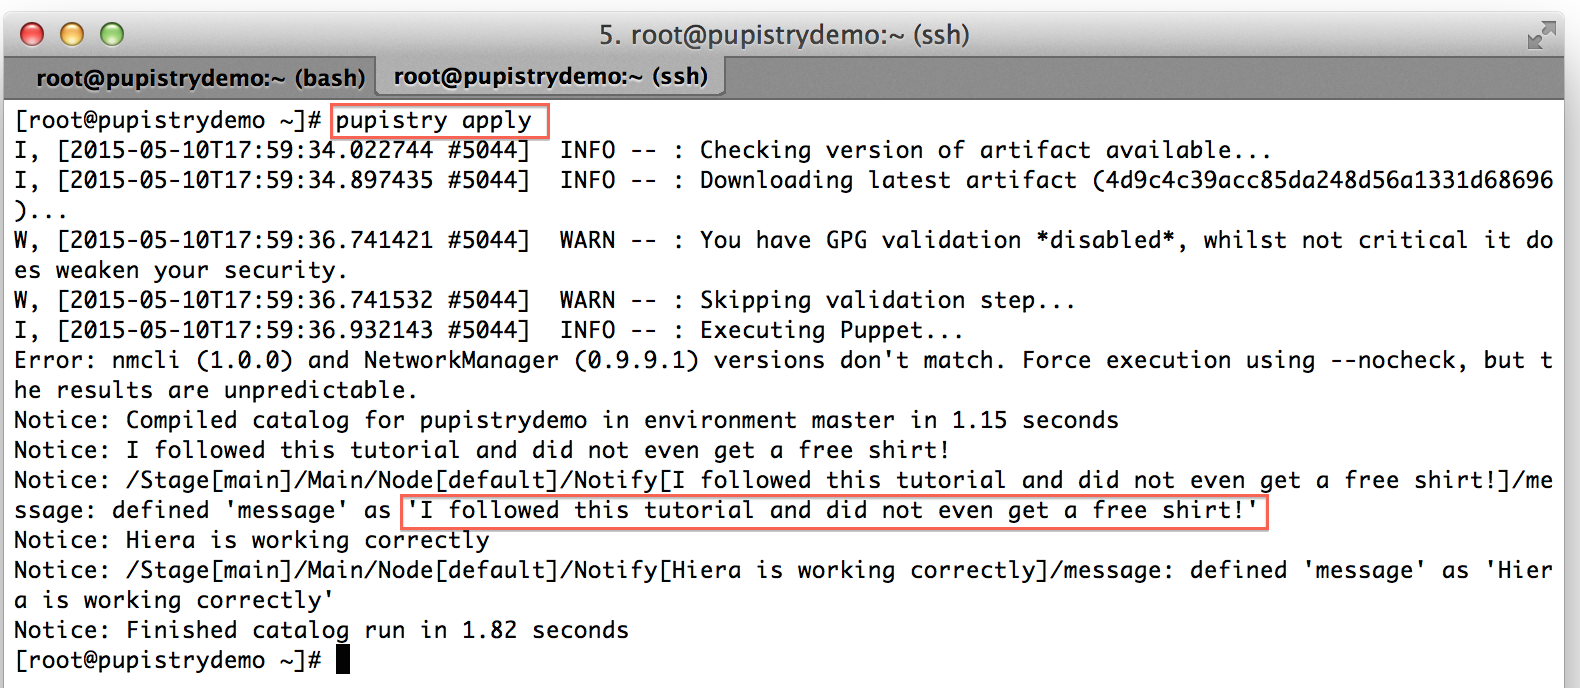
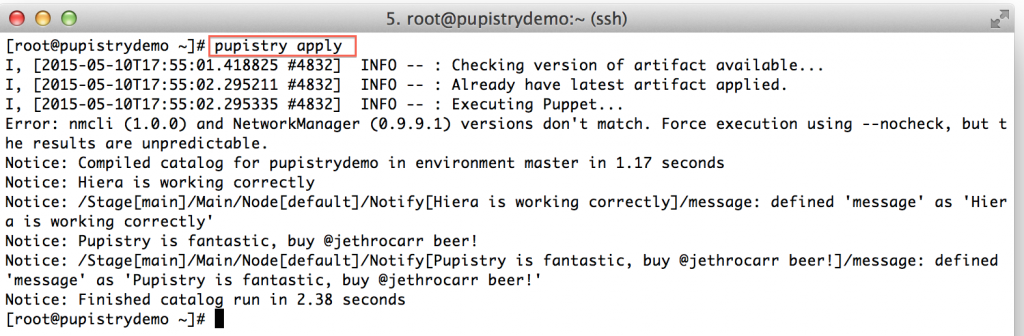
When testing or not using the daemon, you can run Pupistry manually in the same way that you can run the Puppet agent manually:
pupistry apply
Play around with some of the commands you can do, for example:
Run and only show what would have been done:
pupistry apply --noop
Apply a specific branch (this will work with the sample repo):
pupistry apply --environment exampleofbranch
To learn more about what commands can be run in apply mode, run:
pupistry help apply
8. Making a change to your control repo
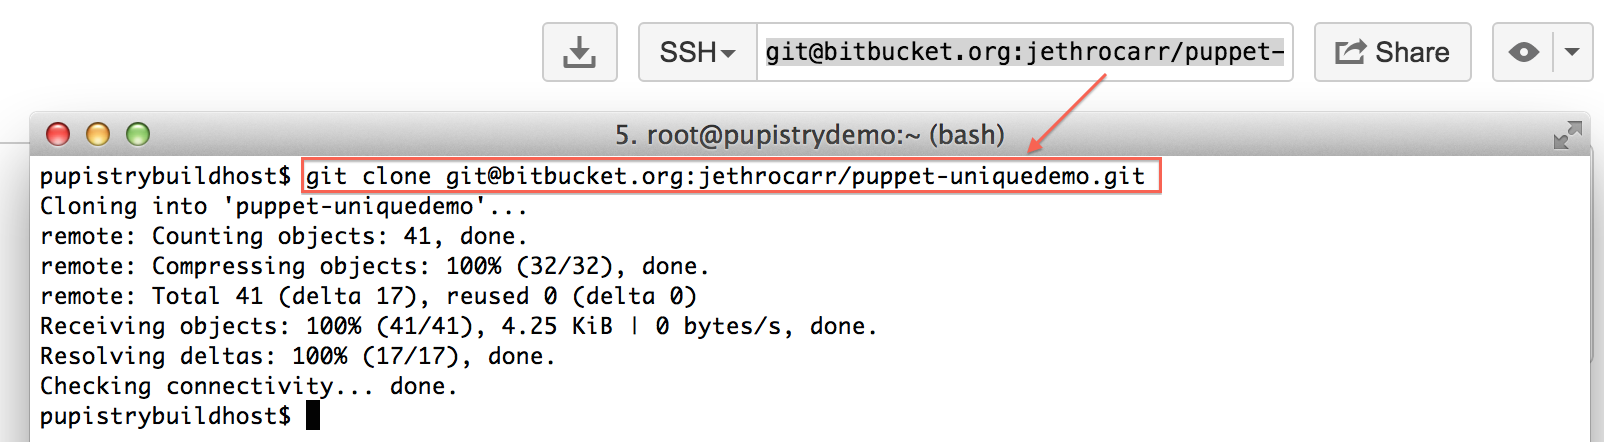
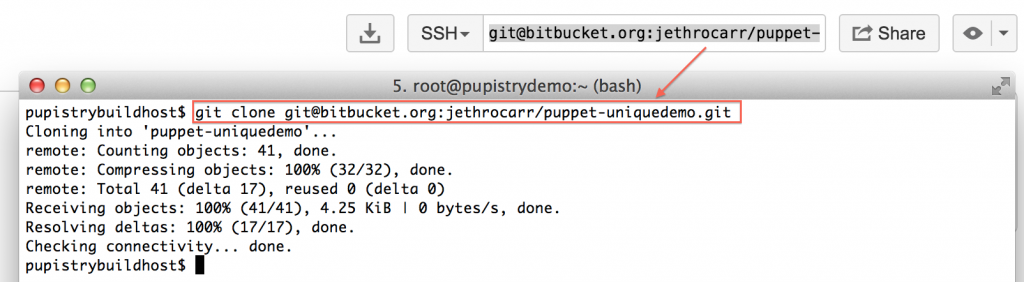
At this point, you have a fully working Pupistry setup that you can experiment with and try new things out. You will want to check out the repo from bitbucket with:
git clone <repo>
Your first change you might want to make is experimenting with changing some of the examples in your repository and pushing a new artifact:
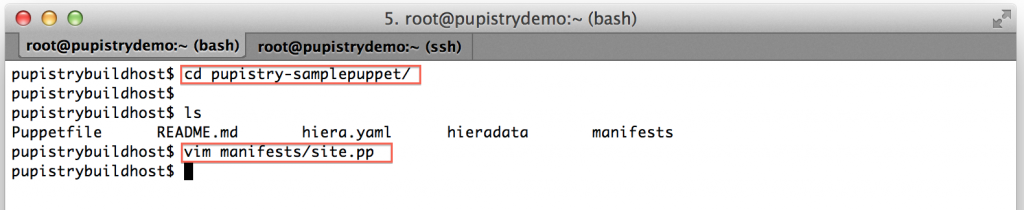
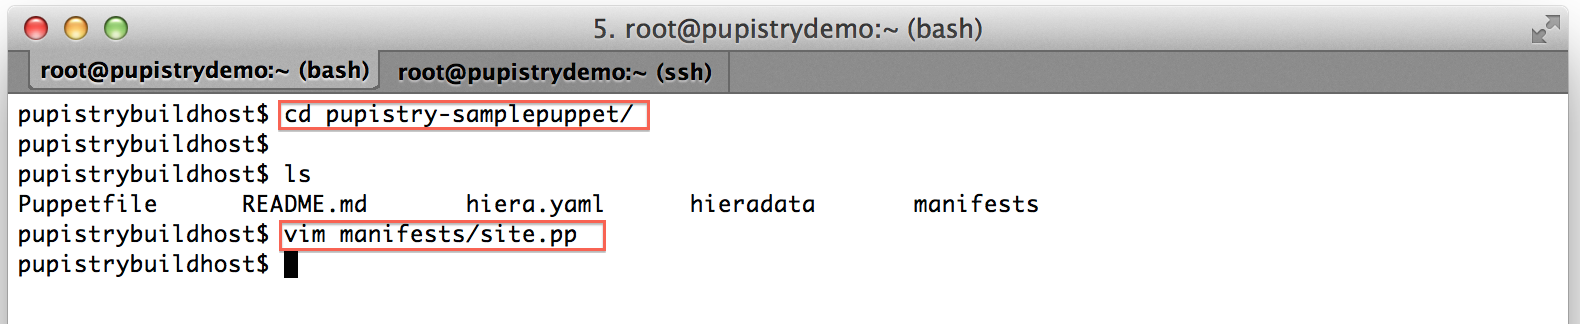
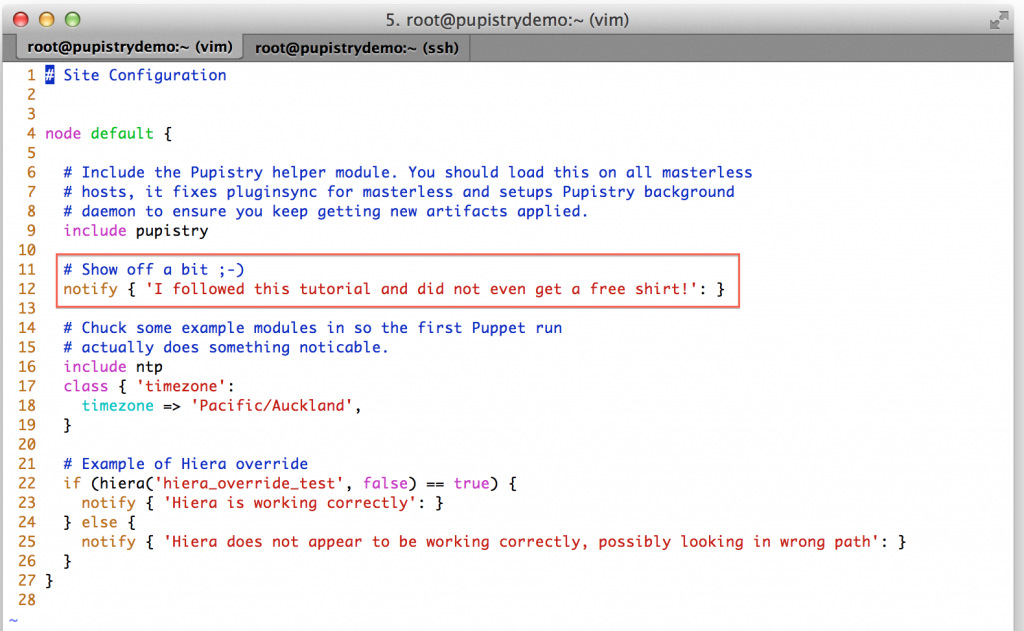
When Puppet runs, it reads the manifests/site.pp file first for any node configuration. We have a simple default node setup that takes some actions like using some notify resources to display messages to the user. Try changing one of these:
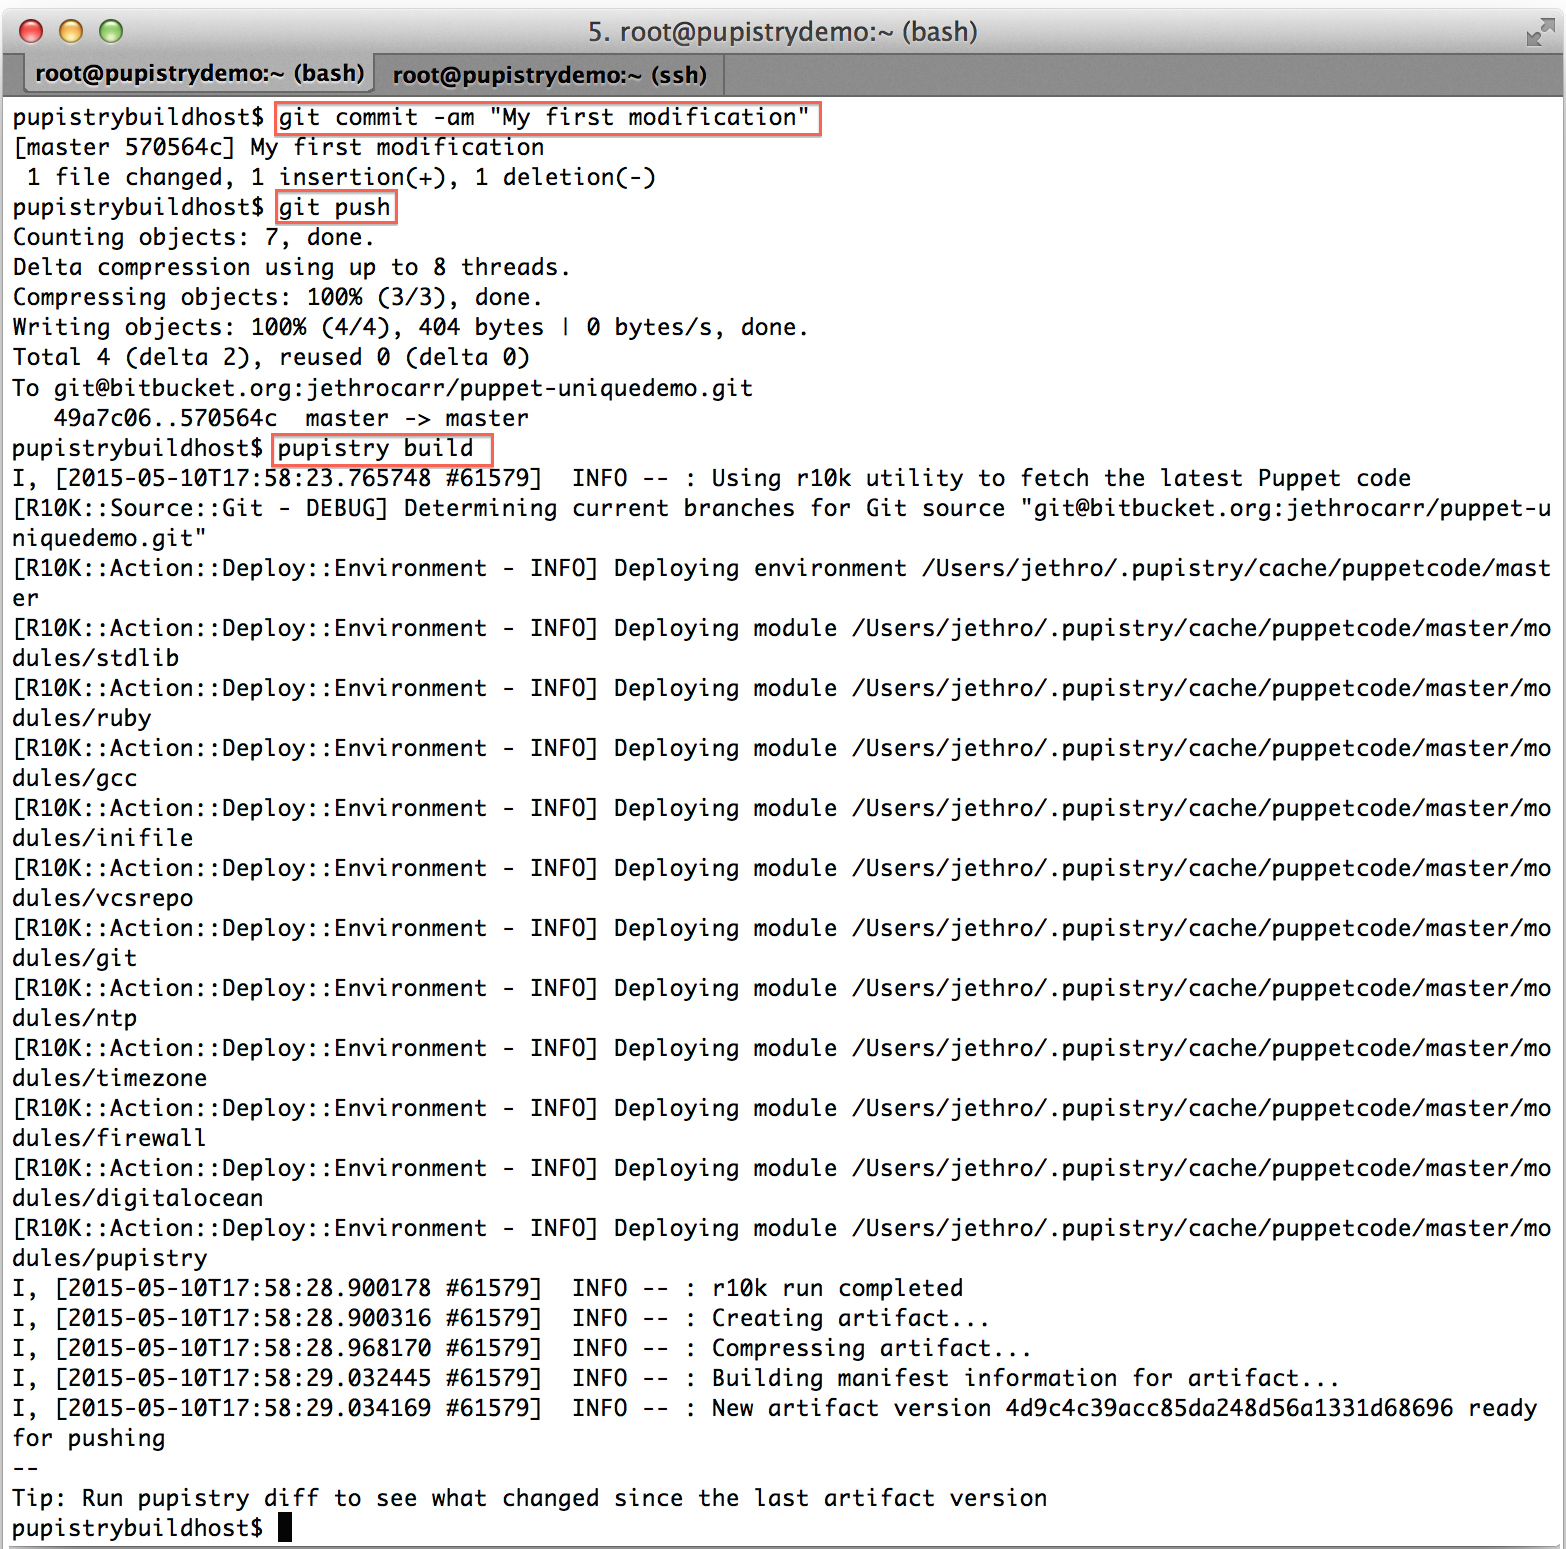
Make a commit & push the change to Bitbucket, then build a new artifact:
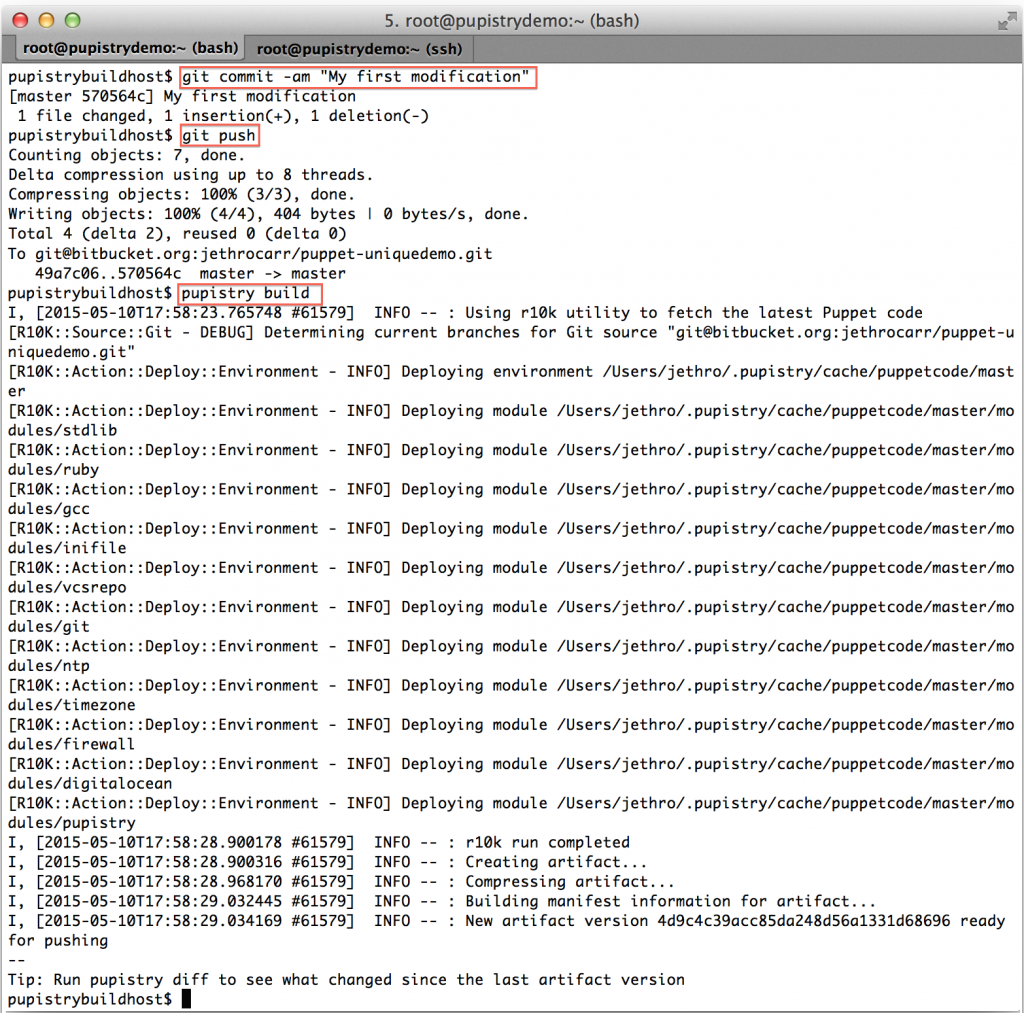
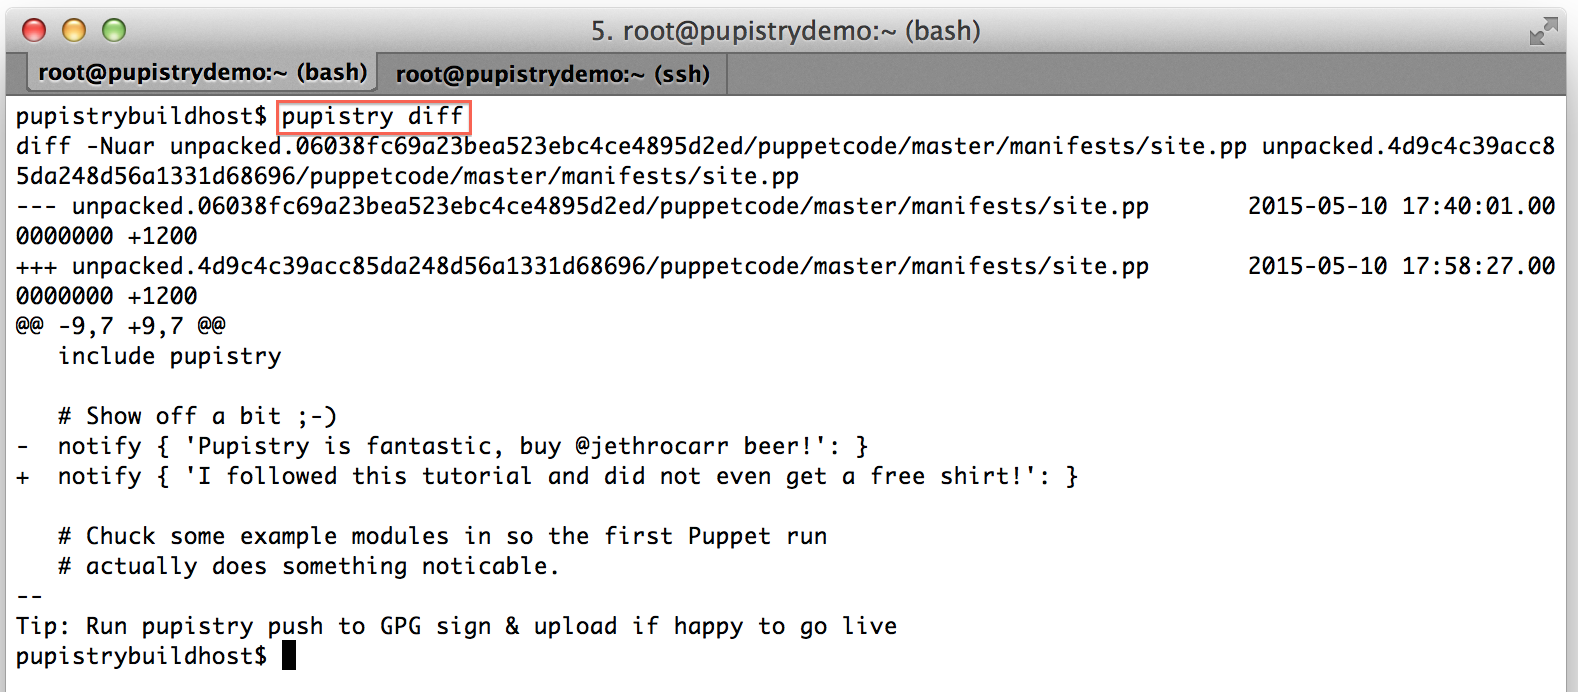
We can now see the diff command in action:
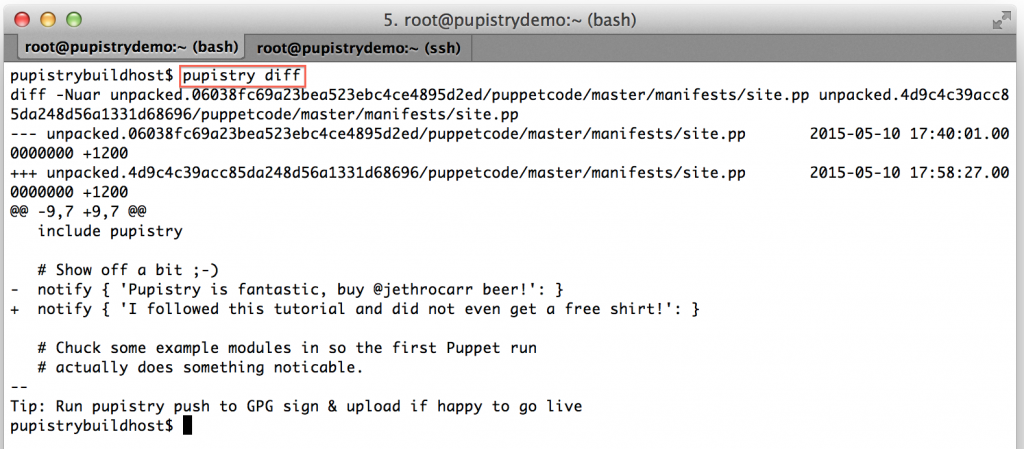
If you’re happy with the changes, you can then push your new artifact to S3 and it will quickly deploy to your servers within the next minute if running the daemon.

You can also run the Pupistry apply manually on your target server to see the new change:

At this point you’ve been able to setup AWS, setup Git, setup Pupistry, build a server and push new Puppet manifests to it! You’re ready to begin your exciting adventure into master-less Puppet and automate all the things!
9. Cleanup
Hopefully you like Pupistry and are now hooked, but even if you do, you might want to cleanup everything you’ve just created as part of this walkthrough.
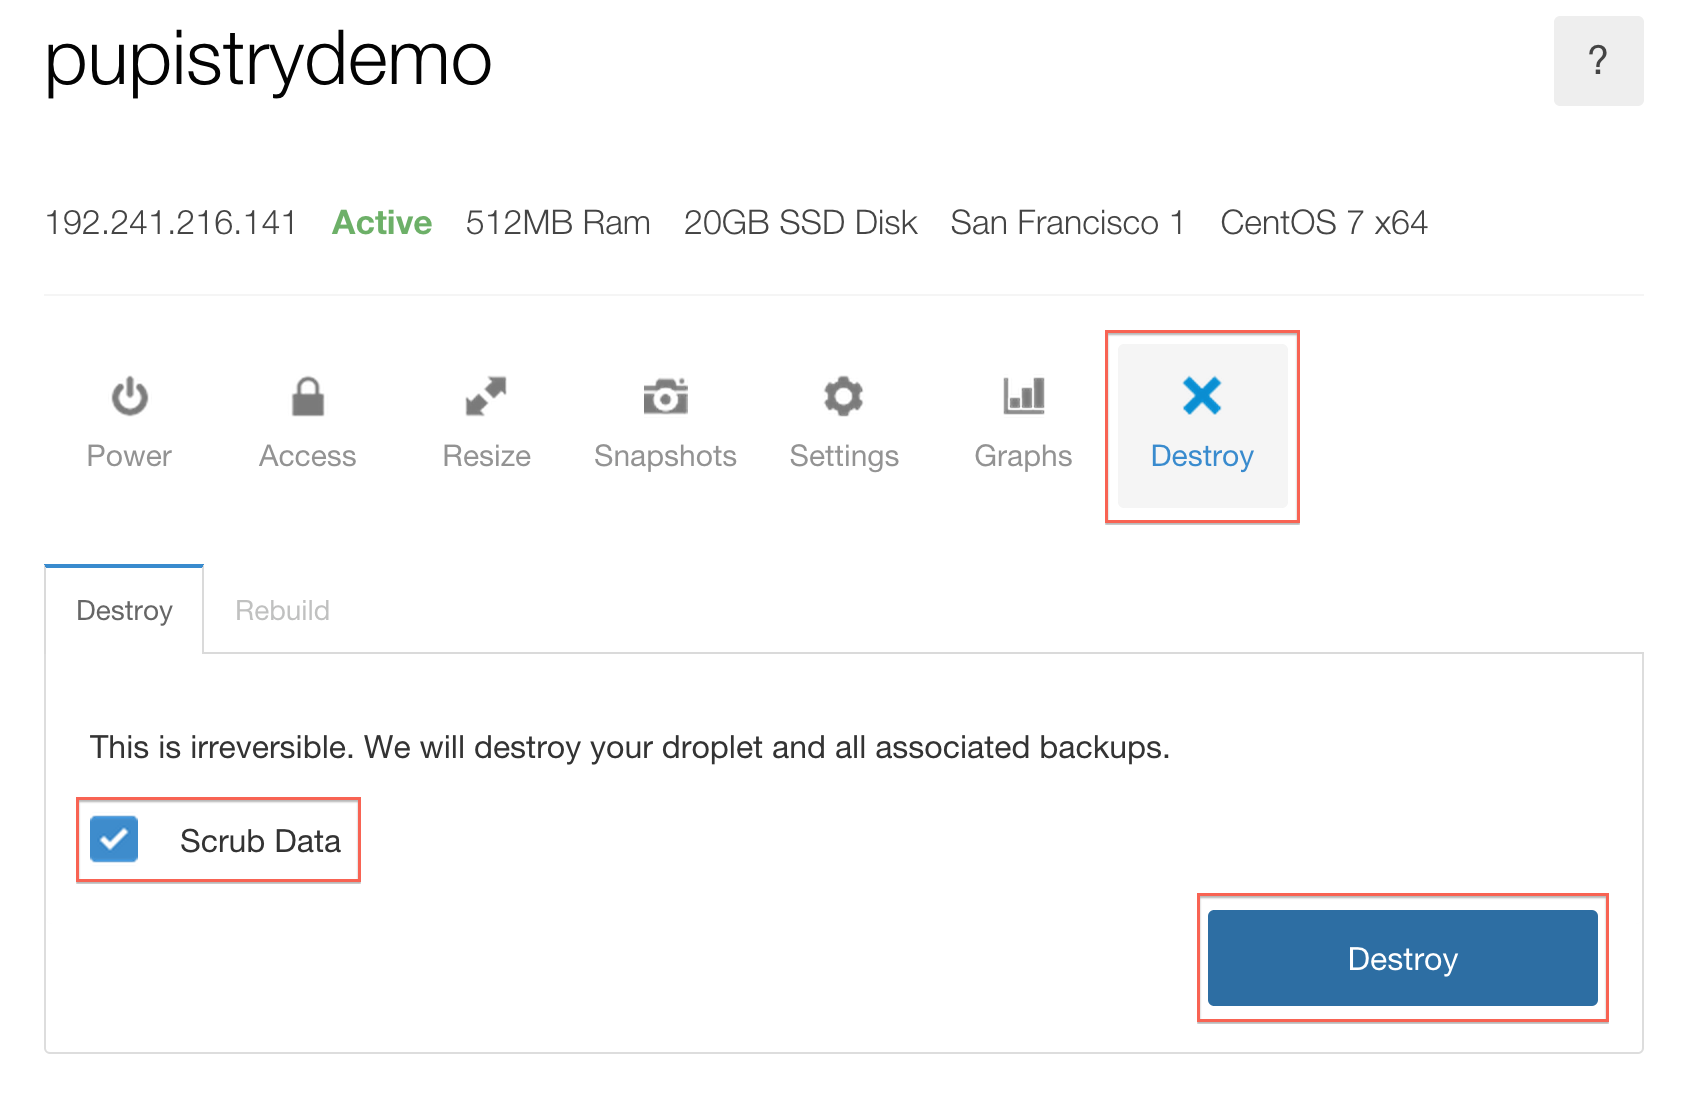
First you probably want to destroy your Digital Ocean Droplet so it doesn’t cost you any further money:

If you want to keep continuing with Pupistry with your new Pupistry Bitbucket control repo and your AWS account you can, but if you want to purge them to clean up and start again:
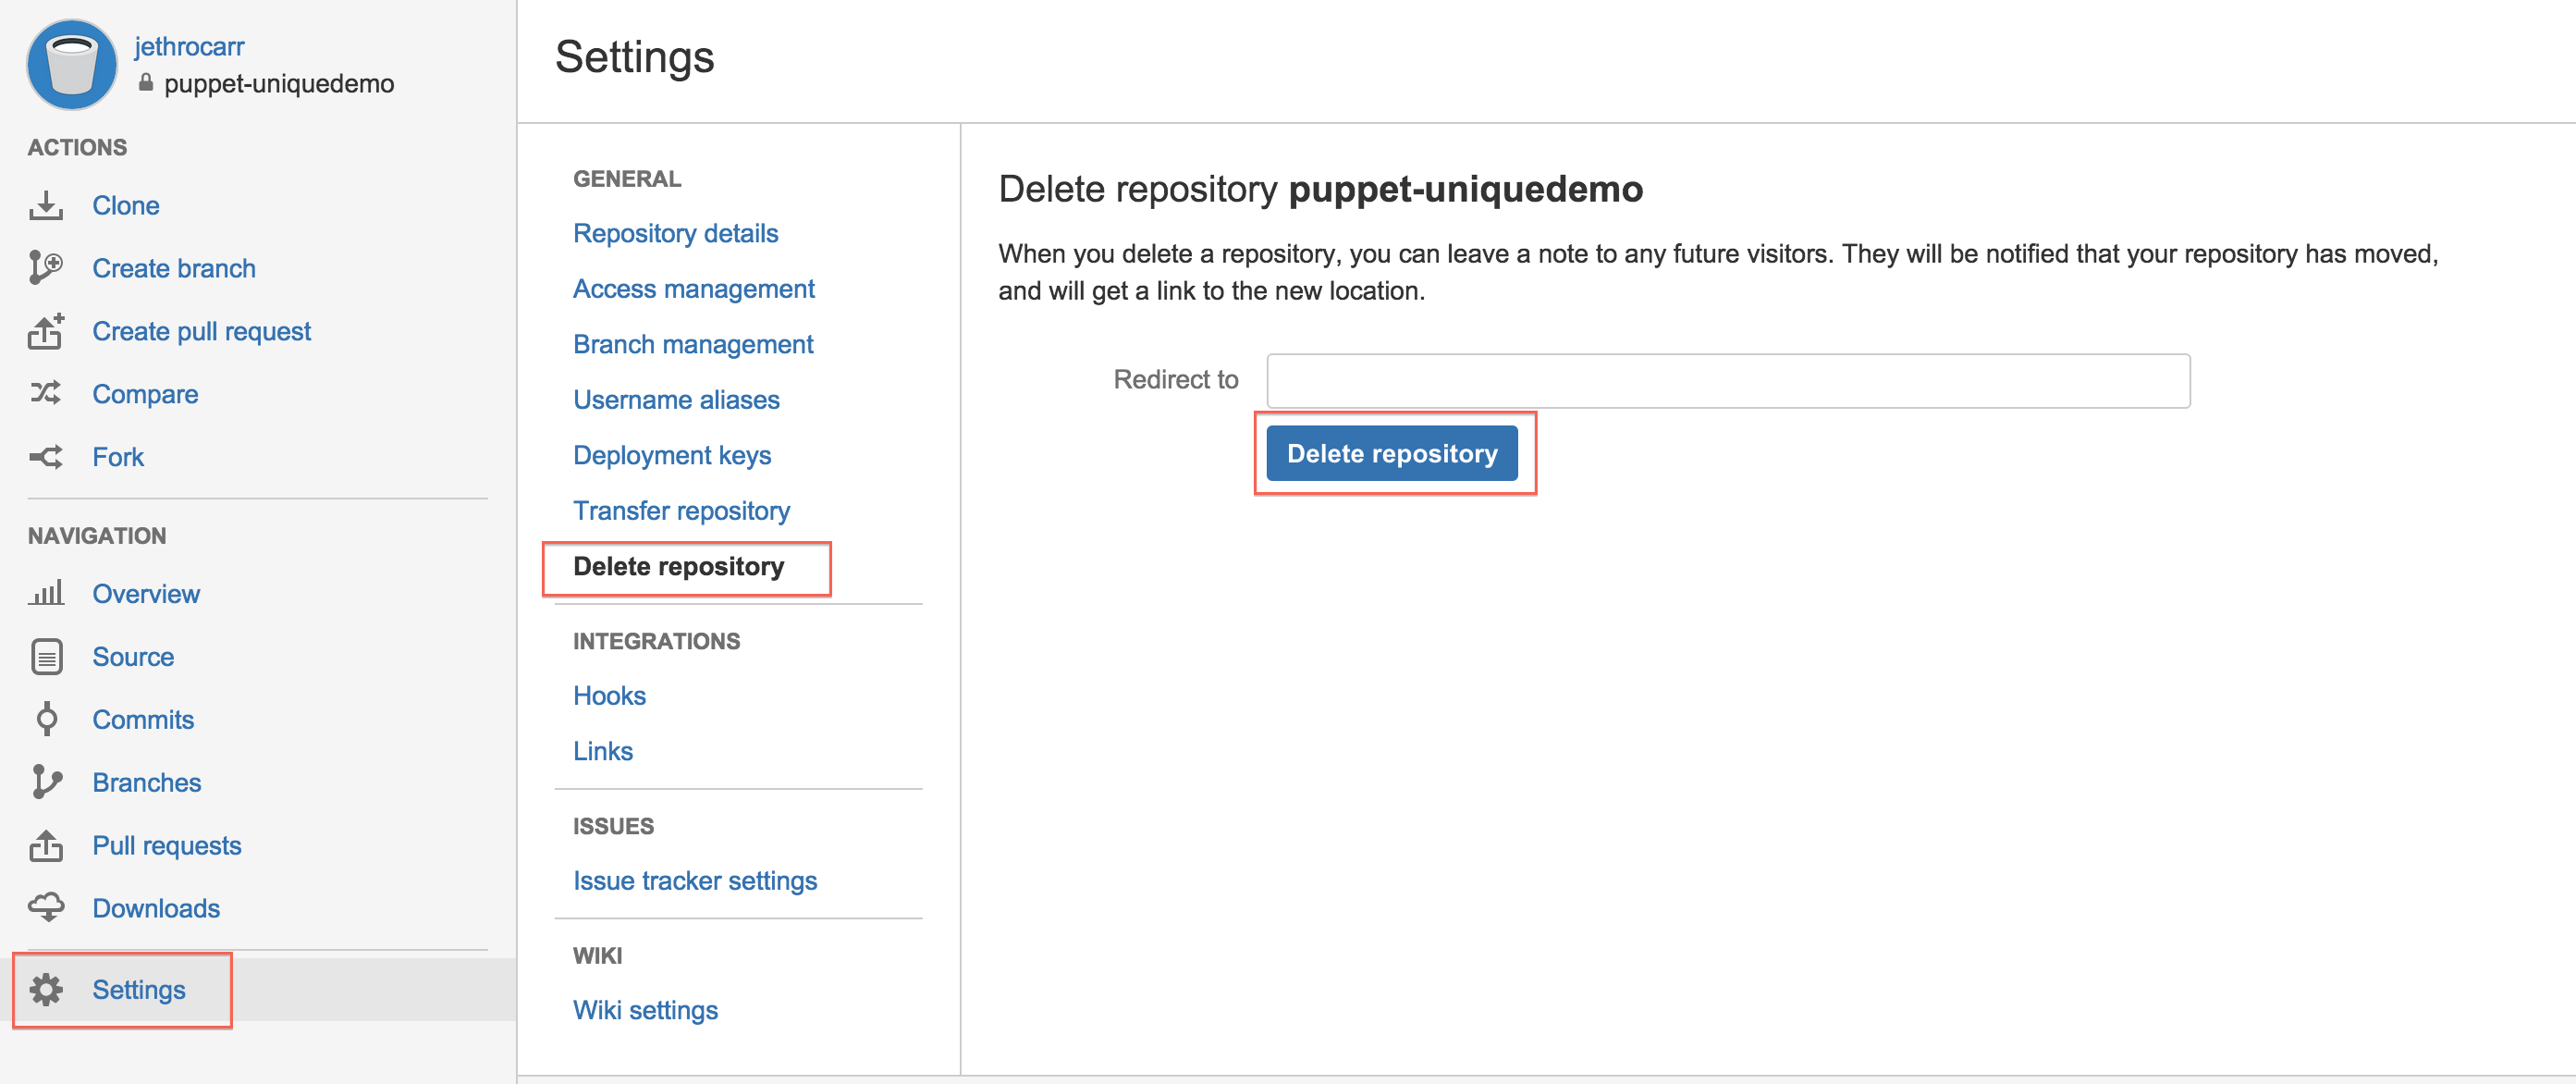
Delete the BitBucket repo:

Delete the AWS S3 bucket contents, then tear down the CloudFormation stack to delete the bucket and the users:

All done – you can re-run this tutorial from clean, or use your newfound knowledge to setup your proper production configuration.
Further Information
Hopefully you’ve found this walkthrough (and Pupistry) useful! Before getting started properly on your Pupistry adventure, please do read the full README.md and also my introducing Pupistry blog post.
Pupistry is a very new application, so if you find bugs please file an issue in the tracker, it’s also worth checking the tracker for any other known issues with Pupistry before getting started with it in production.
Pull requests for improved documentation, bug fixes or new features are always welcome.
If you are stuck and need support, please file it via an issue in the tracker. If your issue relates *directly* to a step in this tutorial, then you are welcome to post a comment below. I get too many emails, so please don’t email me asking for support on an issue as I’ll probably just discard it.
You may also find the following useful if you’re new to Puppet:
Remember that Pupistry advocates the use of masterless Puppet techniques which isn’t really properly supported by Puppetlabs, however generally Puppet modules will work just fine in master-less as well as master-full environments.
Puppet master is pretty standard, whereas Puppet masterless implementations differ all over the place since there’s no “proper” way of doing it. Pupistry hopefully fills this gap and will become a defacto standard for masterless over time.