I recently had the pleasure to speak at the 2018 Mobile Refresh conference held here in Wellington and did a talk introducing how we run some parts of the Sailthru Mobile platform, along with recommendations and advice to anyone else also building backends to support their mobile applications.
It’s more entry-level than some of my other infrastructure talks as it’s focused on people that are primarily mobile developers with maybe a limited set of infrastructure awareness.
Having gone through three Wellington winters in our home, Lisa and I really didn’t want to make it a fourth this year. Whilst our property is fortunate enough to get a lot of sun during the day, it still can’t sustain a comfortable temperature in the middle of winter when we have weeks with day highs of 10c and lows of 5c. In the worst case, it’s gotten right down to 2c outside.
We insulated as much as possible shortly after we moved in, both the roof and floor, but unfortunately with house being very low to the ground, there were sections of the floor that simply couldn’t be insulated, so we ended up with approximately 60% coverage. We aren’t sure about the walls either, some of the ones we’ve had to cut open to do work have revealed insulation but we don’t know for sure if it is fully present in all walls of the house or not.
Insulation upgrade in progress
Most New Zealand homes are also only single glazed and ours is no exception, which means even with the roof (100%), floor (~ 60%) and walls (??%) insulated, we still have massive bay windows leaking heat like crazy. So regardless of the natural sun we get, a high capacity heat source is still critical to maintain a proper temperature at the property.
Which is also precisely what we lacked – when we moved in the house had a rusted wood fireplace in dubious condition and an unflued gas heater which are generally just a bad idea all-round. Neither of these were safe options, so we needed to replace them with something better.
We considered a few different options:
A new wood fire would offer a nice ambience, but access to the property is a challenge and we’d go through most of the firewood we’ve ended up collecting from dropping overgrown trees. So long term, we’d be buying expensive firewood and having to shift it onto the property – plus we’d lose a good amount of space storing a winter’s worth of firewood.
A gas fireplace was considered due to us already having existing piped gas. A modern flued gas fireplace is efficient and doesn’t exhaust into the living space, plus offers all the classic ambience of a fireplace. The only downside is that the heat would be focused in our lounge or dining rooms and wouldn’t propagate nicely through the rest of the house. There are some models that feature ducting that can exhaust some of the heat to other parts of the house (eg 2 or 3 other rooms) but our size of property wouldn’t be able to get full coverage meaning we’d need to looking at needing to install two fireplaces or additional heating to fully cover the property.
We seriously considered a gas boiler and European style radiators emitting radiant heat in every room. This would result in us losing some wall space, although we would have been able to put them under the windows. Ultimately this option ended up not being possible, as our existing gas pipe is too small in diameter and the cost of running a new pipe from the street to the house is extremely uneconomical.
The gas pipe limitation also impacted our ability to drive other high consumption gas appliances, for example feeding large fireplaces could be tricky and we’d probably be unable to run more than a single instantaneous hot water system. Probably for the better anyway given that it’s a fossil fuel, but it’s so much more cost effective than electricity on a per kWh basis in NZ that it’s a compelling option if you have gas piped to your property.
Given the above issues, the only remaining option that made any sense was electric heat pumps. Heat pumps are generally 300-400% efficient, meaning although they use super expensive electricity, you get very good heat output compared to running traditional electric heaters.
What most NZders will think of when you say “heat pump”
These are becoming quite popular now in NZ as an affordable upgrade (a fully installed basic unit might cost as little as $2-3k NZD) for existing properties – the purchase of a mini-split system such as the above allows for easy retrofit installation and you’ll often see these added to lounges to ensure a reliable heat source in the main living space.
Their weakness is that you don’t get the heat spreading from the primary room out into other parts of the house, such as bedrooms. And they’re not cheap enough that you would install one in every room to get the coverage, but even if you did, you’d then have to deal with managing them all in a sensible fashion so they don’t end up fighting each other when maintaining temperatures.
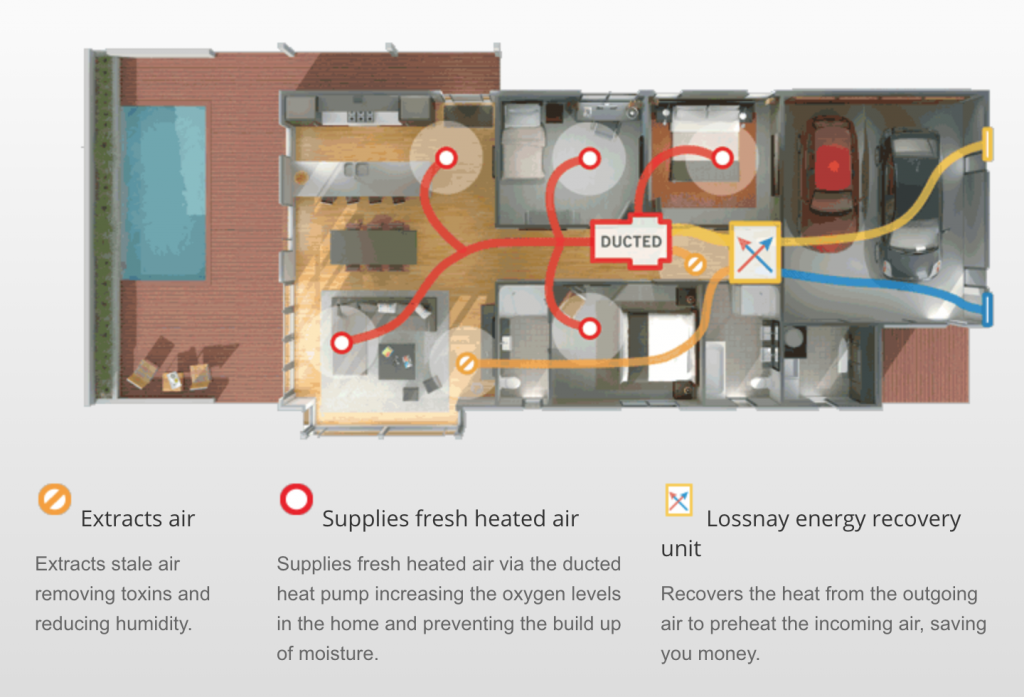
To solve this problem, we went for a less common (in NZ residential homes) option of putting in a central ducted heat pump. These units use the same essential technology (using a refrigerant to shift heat from the outside unit through pipes to an inside unit), but rather than having an on-wall unit, we have a large unit in the attic, with ducting pushing air into every room of the house, to be recirculated back via a hallway intake.
Due to the amount of specialist skills and tools required for this project, plus a lot of time climbing around the attic which I just love doing, we instead contracted Wasabi Air to perform the complete installation for us. They did a really good job, so pretty happy with that.
Diagram from Mitsubishi’s website illustrating how a ducted heat pump setup looks.
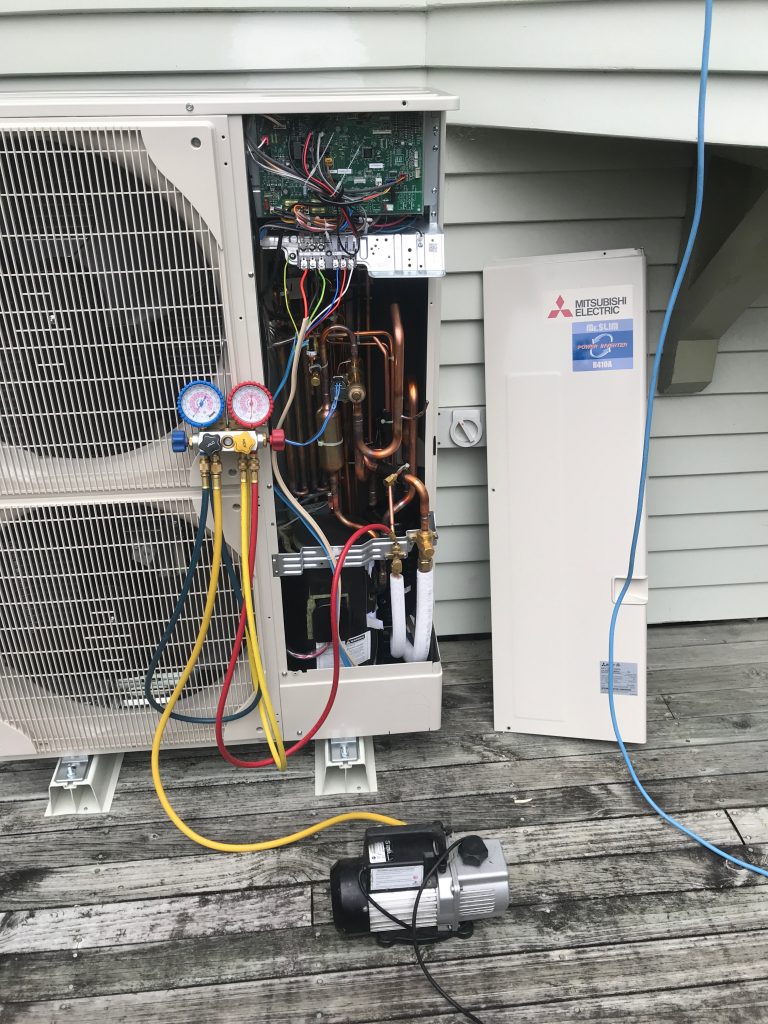
We went with a Mitsubishi PEAD 140 unit based on Wasabi’s recommendation as an appropriately sized unit. This unit is capable of 16 kW heat output or 13 kW cooling output and can consume up to 4 kW of electricity to operate at peak.
The installation is pretty full on, it took 3 days for a team to get everything installed and set up. I took a selection of photos during the install since I’m a weirdo who finds installing things like this interesting.
Firstly the exterior unit needed installation. Whilst modern heat pumps are “quiet” they’re still audible when working hard so you want them away from bedrooms – thankfully we had a convenient space between two bay windows where it could sit below the floor level of the house. The only slight downside of this location, is that I’ve noticed the deck has the tendency to slightly amplify the vibration of the unit at times, whereas if we had gotten it mounted on a concrete pad elsewhere it may have been less of an issue.
Exterior unit. This thing is *big* and shovels a significant amount of air through itself when operating.
Vacuum pumping the refrigerant lines ready for the gas to go in.
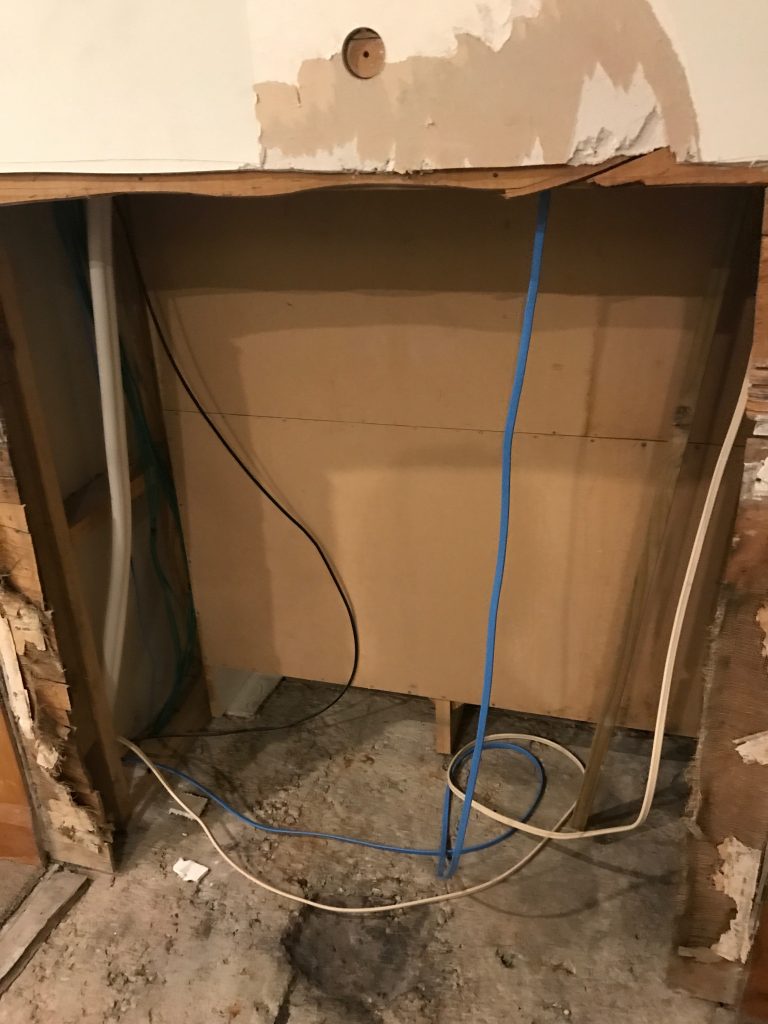
Because the exterior unit needs to run copper piping for the refrigerant, power and controls up into the roof of the house, we needed to go from under the floor to the attic at some point. Rather than an ugly boxed conduit on the outside of the house, we had it installed through the middle of the house.
As mentioned earlier, our fireplace was wrecked, so I knocked it out entirely a few months back (post coming once I finally finish the project) which has left a messy hole an accessible space from the floor to the attic that was perfect for linking the internal and external units.
Whilst the piping is copper, it has a surprising degree of flexibility so the team was able to feed it through and bend it varying degrees, whereas I had assumed it would all have to be right angles and welds. The piping is wrapped in a insulation tube which does a pretty good job at avoiding heat loss – even when running on full, the insulation is just mildly warm to the touch.
Piping and cabling going in.
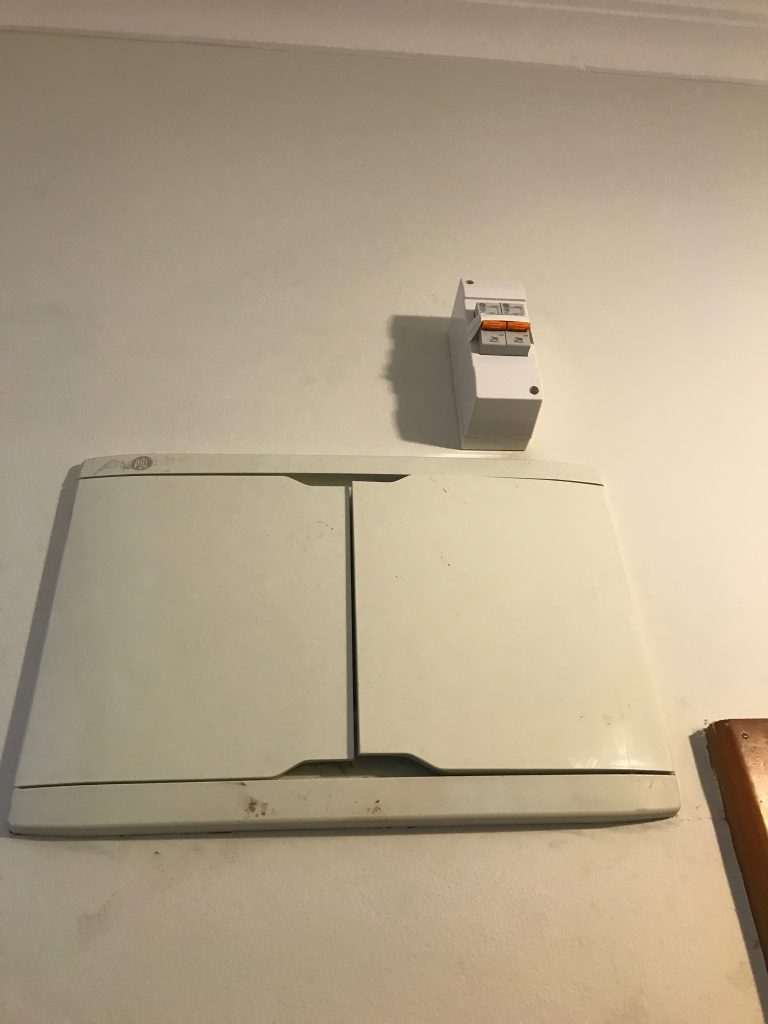
One of those big electrical cables had to go all the way back to the switch board to feed the unit with electricity. Unfortunately our switchboard is totally full, so the electrician ended up having to add a couple additional breakers off it to the side.
It’s not wonderful but it solved the problem – given future plans for the property (electrical hot water, induction cooking, car charging), I think we’ll end up doubling our switchboard and making it all tidy as a future project.
Not going to win any prettiness awards, but it’s safe and compliant.
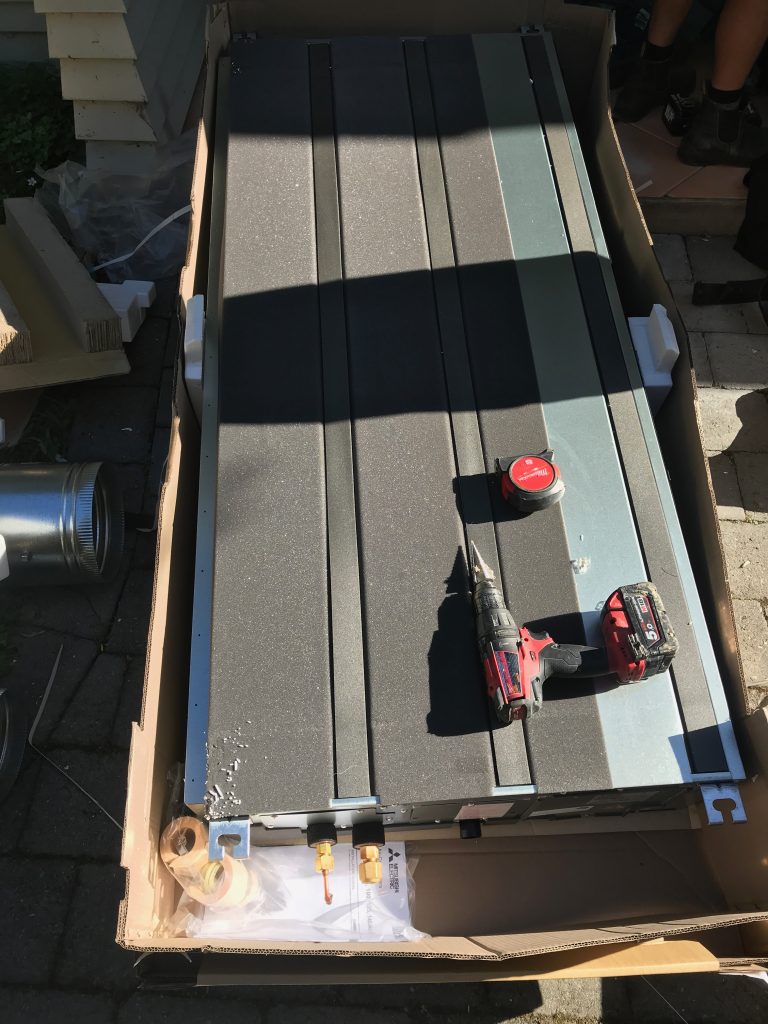
Of course the exterior unit is just half the fun – we also needed the interior unit installed and all the ducting connected. We had what is considered a slim unit, but it’s still a very sizeable item to try and lift up into a roof space!
Indoor unit before going into the roof and having ducting connected.
Impromptu skylight
As there’s no way to get the unit into the roof via existing access ways, the team cut a massive hole in the hallway roof. They then swung the unit up into the roof with a team of guys who do a lot more physical activity than me and backfilled the space with the intake vents.
Intake vents going into the hallway to nicely fill the big hole that got made earlier.
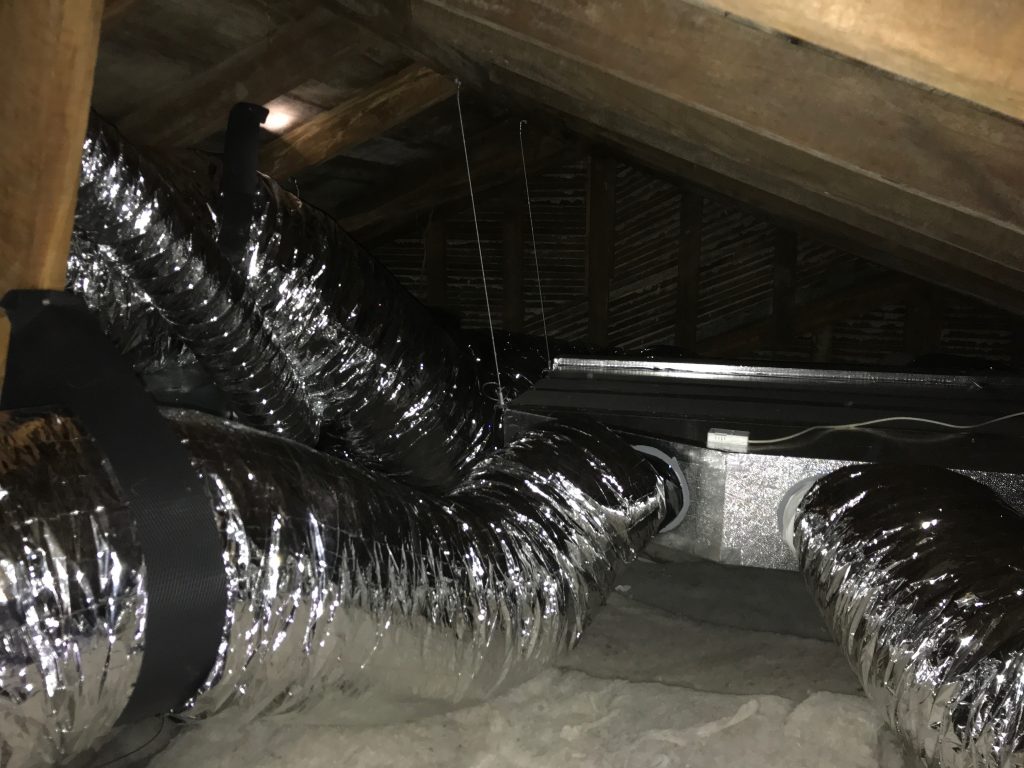
Once fitted in the roof, it takes up even more space for all the ducting to be connected. A large amount of our spacious attic is now consumed with this unit and associated ducting. I’m just glad we’d already done insulation and most of the cabling work we’ll want to do in there for the foreseeable future as it’s a lot more difficult to navigate now.
Fully installed in the attic space
Despite being above the bedroom, the unit is really quiet when operating and we can barely hear it. I took some video of the installation to give an idea of it’s low level of background noise even when inside the attic.
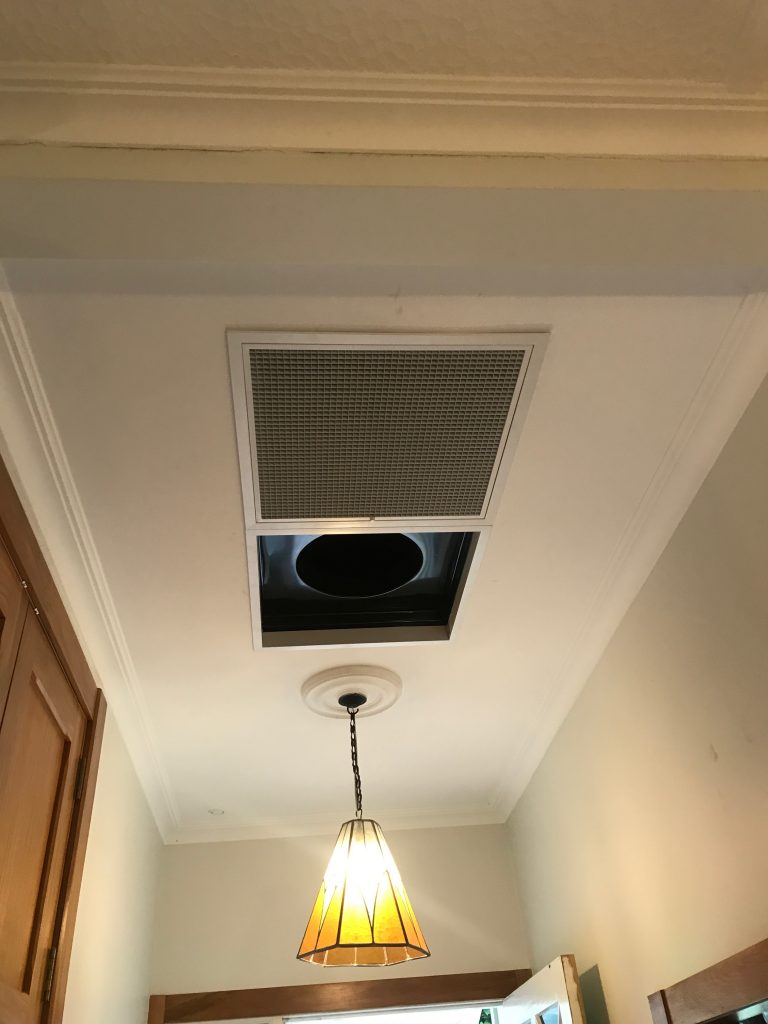
We decided to install outlets into every single bedroom (x4), one in the lounge and one in the dining room for a total of x6 outlets. The hallway features the intake vents for recirculating the air.
Note that there are two key downsides to the ducted heat pump option vs radiators here:
The first is that you can’t directly heat damp areas like the bathrooms or kitchen, as pumping air into those areas will force moisture out into other parts of the house. Radiators have the upper hand here, since you can get appliances such as towel rail radiators to directly provide warmth. That being said, our bathroom gets enough residual heat from being in the middle of the house and when we renovate the second one I plan to look at putting in underfloor heating as it’s on a concrete pad, so it’s not a big issue for us.
The second is that you don’t get per-room control. Whilst it’s technically possible to install dampeners (manual or electronic), when you close off one vent you can unbalance the system a bit and make other rooms too breezy or noisy. So it’s recommended to just heat the whole place and enjoy a fully warm house, rather than trying to create hot + cold rooms.
Ducting getting prepped pre-installation
The above photo showing the ducting being prepared shows the built-in dampeners used to balance the system when it’s installed. These are used to restrict/open the flow of air to each outlet to handle the fact that outlets have different length ducting runs and sizes. It also makes it possible to do things such as setting the heat output in the bedrooms to be a bit lower than that of the living spaces by keeping their volume of air output a little lower.
Once installed, the outlets are unobtrusive in the corner of each room.
I had some concerns around how the vents would handle our high ceilings and we do get some degree of heat blanketing when the system first starts heating the house (warm head, cold toes), but once it brings up the whole house to temperature the high ceilings aren’t a major issue.
That being said, it does mean there’s a lot more air to heat than a property with lower ceiling heights and certainly on the coldest days we’ve found the system takes too long to bring the house house up to a comfortable temperature if we’ve let the house get very cold. The solution is pretty simple, we just leave the house on a lower temperature when away from home to ensure it’s only a few degrees off our comfortable temperature when we come home (typically found 20c when awake and 18c when sleeping is our preferred climate).
It works well – for the first time we’ve actually had a comfortable time in winter, rather than huddling for warmth in only a couple rooms with the rest of the house closed off trying to conserve heat.
Whilst the heat pump ensures the house can now always be at a comfortable temperature, it won’t prevent moisture build up. It can reduce window condensation on account of the warmth and even be put into a drying mode, but it’s ultimately not a ventilation system and doesn’t cycle out moist stale air if you fail to manually ventilate your house.
Our house wasn’t too bad with moisture (not compared to many other NZ properties) on account of the kitchen and bathrooms all featuring extractor fans which ensured the bulk of moisture produced in the house is vented out, but the simple act of living in the house is enough to create moisture and having weeping windows in the morning was still not uncommon for us, especially during winter when opening windows isn’t very compelling.
Given the fact that we have long and cold winters, we decided to invest a bit more and had Mitsubishi’s ventilation product (Lossnay) installed as part of this project. This unit integrates with the ducted heat pump and regularly cycles out stale air and sucks in fresh air, recovering most of the energy in the process so you’re not constantly discarding the energy you just spent heating (or cooling) the house.
Diagram from Mitsubishi’s website illustrating how a Lossnay connects to the ducted heat pump system.
Lossnay unit operating away quietly in the maze of ducting.
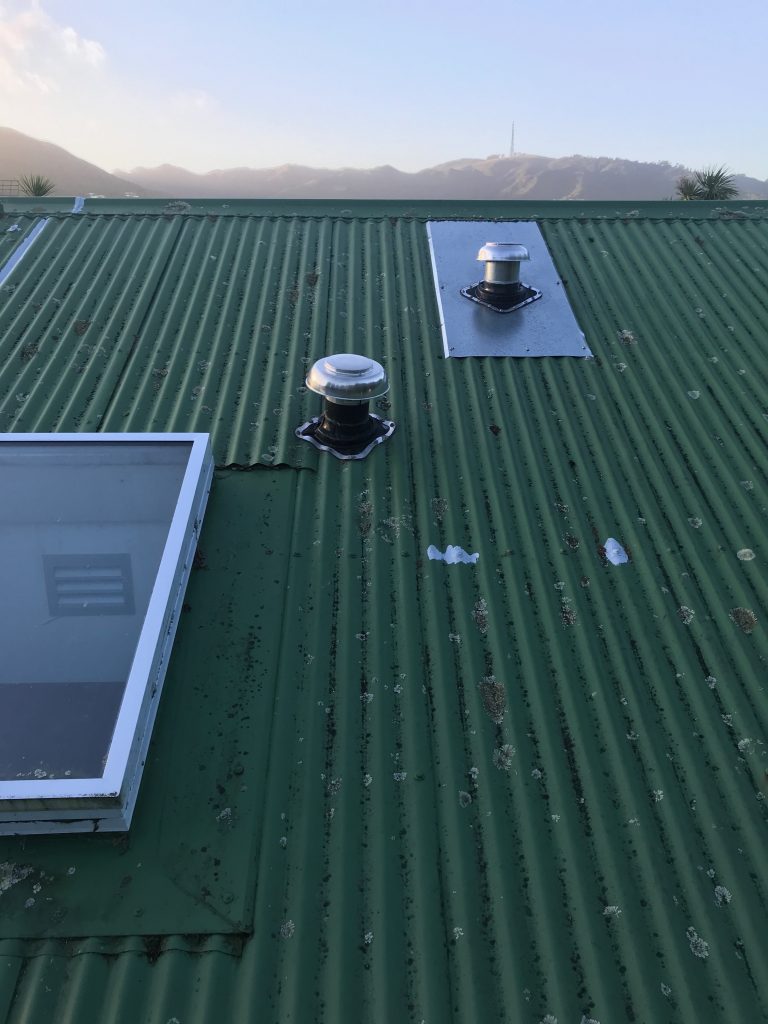
Because of the layout of the house, the two Lossnay vents ended up having to go through the roof – the egress near the existing bathroom fan vent and the intake a number of meters away on the other side to prevent just recirculating the same air, so we now have a few more mushrooms to add to the other unsightly appearance of our roof. Summer 2018-2019 has a painting project on my list to tidy it all up with a fresh coat of paint.
The end result is that we have a completely moisture free property and I haven’t opened the windows once all June, since the system is constantly ensuring we have fresh, dry and warm air in the property. Even on the coldest days, the windows are now completely dry which is just fantastic.
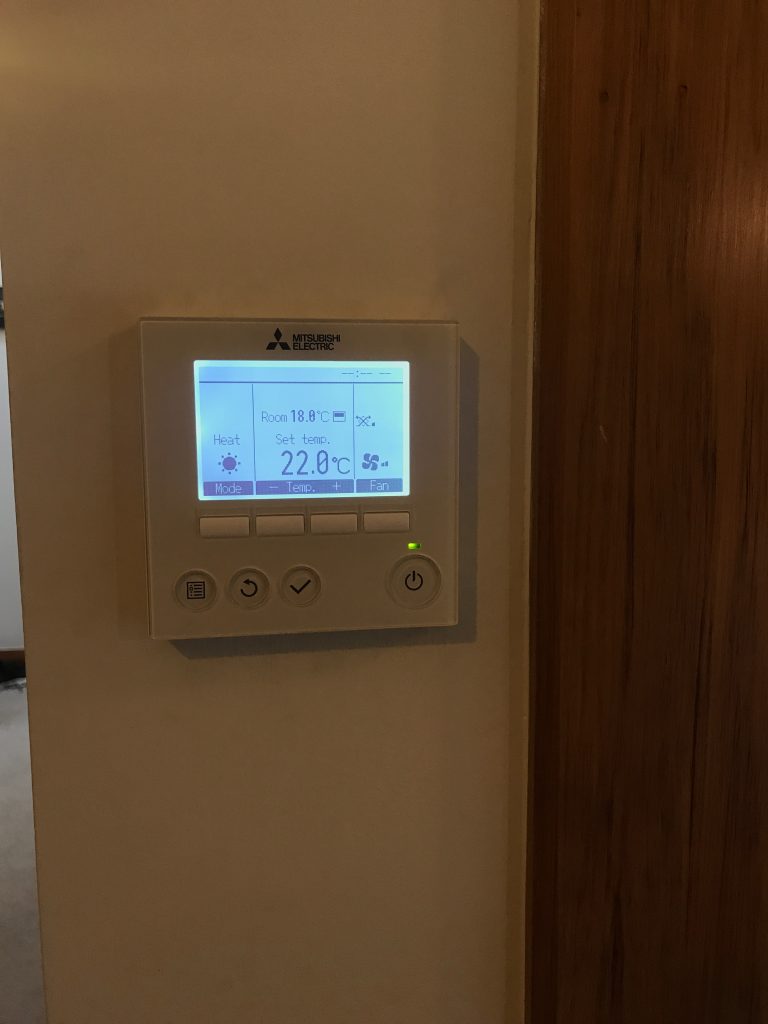
To control the combined system, there’s a central thermostat and control interface installed underneath the return intake. It’s pretty basic, capable of setting modes, fan speeds, temperatures and timers, but does the fundamentals nicely enough.
Nice modern look but it’s not all that intelligent.
Ultimately I wanted proper IP control of the system to allow a range of integrations rather than the manual drudgery of having to touch actual buttons with my actual hands.
Surprisingly for 2018 this isn’t standard for all heat pumps like this, some vendors seem to lack options entirely and whilst Mitsubishi have their “WiFi Control” product, it’s still sold as an extra ~$250 add-on, rather than being natively built into the control interface as standard feature.
Essentially it works by connecting a small embedded computer to the heat pump via it’s onboard serial port (You can see the little white box on one of the earlier photos of the attic install with the trailing cable going to the unit’s control circuit). It then bidirectionally syncs with Mitsubishi’s cloud services, which then allows you to control it from anywhere via your phone app. The experience is well polished and Mitsubishi is even doing HTTPS for their connections which was a (positive) surprise. Plus the WiFi module was designed/built by a local New Zealand company on behalf of Mitsubishi, so that’s kinda cool.
WiFi module + app
Note that I mentioned serial before – this isn’t too tricky to interface with and it is possible to build your own module – I’m not great with hardware and didn’t want the hassle and warranty risks, but if that’s your kind of thing, take a look at this blog post on Nicegear.
Overall it’s a pretty decent Internet of Things product, the only issue I had with it is that it relies entirely on their cloud service. And whilst Mitsubishi’s cloud app is *probably* going to stick around for a while, I wanted local control to allow me to link it to Home Assistant to make it part of a holistic smart house, not just an independent appliance. Getting it into Home Assistant also makes it possible to then control via Apple HomeKit, something not possible with the off-the-shelf product.
I had a bit of fun figuring out how I could interface with it locally (see my talk at the inargural Wellington Home Automation Hackers if interested) but ultimately I discovered that the latest version of the IP module (MAC-568IF-E) supported a Japanese standard called ECHONET Lite. This standard allows for completely local network control of various smart home appliances, including heat pumps, which allowed me to then write a bridge application between Home Assistant (using MQTT) and the heat pump (using ECHONET Lite).
The source code for this bridge application is available at https://github.com/jethrocarr/echonetlite-hvac-mqtt-service including a Docker image for easy installation.
The only limitation is that I have not found a way to control the Lossnay via ECHONET Lite – given that the official Mitsubishi app also lacks control, I suspect they simply haven’t developed functionality into the WiFI control module to expose the options for the Lossnay, it’s probably not a massively popular addon
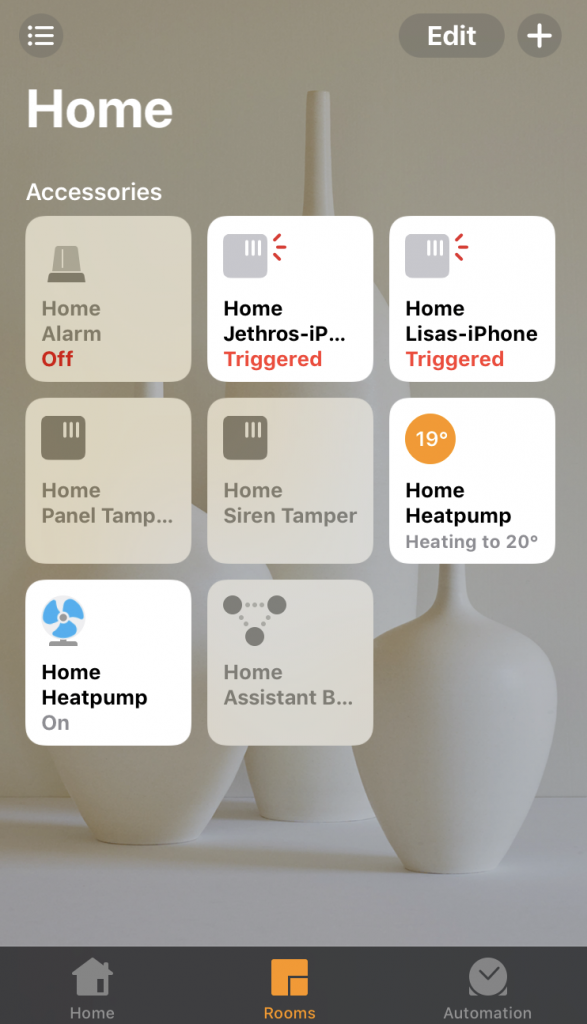
End result is that I now have the ability to control the mode and temperature via HomeKit from my iPhone/iPad – and since HomeKit links with the wider Apple Ecosystem and the fact we have an Apple TV, it’s possible for both Lisa and myself to control the heat pump (and all the other linked stuff) remotely from anywhere without a VPN needed. It also makes things super trivial to delegate and revoke access to guests when visiting.
Heating controls in HomeKit!
The other main drive to integrate locally is that I want to be able to setup smarter rules inside Home Assistant. Some of the stuff I’m planning is:
Automatically set the temperature when we are away from home vs at home. We already have occupancy data from a range of metrics that we can use so this won’t be too tricky.
Take exterior temperature into account, eg if the day is going to heat up there could be hours where we can shutdown the system entirely for power savings.
Being able to read temperatures from sensors around the house rather than the averaged thermostat reading near the return intake and take into consideration when setting temperatures – eg “I always want the bedrooms at 18c, even if it means the hallway and lounge end up slightly warmer than they should otherwise”.
Automatically shut down the system if someone leaves the front/back door open for more than a minute.
A smarter night setback mode. The current behaviour of the system is to always run the fans whether actively heating or not, but this can sometimes be annoying at night when the breeze can be felt more noticeably. I’d like to program in logic to automatically shutdown the aircon when the temp is above 18, but if it drops below 18, heat back up to 20 then switch off again – thus only running the fans when actively heating but still ensuring the house stays warm. So no breezes other than when heating. The system has this with “night setback” but it just turns on if it gets below a threshold, it doesn’t then turn off again once it’s at a comfortable level.
So aside from the remaining automation work, project complete! We are super happy with this solution, it’s completely changed the liveability of the property during winter and it’s an upgrade I would absolutely make to any other property that I ever buy in future or recommend to anyone else living in our climate here in NZ.
It’s not a cheap solution – expect to spend $15-20k NZD for a 3-4 bedroom home, although it will vary considerably based on sizing and installer effort needed. Like most home upgrades, labour is a huge component of the ultimate bill. Our final bill came in around $22k, but this also included the Lossnay ventilation unit.
There’s also the electrical cost to operate. This one is super subjective since it depends on your usage patterns, house, etc. Our first winter month bill at ~$450 NZD seemed super high, but when we compared with previous years, it was only 30% more and instead of having two rooms barely liveable, we got an entire house that was comfortable. In fact it’s efficient enough that we’re likely to still come in just on or under the 8,000 kWh yearly low user consumption, given that our hot water is currently gas. Once we go full electric with our hot water, we will probably surpass that and need to go to the standard plan (cheaper per kWh rate, higher line charges).
I’m expecting to get 15 years lifespan on the system, maybe longer. At 15 years, it’s essentially $1,460 per year deprecation for the asset, which isn’t too bad for the level of comfort it provides. If we get longer, or can refurbish to extend beyond that period, even better. It’s also worth noting that even if the mechanical components need replacing at their end of life, we have all the ducting, piping, electrical etc already installed which would be reusable, making a replacement project at it’s EOL considerably cheaper than a new installation given how much of the cost is the labour doing ducting runs, cutting holes, etc.
Whilst there are many other reputable brands out there, we went with the Mitsubishi offering for two main reasons.
It had an IP module (“WiFi control”) available. If you’re buying a unit, make sure to research this closely, not every vendor has one and you don’t want to get burnt with a system that’s extremely difficult to get integrated into your wider smart home.
The integration with the ventilation product ensured that we could get a single vendor solution for the complete system, rather than trying to mix one vendor’s ventilation system with another vendor’s heat pump system and having to figure out which one was at fault if they didn’t cooperate nicely. This may depend on who your installer is as well, ours only did the one ventilation product, so kinda made the choice easy.
Having seen the effort and complexity that went into this installation, I’m glad I got the pros to do it. It would have taken ages to do by myself over weekends, etc and there’s a number of specialist steps (eg filling the refrigerant lines with gas) which are non-trivial plus just the experience of knowing how to size and setup the ducting runs appropriately for the property. So I’d recommend staying away from a DIY project on this one, despite the temptation given the costs involved. A good friend went through a project to do most of the work on his own install himself and it ultimately didn’t save as much as expected and created a number of headaches along the way.
I’ve been learning a bit of Swift lately in order to write an iOS app for my alarm system. I’m not very good at it yet, but figured I’d write some notes to help anyone else playing with the murky world of Firebase Cloud Messaging/FCM and iOS.
One of the key parts of the design is that I wanted the alarm app and the alarm server to communicate directly with each other without needing public facing endpoints, rather than the conventional design when the app interacts via an HTTP API.
The intention of this design is that it means I can dump all the alarm software onto a small embedded computer and as long as that computer has outbound internet access, it just works™️. No headaches about discovering the endpoint of the service and much more simplified security as there’s no public-facing web server.
Given I need to deliver push notifications to the app, I implemented Google Firebase Cloud Messaging (FCM) – formerly GCM – for push delivery to both iOS and Android apps.
Whilst FCM is commonly used for pushing to devices, it also supports pushing messages back upstream to the server from the device. In order to do this, the server must be implemented as an XMPP server and the FCM SDK be embedded into the app.
The server was reasonably straight forwards, I’ve written a small Java daemon that uses a reference XMPP client implementation and wraps some additional logic to work with HowAlarming.
Firstly, it’s important to have some logic in place to handle/report back if a message can not be sent upstream – otherwise you have no way to tell if it’s worked. To do this in swift, I added a notification observer for .MessagingSendError which is thrown by the FCM SDK if it’s unable to send upstream.
class AppDelegate: UIResponder, UIApplicationDelegate, MessagingDelegate {

 func application(_ application: UIApplication, didFinishLaunchingWithOptions launchOptions: [UIApplicationLaunchOptionsKey: Any]?) -> Bool {
   ...
   // Trigger if we fail to send a message upstream for any reason.
   NotificationCenter.default.addObserver(self, selector: #selector(onMessagingUpstreamFailure(_:)), name: .MessagingSendError, object: nil)
   ...
 }

 @objc
 func onMessagingUpstreamFailure(_ notification: Notification) {
   // FCM tends not to give us any kind of useful message here, but
   // at least we now know it failed for when we start debugging it.
   print("A failure occurred when attempting to send a message upstream via FCM")
 }
}
Unfortunately I’m yet to see a useful error code back from FCM in response to any failures to send message upstream – seem to just get back a 501 error to anything that has gone wrong which isn’t overly helpful… especially since in web programming land, any 5xx series error implies it’s the remote server’s fault rather than the client’s.
Getting the GCM Sender ID
In order to send messages upstream, you need the GCM Sender ID. This is available in the GoogleService-Info.plist file that is included in the app build, but I couldn’t figure out a way to extract this easily from the FCM SDK. There probably is a better/nice way of doing this, but the following hack works:
// Here we are extracting out the GCM SENDER ID from the Google
// plist file. There used to be an easy way to get this with GCM, but
// it's non-obvious with FCM so here's a hacky approach instead.
if let path = Bundle.main.path(forResource: "GoogleService-Info", ofType: "plist") {
  let dictRoot = NSDictionary(contentsOfFile: path)
  if let dict = dictRoot {
    if let gcmSenderId = dict["GCM_SENDER_ID"] as? String {
       self.gcmSenderId = gcmSenderId // make available on AppDelegate to whole app
    }
  }
}
And yes, although we’re all about FCM now, this part hasn’t been rebranded from the old GCM product, so enjoy having yet another acronym in your app.
Ensuring the FCM direct channel is established
Finally the biggest cause I had for upstream message delivery failing, is that I was often trying to send an upstream message before FCM had finished establishing the direct channel.
This happens for you automatically by the SDK whenever the app is loaded into foreground, provided that you have shouldEstablishDirectChannel set to true. This can take up to several seconds after application launch for it to actually complete – which means if you try to send upstream too early, the connection isn’t ready, and your send fails with an obscure 501 error.
The best solution I found was to use an observer to listen to .MessagingConnectionStateChanged which is triggered whenever the FCM direct channel connects or disconnects. By listening to this notification, you know when FCM is ready and capable of delivering upstream messages.
An additional bonus of this observer, is that when it indicates the FCM direct channel is established, by that time the FCM token for the device is available to your app to use if needed.
So my approach is to:
Setup FCM with shouldEstablishDirectChannel set to true (otherwise you won’t be going upstream at all!).
Setup an observer on .MessagingConnectionStateChanged
When triggered, use Messaging.messaging().isDirectChannelEstablished to see if we have a connection ready for us to use.
If so, pull the FCM token (device token) and the GCM Sender ID and retain in AppDelegate for other parts of the app to use at any point.
Dispatch the message to upstream with whatever you want in messageData.
My implementation looks a bit like this:
class AppDelegate: UIResponder, UIApplicationDelegate, MessagingDelegate {

 func application(_ application: UIApplication, didFinishLaunchingWithOptions launchOptions: [UIApplicationLaunchOptionsKey: Any]?) -> Bool {
  ...
  // Configure FCM and other Firebase APIs with a single call.
  FirebaseApp.configure()

  // Setup FCM messaging
  Messaging.messaging().delegate = self
  Messaging.messaging().shouldEstablishDirectChannel = true

  // Trigger when FCM establishes it's direct connection. We want to know this to avoid race conditions where we
  // try to post upstream messages before the direct connection is ready... which kind of sucks.
  NotificationCenter.default.addObserver(self, selector: #selector(onMessagingDirectChannelStateChanged(_:)), name: .MessagingConnectionStateChanged, object: nil)
  ...
 }

 @objc
 func onMessagingDirectChannelStateChanged(_ notification: Notification) {
  // This is our own function listen for the direct connection to be established.
  print("Is FCM Direct Channel Established: \(Messaging.messaging().isDirectChannelEstablished)")

  if (Messaging.messaging().isDirectChannelEstablished) {
   // Set the FCM token. Given that a direct channel has been established, it kind of implies that this
   // must be available to us..
   if self.registrationToken == nil {
    if let fcmToken = Messaging.messaging().fcmToken {
     self.registrationToken = fcmToken
     print("Firebase registration token: \(fcmToken)")
    }
   }

   // Here we are extracting out the GCM SENDER ID from the Google PList file. There used to be an easy way
   // to get this with GCM, but it's non-obvious with FCM so we're just going to read the plist file.
   if let path = Bundle.main.path(forResource: "GoogleService-Info", ofType: "plist") {
    let dictRoot = NSDictionary(contentsOfFile: path)
     if let dict = dictRoot {
      if let gcmSenderId = dict["GCM_SENDER_ID"] as? String {
       self.gcmSenderID = gcmSenderId
     }
    }
   }

  // Send an upstream message
  let messageId = ProcessInfo().globallyUniqueString
  let messageData: [String: String] = [
   "registration_token": self.registrationToken!, // In my use case, I want to know which device sent us the message
   "marco": "polo"
  ]
  let messageTo: String = self.gcmSenderID! + "@gcm.googleapis.com"
  let ttl: Int64 = 0 // Seconds. 0 means "do immediately or throw away"

  print("Sending message to FCM server: \(messageTo)")

  Messaging.messaging().sendMessage(messageData, to: messageTo, withMessageID: messageId, timeToLive: ttl)
  }
 }

 ...
}
It’s been an interesting exercise – I wouldn’t particularly recommend this architecture for anyone building real world apps, the main headaches I ran into were:
FCM SDK just seems a bit buggy. I had a lot of trouble with the GCM SDK and the move to FCM did improve stuff a bit, but there’s still a number of issues that occur from time to time. For example: occasionally a FCM Direct Channel isn’t established for no clear reason until the app is terminated and restarted.
Needing to do things like making sure FCM Direct Channel is ready before sending upstream messages should probably be handled transparently by the SDK rather than by the app developer.
I have still yet to get background code execution on notifications working properly. I get the push notification without a problem, but seem to be unable to trigger my app to execute code even with content-available == 1 . Maybe a bug in my code, or FCM might be complicating the mix in some way, vs using pure APNS. Probably my code.
It’s tricky using FCM messages alone to populate the app data, occasionally have issues such as messages arriving out of order, not arriving at all, or occasionally ending up with duplicates. This requires the app code to process, sort and re-populate the table view controller which isn’t a lot of fun. I suspect it would be a lot easier to simply re-populate the view controller on load from an HTTP endpoint and simply use FCM messages to trigger refreshes of the data if the user taps on a notification.
So my view for other projects in future would be to use FCM purely for server->app message delivery (ie: “tell the user there’s a reason to open the app”) and then rely entirely on a classic app client and HTTP API model for all further interactions back to the server.
Being tethered to one’s device via a cable has long been an annoyance and with Apple finally releasing their AirPods product, I decided to take the risk of a first adopter of a Gen1 product and ordered a pair.
I seemed to be lucky and had mine arrive on 19th December – I suspect Apple allocated various amounts of stock per region and NZ didn’t have the same level of competition for the early shipments as the US did. Looks like the wait time is now around 6 weeks for new orders.
Fortunately AirPods do not damage my unstoppable sex appeal.
There’s been a heap of reviews online, but I wanted to write a bit about them myself, because frankly, they’re just brilliant and probably the best purchase I’ve made this year.
So why are they so good?
Extremely comfortable – I found them a lot lighter than I expected them to be and they stay in my ears properly without any discomfort or looseness. This is with the caveat that the old wired EarPods also fitted me well, I’m sure that this won’t be the case for everyone.
Having music automatically pause when you remove them is just awesome. It’s an example of the Apple of old making intuitive tech that you don’t need to think about controlling, because it just does what it should. Take AirPods out? Probably don’t want that track to keep playing…
The battery life and charging is pretty good. I’m getting the stated 4-5 hours life per charge and of course the carry case gives you another 24 hours or so of charge.
The freedom of not being attached by a cord is extremely liberating. At one point I forgot I was tethered to my iMac and ended up going for a walk down to the other end of the house before it disconnected. I could easily see myself forgetting they’re in and getting into the shower one day by mistake.
The quality is “good enough”. Sure, you can get better audio through other products, but when it comes to earbuds, you’re going to compromise the quality in exchange for form factor and portability. For the sort of casual listening that I’m doing, it meets my expectations happily enough.
Easy switching between devices, something that traditional bluetooth products tended to do pretty badly.
Connectivity seems pretty strong. I’ve never had the audio dropout whilst listening, infact when I left them in and walked around the house, I had audio going through the walls.
They’re not perfect – not that I was expecting them to be given it’s a first-gen product from Apple which generally always means a few teething issues:
Sometimes the AirPods simply aren’t discoverable by my iMac, and even when they are, the connection method can be hit and miss – sometimes I can just click on the volume icon and select them, other times I have to go into the Bluetooth menu and select from there. Personally I’ll blame MacOS/iMac for this, I’ve had other Bluetooth headaches with it in the past and I suspect it’s just not that well tested and implemented for anything more than the wireless keyboards/mice they ship with them. For example, other than the AirPods issues, my iMac often fails to see my iPhone or iPad when they’re in the near vicinity to do iOS handoff.
At one point a phone call decided to drop from the AirPods and revert to the on-phone speaker without any clear reason/cause.
I managed to end up with one AirPod unpairing itself from the phone, so I had mono audio until I re-selected AirPods again from the phone’s output menu.
The “dental floss” charging and storage case is pretty clever as well, although I find it a bit odd that Apple didn’t emboss it with the Apple logo like they normally do for all their other products.
That being said, these issues are not frequent and I expect them to be improved with software updates over time.
If I had any feature changes I’d like to see for Gen2, it would be for Apple to:
Insert a touch sensor on the AirPods to allow changing of volume by swiping up/down on the AirPod. That being said, using the phone volume rocker or the keyboard to change volume isn’t a big issue. The AirPods also have a “double-tap” detection feature that can either launch Siri or Play/Pause music.
Bring up the waterproofing to a level that allows their use in the shower. Whilst there are reports on the internet of AirPods surviving washing machine cycles already, I’d love a version that’s properly rated for water exposure that could truely go anywhere.
Are they worth the NZ $269? I think so – sure, I’d be happy if they could drop the price and include a pair with every iPhone sold, but I think it’s a remarkable effort of technology miniaturisation that’s resulted in a high quality product that produces a fantastic user experience. That generally doesn’t come cheap and I feel that given the cost of other brand name wireless audio products, AirPods are reasonably priced.
I’d maybe re-consider buying them if I was using a non-Apple ecosystem (which limits the nice peering features, although they should work with any Bluetooth device) or if I was only going to use it with MacOS rather than iOS devices. With less need for the nice peering and portability features, third party offerings become a bit more attractive.
Having recently changed jobs (Fairfax/Stuff -> Sailthru/Carnival), the timing worked out so that I managed to get one of the first new USB-C 2016 Macbook Pros. A few people keep asking me about the dongle situation, so figured I’d just blog about the machine.
Some key things to keep in mind:
I don’t need to attach much in the way of USB devices. Essentially I want my screen and input devices when docked at the office, but I have no SD cards and don’t generally swap anything with USB flash drives.
My main use case is pushing bits to/from the cloud. Eg web browser, terminals, some IDE usage. Probably the heaviest task I’d throw at it would be running something like IntelliJ or Xcode.
I value portability more than performance.
If Apple still made cinema displays, this would be a fully Apple H/W stack
Having used it for about 1 month now, it’s a brilliant unit. Probably the biggest things I love about it are:
The weight – at 1.37Kg, it’s essentially the same weight as the 13″ Macbook Air, but packs a lot more grunt. And having come from the 15″ Macbook Pro, it’s a huge size and weight reduction, yet still extremely usable.
USB-C. I know some people are going to hate the new connector, but this is the first laptop that literally only requires a single connector to dock – power, video data – one plug.
The larger touch pad is a nice addition. And even with my large man hands, I haven’t had any issues when typing, Apple seems to have figured out how to do palm detection properly.
It looks and feels amazing, loving the space gray finish. The last generation Macbooks were beautiful machines, but this bumps it up a notch.
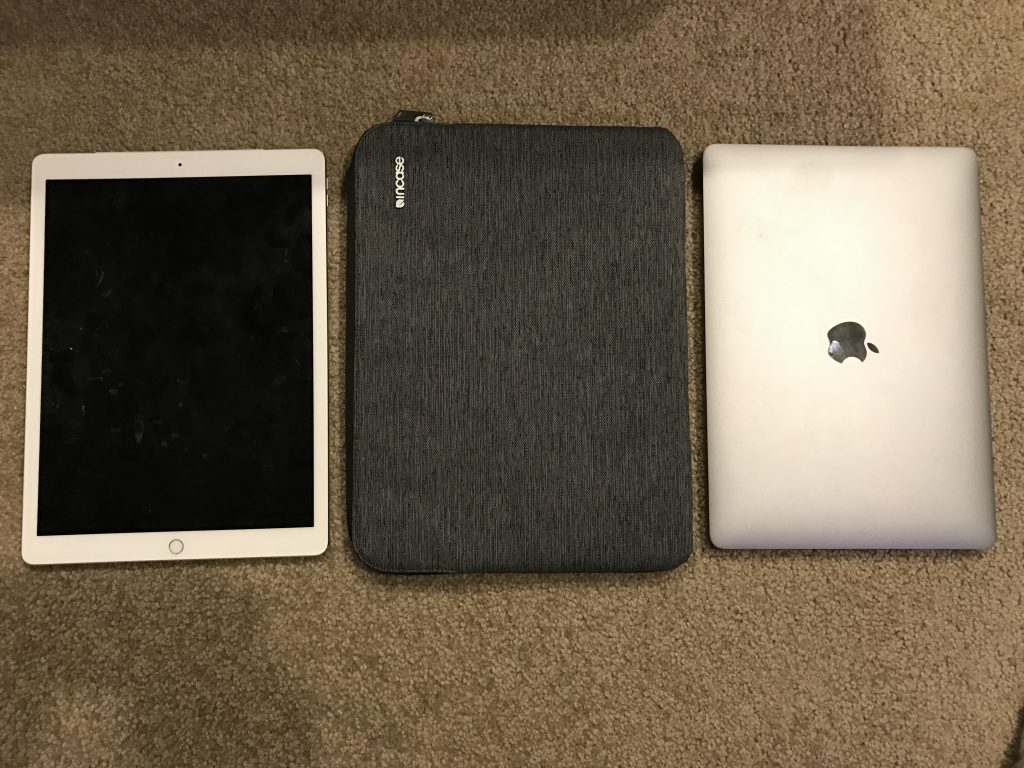
The new 13″ is so slim and light, it fits perfectly into my iPad Pro 12″ sleeve. Don’t bother buying the sleeves intended for the older 13″ models, they’re way too big.
One thing to note is that the one I have is the entry level model. This brings a few differences over the other models:
This model is the only one to lack the new Touchbar. In my case, I use the physical ESC key a lot and don’t have a lot of use for the gimmick. I’d have preferred if Apple had made the Touchbar an optional additional for all models so any level machine could opt in/out.
As the entry level model, it features only 2x USB-C/Thunderbolt-3 ports. All Touchbar enabled models feature 4x. If you are like me and only want to dock, generally the 2x ports only issue isn’t a biggie since you’ll have one spare port, but it will be an issue if you want to drive multiple displays. If you intend to attach 2+ external displays, I’d recommend getting the model with 4x ports.
All the 13″ models feature Intel graphics. The larger 15″ model ships with dual Intel and AMD graphics that swap based on activity and power usage. Now this does mean the 13″ is slower at graphics, but I’m also hearing anecdotally that some users of the 15″ are having graphics stability issues with the new AMD drivers – I’ve had no stability issues of any kind with this new machine.
The 2.0Ghz i5 isn’t the fastest CPU. That being said, I only really notice it when doing things like compiles (brew, Xcode, etc) which my 4Ghz i7 at home would crunch through much faster. As compiling things isn’t a common requirement for my work, it’s not an issue for me.
It’s not without it’s problems of course – “donglegate” is an issue, but the extend of the issue depends on your requirements.
On the plus side, the one adaptor you won’t have to buy is headphones – all models still include the 3.5mm headphone jack. One caveat however, they are now purely analogue audio, the built in toslink port has been abandoned.
Whilst there are a huge pile of dongles available, I’d say the essential two dongles you must have are:
The USB-C to USB adaptor. If you ever need to connect USB devices when away from desk, you’ll want this one in your bag.
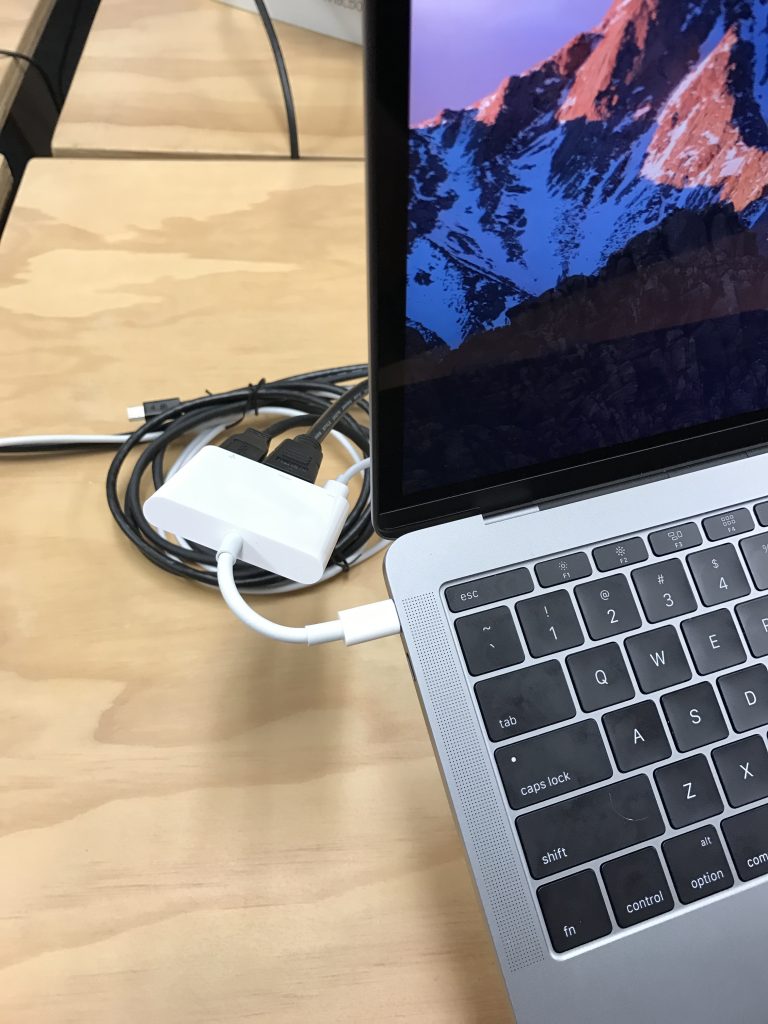
The USB-C Digital A/V adaptor. Unless you are getting a native USB-C screen, this is the only official Apple adaptor that supports a digital display. This specific adaptor provides 1x USB2, 1x HDMI and 1x USB-C for charging.
I have some concerns about the digital A/V adaptor. Firstly I’m not sure about is whether it can drive a 4K panel, eg if it’s HDMI 2.0 or not. I’m driving a 25″ Dell U2515H at 2560×1440 at 60Hz happily, but haven’t got anything higher resolution to check with.
It also feels like it’s not going to tolerate a whole lot of flexing and unflexing so I’ll be a bit wary about it’s longevity if travelling with it to connect to things all over the place.
The USB-C Digital AV adaptor. At my desk I have USB and HDMI feeding into the LCD (which has it’s own USB hub) and power coming from the Apple-supplied USB-C charger.
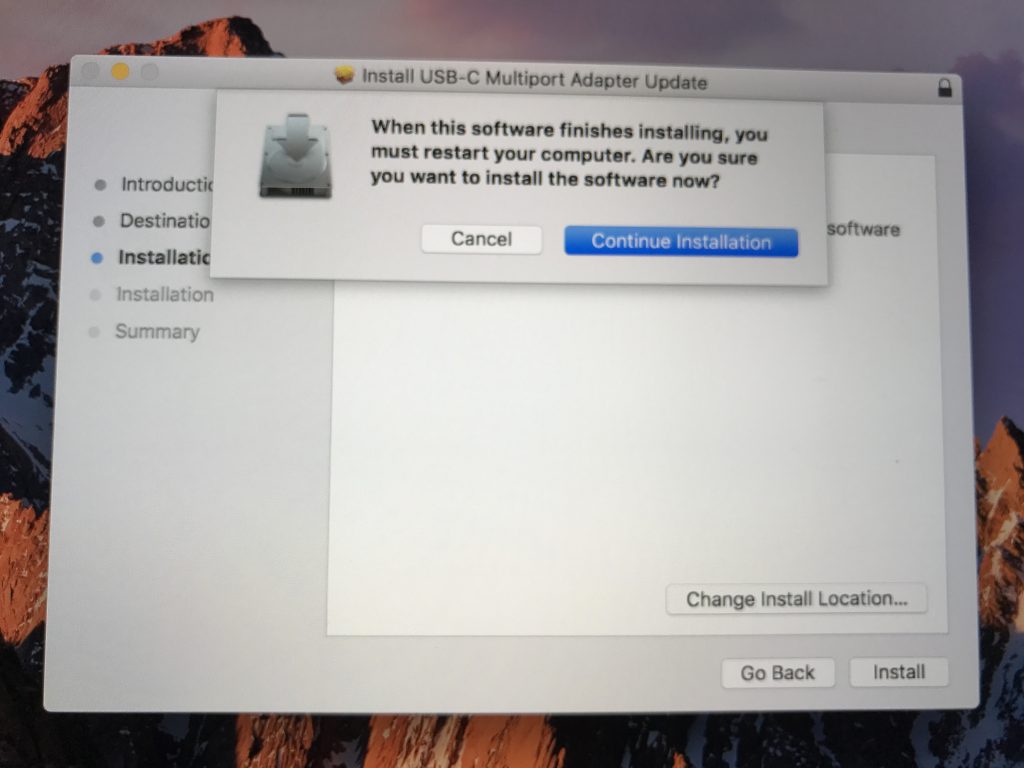
Updating and rebooting for a *dongle update*? The future is bleak.
Oh and if you want a DisplayPort version – there isn’t an official one. And this is where things get a little crazy.
For years all of Apple’s laptops have shipped with combined Thunderbolt 1/2 and Mini-Display ports. These ports take either device, but are technically different protocols that share a single physical socket. The new Macbook Pro doesn’t have any of these sockets. And there’s no USB-C to Mini Display port adaptor sold by Apple.
Apple does sell the “Thunderbolt 3 (USB-C) to Thunderbolt 2 Adaptor” but this is distinctly different to the port on the older laptops, in that it only supports Thunderbolt 2 devices – there is no support for Mini DisplayPort, even though the socket looks the same.
So this adaptor is useless for you, unless you legitimately have Thunderbolt 2 devices you wish to continue using – but these tend to be a minority of the Apple user base whom purchased things like disk arrays or the Apple Cinema Display (which is Thunderbolt, not Mini DisplayPort).
If you want to connect directly to a DisplayPort screen, there are third party cables available which will do so – just remember they will consume a whole USB-C port and not provide data and power. So adding 2x screens using these sorts of adaptors to the entry level Macbook isn’t possible since you’ll have no data ports and no power left! The 4x port machines make it more feasible to attach multiple displays and use the remaining ports for other use cases.
The other option is one of the various third party USB-C/Thunderbolt-3 docks. I’d recommend caution here however, there are a number on the market that doesn’t work properly with MacOS (made for Windows boxes) and a lot of crap “first to market” type offerings that aren’t really any good.
My recommendation is that if you buy one of these machines, you should ideally make the investment in a new native USB-C 4K or 5K panel when you purchase this machine. Apple recommend two different LG models which look pretty good:
There is no such thing as the Apple Cinema Display any more, but these would be their logical equivalent now. These screens connect via USB-C, power your laptop (so no need to spend more on a charger, you can use the one that ships with the laptop as your carry around one) and features a 3x USB-C hub in the back of the screen.
If you’re wanting to do multiple displays, note that there are some limits:
13″ Macbook Pros can drive a single 5K panel or 2x 4K panels.
15″ Macbook Pros can drive two 5K panels or 4x 4K panels.
Plus remember if buying the entry level 13″, having two screens would mean no spare ports at all on the unit – so it would be vital to make sure the screens can power the machine and provide additional ports.
Also be aware that just because the GPU can drive this many panels, doesn’t mean it can drive them particularly well – don’t expect any 4K gaming for example. My high spec iMac 5k struggles at times to drive it’s one panel using an AMD Radeon card, so I’m dubious about the Intel chipset in the new Macbooks being able to drive 2x 4K panels.
So recommendations:
If you need maximum portability, I’d still recommend going for the Macbook 13″ Pro over the Macbook 12″ Retina. It’s slightly heaver (1.37kg vs 0.92kg) and slightly more expensive (NZ $2499 vs $2199), but the performance is far better and the portability is almost the same. The other big plus, is that the USB-C in the Macbook Pro is also a Thunderbolt-3 port, which gives you much better future proofing.
If you need a solid work horse for a DevOps engineer, the base Macbook Pro 13″ model is fine. It’s a good size for carrying around for oncall and 16GB of RAM with a Core i5 2.0Ghz is perfectly adequate for local terminals, IDEs and browsers. Anything needing more grunt can get pushed to the cloud.
No matter what model you buy, bump it to 16GB RAM. 8GB isn’t going to cut it long term and since you can’t expand later, you’ll get better lifespan by going to max RAM now. I’d rate this more worthwhile than buying a better CPU (don’t really need it for most workloads) or more SSD (can never get enough SSD anyway, so just overflow into iCloud).
If you some how can’t live with only 16GB of RAM and need 32GB you’re kind of stuck. But this is a problem across most portable lines from competitors currently, 32GB RAM is too power hungry with the current gen CPUs and memory. If you need that much memory locally you’ll have to look at the iMac 5k (pretty nice) or the Mac Pro series (bit dated/overly expensive) to get it on a Mac.
So is it a good machine? I think so. I feel the main problem is that the machine is ahead of the rest of the market, which means lots of adaptors and pain until things catch up and everything is USB-C. Apple themselves aren’t even ready for this machine, their current flagship iPhone still ships with an older USB 3 connector rather than a USB-C one, which leads to an amusing situation where the current gen iPhone and current gen Macbook Pro can’t be connected without first purchasing a dongle.
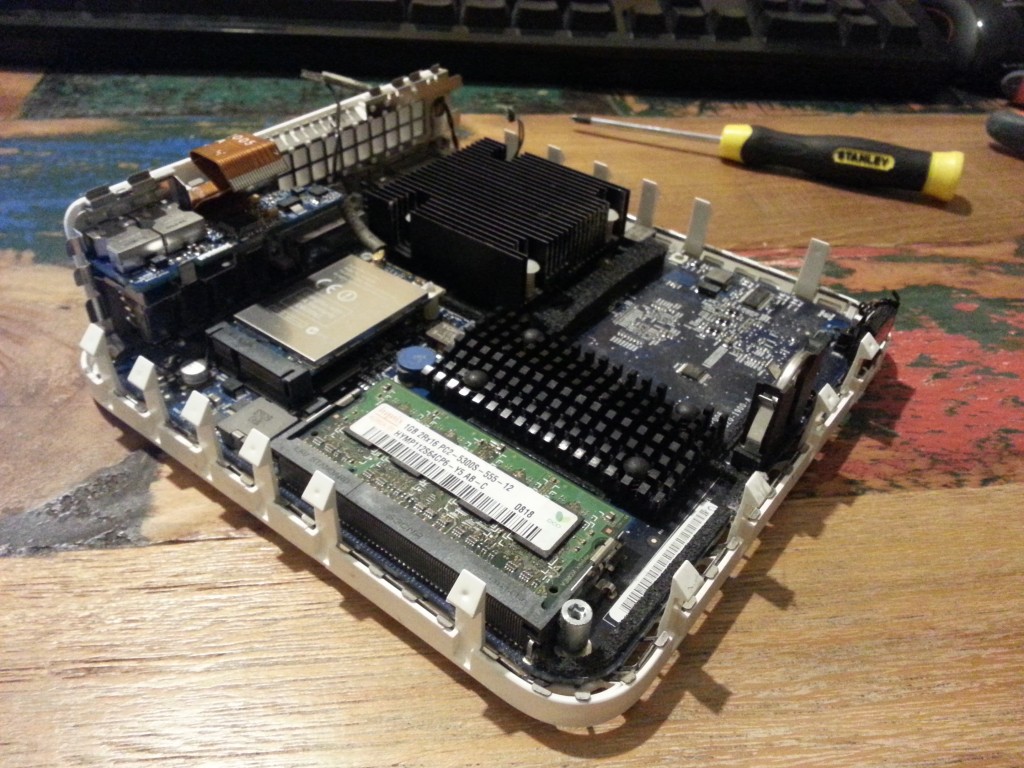
The first generation Intel Apple Mac Mini (Macmini1,1) has a special place as the best bang-for-buck system that I’ve ever purchased.
Purchased for around $1k NZD in 2006, it did a stint as a much more sleep-friendly server back after I started my first job and was living at my parents house. It then went on to become my primary desktop for a couple of years in conjunction with my laptop. And finally it transitioned into a media centre and spent a number of years driving the TV and handling long running downloads. It even survived getting sent over to Sydney and running non-stop in the hot blazing hell inside my apartment there.
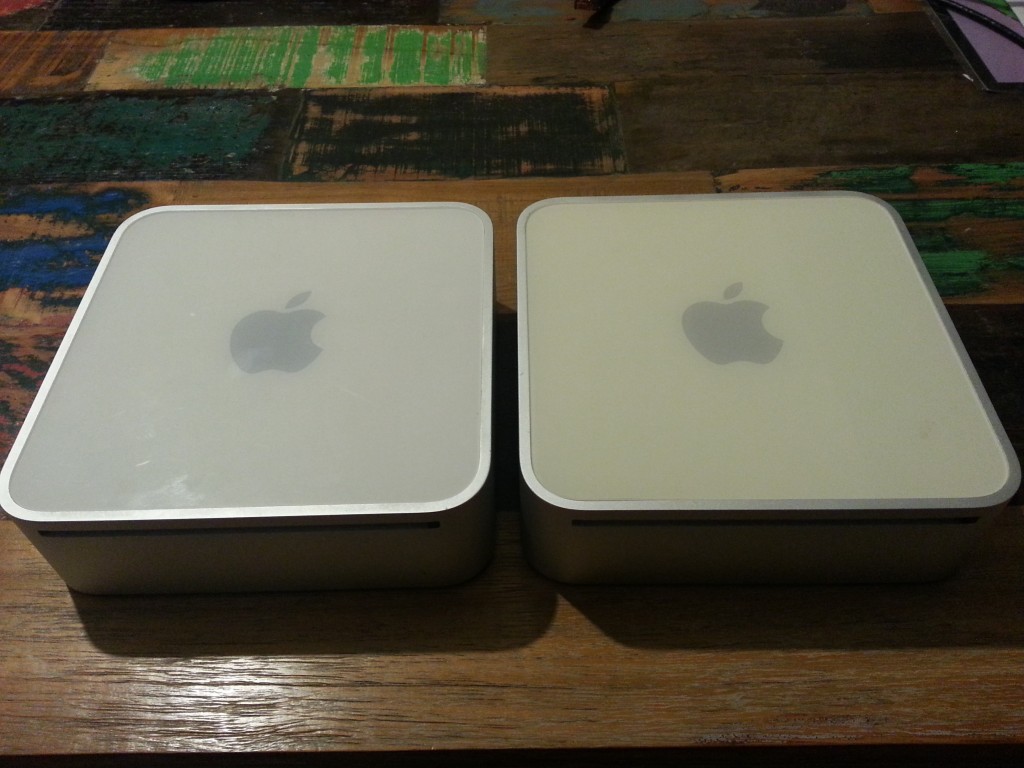
My long term relationship on the left and a more recent stray I obtained. Clearly mine takes after it’s owner and hasn’t seen the sun much.
Having now reached it’s 10th birthday, it’s started to show it’s age. Whilst it handles 720p content without an issue, it’s now hit and miss whether 1080p H264 content will work without unacceptable jitter.
It’s previously undergone a few upgrades. I bumped it from the original 512MB RAM to 2GB (the max) years ago and it’s had it’s 60GB hard drive replaced with a more modern 500GB model. But neither of these will help much with the video decoding performance.
Given we had recently obtained something that the people at Samsung consider a “Smart” TV, I decided to replace the Mac Mini with the Plex client running natively on the TV and recycle the Mac Mini into a new role as a small server to potentially replace a much more power hungry AMD Phenom II system that performs somewhat basic storage and network tasks.
Unfortunately this isn’t as simple as it sounds. The first gen Intel Mac Minis arrived on the scene just a bit too soon for 64-bit CPUs and so are packing the original Intel Core Solo or Intel Core Duo (1 or 2 cores respectively) which aren’t clocked particularly high and are only 32bit capable.
Whilst GNU/Linux *can* run on this, supported versions of MacOS X certainly can’t. The last MacOS version supported on these devices is Mac OS X 10.6.8 “Snow Leopard” 32-bit and the majority of app developers for MacOS have decided to set their minimum supported platform at 64-bit MacOS X 10.7.5 “Lion” so they can drop the old 32-bit stuff – this includes the popular Chrome browser which now only provides 64-built builds. Basically OS X Snow Leopard is the Win XP of the MacOS world.
Even running 32-bit GNU/Linux can be an exercise in frustration. Some distributions now only ship 64-bit builds and proprietary software vendors don’t always bother releasing 32-bit builds of their apps limiting what you can run on them.
On the plus side, this earlier generation of Apple machines was before Apple decided to start soldering everything together which means not only can you replace the RAM, storage, drives, WiFi card, you can also replace the CPU itself since it’s socketed!
Essentially you can replace the CPUs in the Macmini1,1 (2006) or Macmini2,1 (2007) models with any chip compatible with Intel Socket M, the highest spec model available being the Intel Core 2 Duo 2.33 Ghz T7600.
At ~$60NZD for the T7600, it was a bit more than I wanted to spend for a decade old CPU. However moving down slightly to the T7400, the second hand price drops to around ~$20NZD per CPU with international shipping included. And at 2.177Ghz it’s no slouch, especially when compared to the original 1.5Ghz single core CPU.
It took a while to get here, I used this seller after the first seller never delivered the item and refunded me when asked about it. One of my CPUs also arrived with a bent pin, so there was some rather cold sweat moments straightening the tiny pin with a screw driver. But I guess this is what you get for buying decade old CPUs from a mysterious internet trader.
I was surprised at the lack of dust inside the unit given it’s long life, even the fan duct was remarkably dust-free.
The replacement is a bit of a pain, you have to strip the Mac Mini right down and take the motherboard out, but it’s not the hardest upgrade I’ve ever had to do – dealing with cheap $100 cut-your-hand-open PC cases were much nastier than the well designed internals of the Mac. The only real tricky bit is the addition and removal of the heatsink which worked best with a second person helping remove the plastic pegs.
I did it using a regular putty knife, needle-nose pliers, phillips & flat head screw drivers and one Torx screw driver to deal with a single T10 screw that differs from the rest of the ones in the unit.
Recommend testing this things *before* putting the main case back together, they’re a pain to open back up if it doesn’t work first run.
The end result is an upgrade from a 1.5 Ghz single core 32bit CPU to 2.17 Ghz dual core 64bit CPU – whilst it won’t hold much to a modern i7, it will certainly be able to crunch video and server tasks quite happily.
The next problem was getting an OS on there.
This CPU upgrade opens up new options for MacOS fans, if you hack the installer a bit you can get MacOS X 10.7.5 “Lion” on there which gives you a 64-bit OS that can still run much of the current software that’s available. You can’t go past Lion however, since the support for the Intel GMA 950 GPU was dropped in later versions of MacOS.
Given I want them to run as servers, GNU/Linux is the only logical choice. The only issue was booting it… it seems they don’t support booting from USB flash drives.
These Mac Minis really did fall into a generational gap. Modern enough to have EFI and no legacy ports, yet old enough to be 32-bit and lack support for booting from USB. I wasn’t even sure if I would even be able to boot 64-bit Linux with a 32-bit EFI…
Given it doesn’t boot from USB and I didn’t have any firewire devices lying around to try booting from, I fell back to the joys of optical media. This was harder than it sounds given I don’t have any media and barely any working drives, but my colleague thankfully dug up a couple old CD-R for me.
“Daddy are those shiny things floppy disks?”
I also quickly remembered why we all moved on from optical media. My first burn appeared to succeed but crashed trying to load the bootloader. And then refused to eject. Actually, it’s still refusing to eject, so there’s a Debian 8 installer that might just be stuck in there until it’s dying days… The other unit’s optical drive didn’t even work at all, so I couldn’t even do the pain of swapping around hardware to get a working combination.
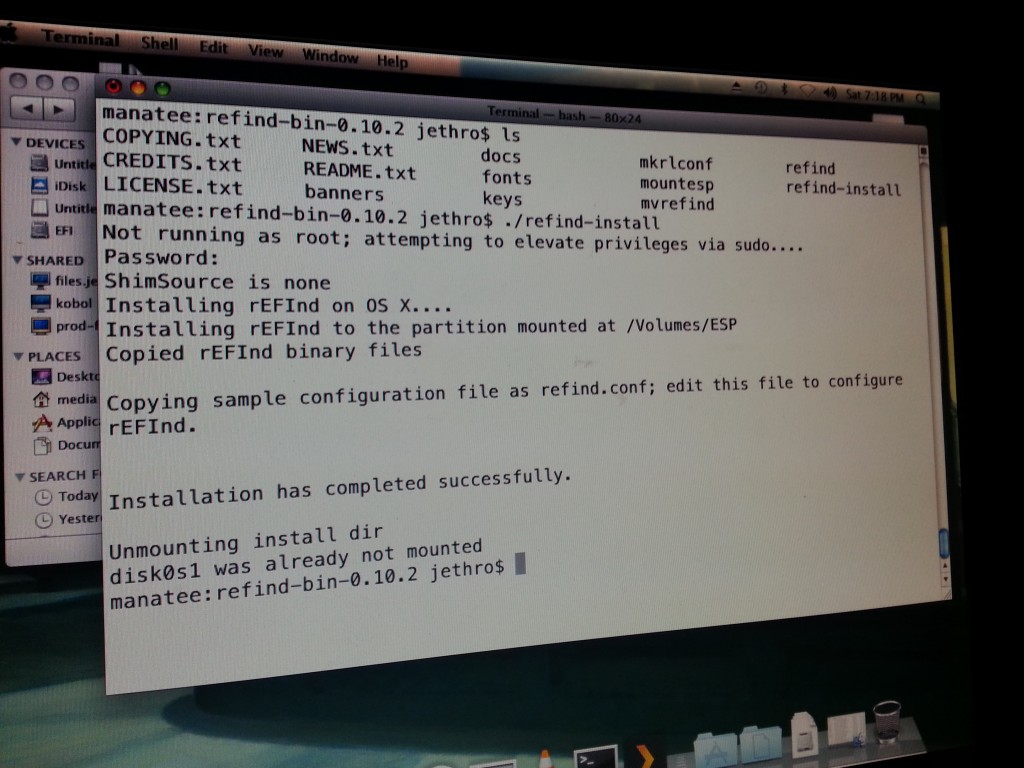
Having exhausted the optional of a old-school CD-based GNU/Linux install, I started digging into ways to boot from another partition on the machine’s hard drive and found a project called rEFInd.
This awesome software is an alternative boot manager for EFI. It differs from a boot loader slightly, in a traditional BIOS -> Boot Loader -> OS world, rEFInd is equivalent to a custom BIOS offering better boot functionality than the OEM vendor.
It works by installing itself into a small FAT partition that lives on the hard disk – it’s probably the easiest low-level tool I’ve ever installed – download, unzip, and run the installer from either MacOS or Linux.
Disturbingly easy from the existing OS X installation
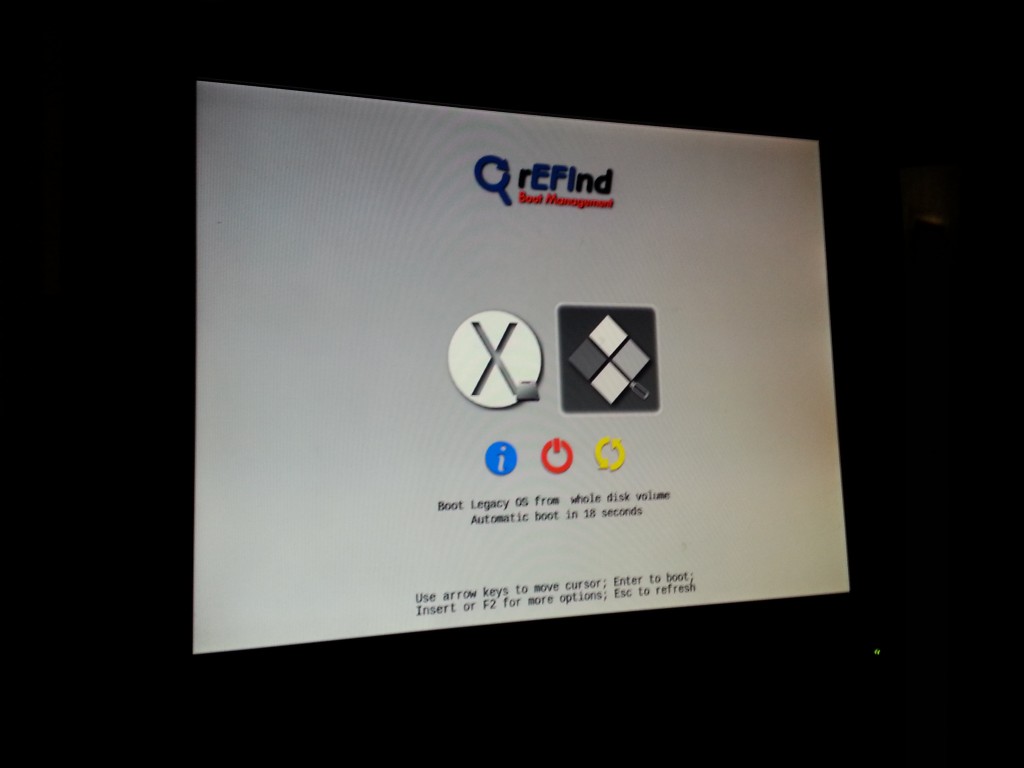
Once installed, rEFInd kicks in at boot and offers the ability to boot from USB flash drives, in addition to the hard drive itself!
The USB flash installer has been detected as “Legacy OS from whole disk volume”.
Yusss, Debian installer booted from USB via rEFInd!
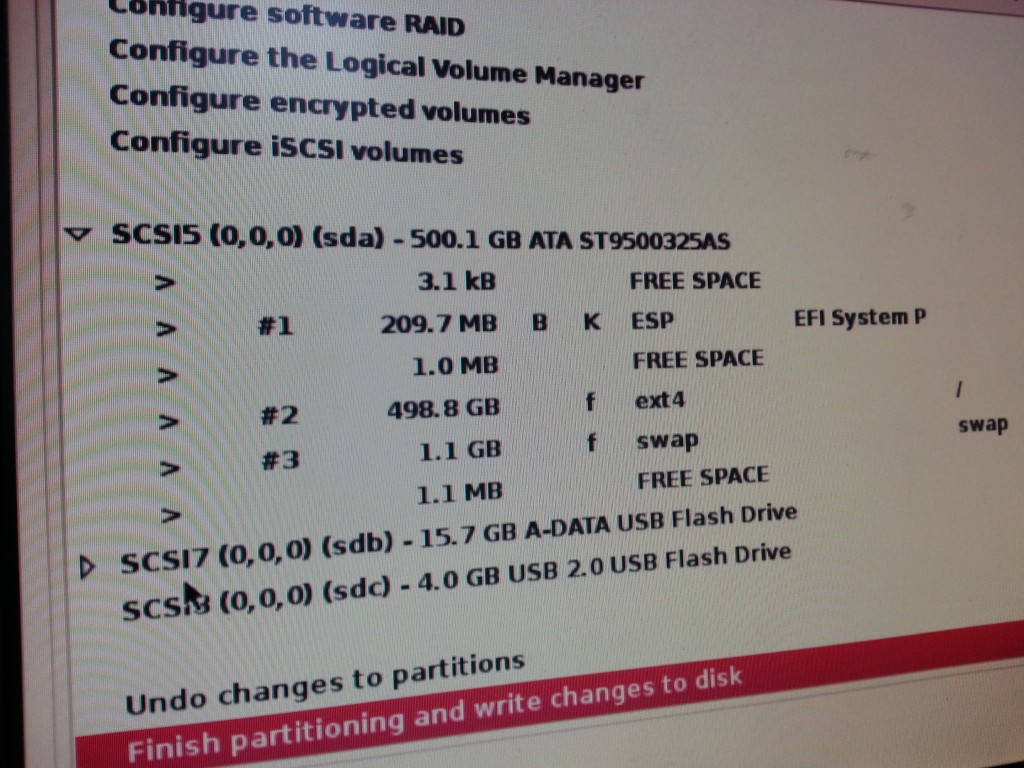
A typical Debian installation followed, only thing I was careful about was not to delete the 209.7MB FAT filesystem used by EFI – I figured I didn’t want to find out what deleting that would mean on a box that was hard enough to boot as it is…
The small < 1MB free space between the partitions here irks me so much, I blame MacOS for aligning the partitions weirdly.
Once installed. rEFInd detected Linux as the OS installed on the hard drive and booted into GRUB and from there the usual Linux boot process works fine.
Launch the penguins!
Final result -2GB RAM, 64bit CPU, delicious delicious GNU/Linux x86_64
I can confirm that both 32bit and 64bit Debian works nicely on this box (I installed 32-bit first by mistake) – so even without doing the CPU upgrade, if you want to get a bit more life out of these early unsupported Mac Minis, they’d happily run a 32-bit Debian desktop so you can enjoy wonders like a properly patched browser and operating system.
Not all other distributions will work – Ubuntu for example don’t include EFI support on their 32-bit installer which will probably cause some headaches. You should be OK with any of the major 64-bit distributions since they tend to always support EFI.
The final joy I ran into is that when I set up the Mac Mini as a headless box, it didn’t boot… it just turned on and never appeared on the network.
Seems that the Mac Minis (even the later unibody generation) have some genius firmware that disables the GPU hardware if no screen is attached, which then messes up most operating systems on it.
The easy fix, is to hack together a fake VGA load by connecting a 100Ω resister between pins 2 and 7 of a DVI-to-VGA adaptor (such as the one that ships with the Mac Mini).
I need to make a tidier/better version of this, but it works!
No idea what engineer thought this was a good feature, but thankfully it’s an easy and cheap fix, especially since I have a box littered with these now-useless adaptors.
The end result is that I now have 2x 64-bit first gen Mac Minis running Debian GNU/Linux for a cost of around $20NZD and some time dismantling/reassembling them.
I’d recommend these small Mac Minis for server purposes, but the NZ second hand prices are still a bit too expensive for their age to buy specifically for this… Once they start going below $100 they’d make reasonable alternatives to something like the Intel NUC or Raspberry Pi for small serving tasks.
The older units aren’t necessarily problem free either. Whilst the build quality is excellent, after 10 years things don’t always work right. Both of my optical drives no longer function properly and one of the Mac Minis has a faulty RAM slot, limiting it to 1GB instead of the usual 2GB.
And of course at 10 years whom knows how much longer they’ll run for – but it’s been a good run so far, so here’s to another 10 years (hopefully)! The real limiting factor is going to be the 1GB/2GB RAM long term.
With a change in job, I recently shifted from my primary work computer being a Lenovo X1 Carbon running GNU/Linux to using an Apple Macbook Pro Retina 15″ running MacOS.
It’s not the first time that I’ve used MacOS as my primary workstation, but I’ve spent the vast majority of my IT life working in a purely GNU/Linux environment so it was interesting having to try and setup my usual working habits and flow with this new platform.
I’m going to do a few blog posts addressing my thoughts and issues with this platform and how I’ve found it compared to my GNU/Linux laptops. I’m going to look at both hardware and software and note down a few fixes and tricks that I’ve learnt along the way.
Part 3: The Apple Input Devices
I’ll freely admit that I’m a complete and total keyboard snob and I’ve been spoilt with quality desktop keyboards (Das Keyboard, IBM Model M) and the best possible laptop keyboard on the market – the classic IBM/Lenovo Thinkpad keyboard (pre-chiclet style).
Keeping this snobbery and bias in mind, I’m bitterly disappointed by the quality of the Apple keyboard. It’s a surprising slip-up by a company that prides itself on perfection and brilliant hardware design, I fear that the keyboard is just an unfortunate casualty of that design-focused mentality.
I have two main issues with this keyboard. Firstly, the shallowness and feeling of the keys, and secondly the layout and key selection.
The shallowness is the biggest issue with the keyboard. Laptops certainly aren’t known for their key travel distance, but there have been a few exceptions to the rule – IBM/Lenovo’s Thinkpad series is widely recognised as featuring one of the better keyboards in the market with decent sized keys, good layout and enough key depth to get a reasonable amount of travel when typing. (Side note: talking about the classic Thinkpad keyboards here… I’m undecided about their new chiclet style keyboards on recent models…)
On the Macbook, the key depth and travel distance is very short, there’s almost no movement when pressing keys and I lose the ability to effectively bounce between the different keys. I personally find that repeatedly doing the small motions needed to type on this keyboard for 4 hours or more causes me physical discomfort in my hands and I fear that if I were to use the Macbook keyboard as my primary computer, I would be looking at long term RSI problems.
Having said that, to be fair to Apple I probably couldn’t handle more than 6-8 hours a day on my Thinkpad keyboard – whilst it’s better than the Apple one, it’s still fundamentally a laptop keyboard with all the limitations it suffers. Realistically, for the amount of time I spend on a computer (12+ hours a day), I require an external keyboard whether it’s plugged into a Macbook, a Thinkpad or some other abomination of typing quality.
The other issue I have with Apple’s keyboard is that despite the large size of the laptop (mine is a 15.6″ unit), they’ve compromised the keyboard layout and removed various useful keys – the ones that I miss the most are home, end, insert, delete, page up and page down, all of which require the use of key combinations to be achieved on the Macbook.
The Thinkpad line has always done pretty well at including these keys, even if they have a VERY annoying habit of moving around their positions with different hardware generations, and their presence on the keyboard is very appreciated when doing terminal work – which for me, is a fast part of my day. It’s a shame that Apple couldn’t have used a bit more of the surface space on the laptop to add some of these keys in.
Overall, if I examine the Macbook keyboard as something I’m only going to use when out of the home/work office, then it’s an acceptable keyboard. I’ve certainly used far worse laptop keyboards and it sure beats tapping away on a tablet touchscreen or using something like the Microsoft Surface foldout keyboards.
And of course both the Thinkpad and the Macbook pale in comparison to a proper external keyboard – as long as I have a decent home/work office external keyboard it’s not too much of a deal breaker, but I’d certainly weigh in the keyboard as a negative if I was considering a machine for a role as a travelling consultant, where I could be spending weeks at a client site with unknown facilities and maybe needing to rely on the laptop itself.
Despite the insistence of some people that the keyboard is the only thing a computer needs, you’ll probably also want to use some kind of cursor moving thing if you want to effectively make use of the MacOS GUI.
The Macbook ships with a large touchpad centered in the middle of the laptop beneath the keyboard. This is a pretty conventional design, although Apple has certainly been pushing the limits on getting the largest possible sized touchpad on a laptop – a trend that other vendors appear to have been following in recent years.
Personally I hold a controversial opinion where I vastly prefer Trackpoint-style pointers on laptops over touchpads. I’m sure that a case could be made to accuse me of Thinkpad fanboyism, but I’ve used and enjoyed Trackpoints on Toshiba, HP and Lenovo computers in the past with great success.
The fundamental reason I prefer the Trackpoint, is that whilst it takes longer to get used to and feels weird at first, once it’s mastered, it’s possible to rapidly jump between typing and cursor moving with minimal effort.
Generally my fingers are resting on keys right next to the Trackpoint, or sometimes even I rest my finger on the Trackpoint itself whilst waiting, so it’s easy to jump between typing and cursoring. Plus on the Thinkpad design, my thumb rests just above the 3-button mouse, which is fantastically convenient.
http://xkcd.com/243/
Whilst the Macbook’s large touchpad is by far the best touchpad I’ve ever used, it still has the fundamental flaw of the layout forcing me to make a large movement to go between the keyboard and the touchpad each time.
This is technically a Macbook air in the picture, but the keyboard and touchpad is the same across the entire product line…. this laptop was closer to my camera. :-)
It also has the issue of then sitting right in the way of my palm, so it took me a while to get used to not hitting the touchpad with my palm whilst typing. I’ve gotten better at this, although it still happens from time to time and does prevent me from resting my palm in my preferred natural position.
Admittedly I am nitpicking. To their credit, Apple has done a far better job of touchpads than most other vendors I’ve ever used. Generally laptop touchpads are too small (you can see how tiny the one on my Thinkpad is – I just disabled it entirely in favour of the Trackpoint) and even vendors who are busy cloning Apple’s design haven’t always gotten the same feel of sturdiness that Apple’s touchpad offers.
The gesture integration with MacOS is also excellent – I’ve found that I’m often using the three-finger swipe to switch between workspaces and the two-finger scrolling is very easy to use when doing web browsing, nicer and more natural feeling than using the cursor keys or a scroll wheel even.
Overall it’s a decent enough machine and beats most other laptop vendors in the market. I’d personally still go for the Thinkpad if all things other than keyboard were identical, simply due to how much I type and code, but the Macbook keyboard and touchpad is an acceptable second place for me and a good option for most general users.
See other posts in this series via the jethro does mac tag as I explore using MacOS after years of GNU/Linux only.
With a change in job, I recently shifted from my primary work computer being a Lenovo X1 Carbon running GNU/Linux to using an Apple Macbook Pro Retina 15″ running MacOS.
It’s not the first time that I’ve used MacOS as my primary workstation, but I’ve spent the vast majority of my IT life working in a purely GNU/Linux environment so it was interesting having to try and setup my usual working habits and flow with this new platform.
I’m going to do a few blog posts addressing my thoughts and issues with this platform and how I’ve found it compared to my GNU/Linux laptops. I’m going to look at both hardware and software and note down a few fixes and tricks that I’ve learnt along the way.
Part 1: The Retina Display
Apple is known for their hardware quality – the Macbook Pro Retina 15″ I am using is a top-of-the-line machine with a whopping Core i7, 16GB of RAM and 512GB SDD, Nvidia GPU and the massive 2880×1800 pixel Retina LCD display. Whilst the hardware is nice, it’s something that can be found with other vendors – what really makes it interesting, is the massive high resolution display.
Shiner than a Thinkpad. But is it just a showoff?
Unfortunately for all the wonderfulness that Retina advertises, it’s given me more grief than happiness so far. My main issue, is how Apple handles this massive high resolution display.
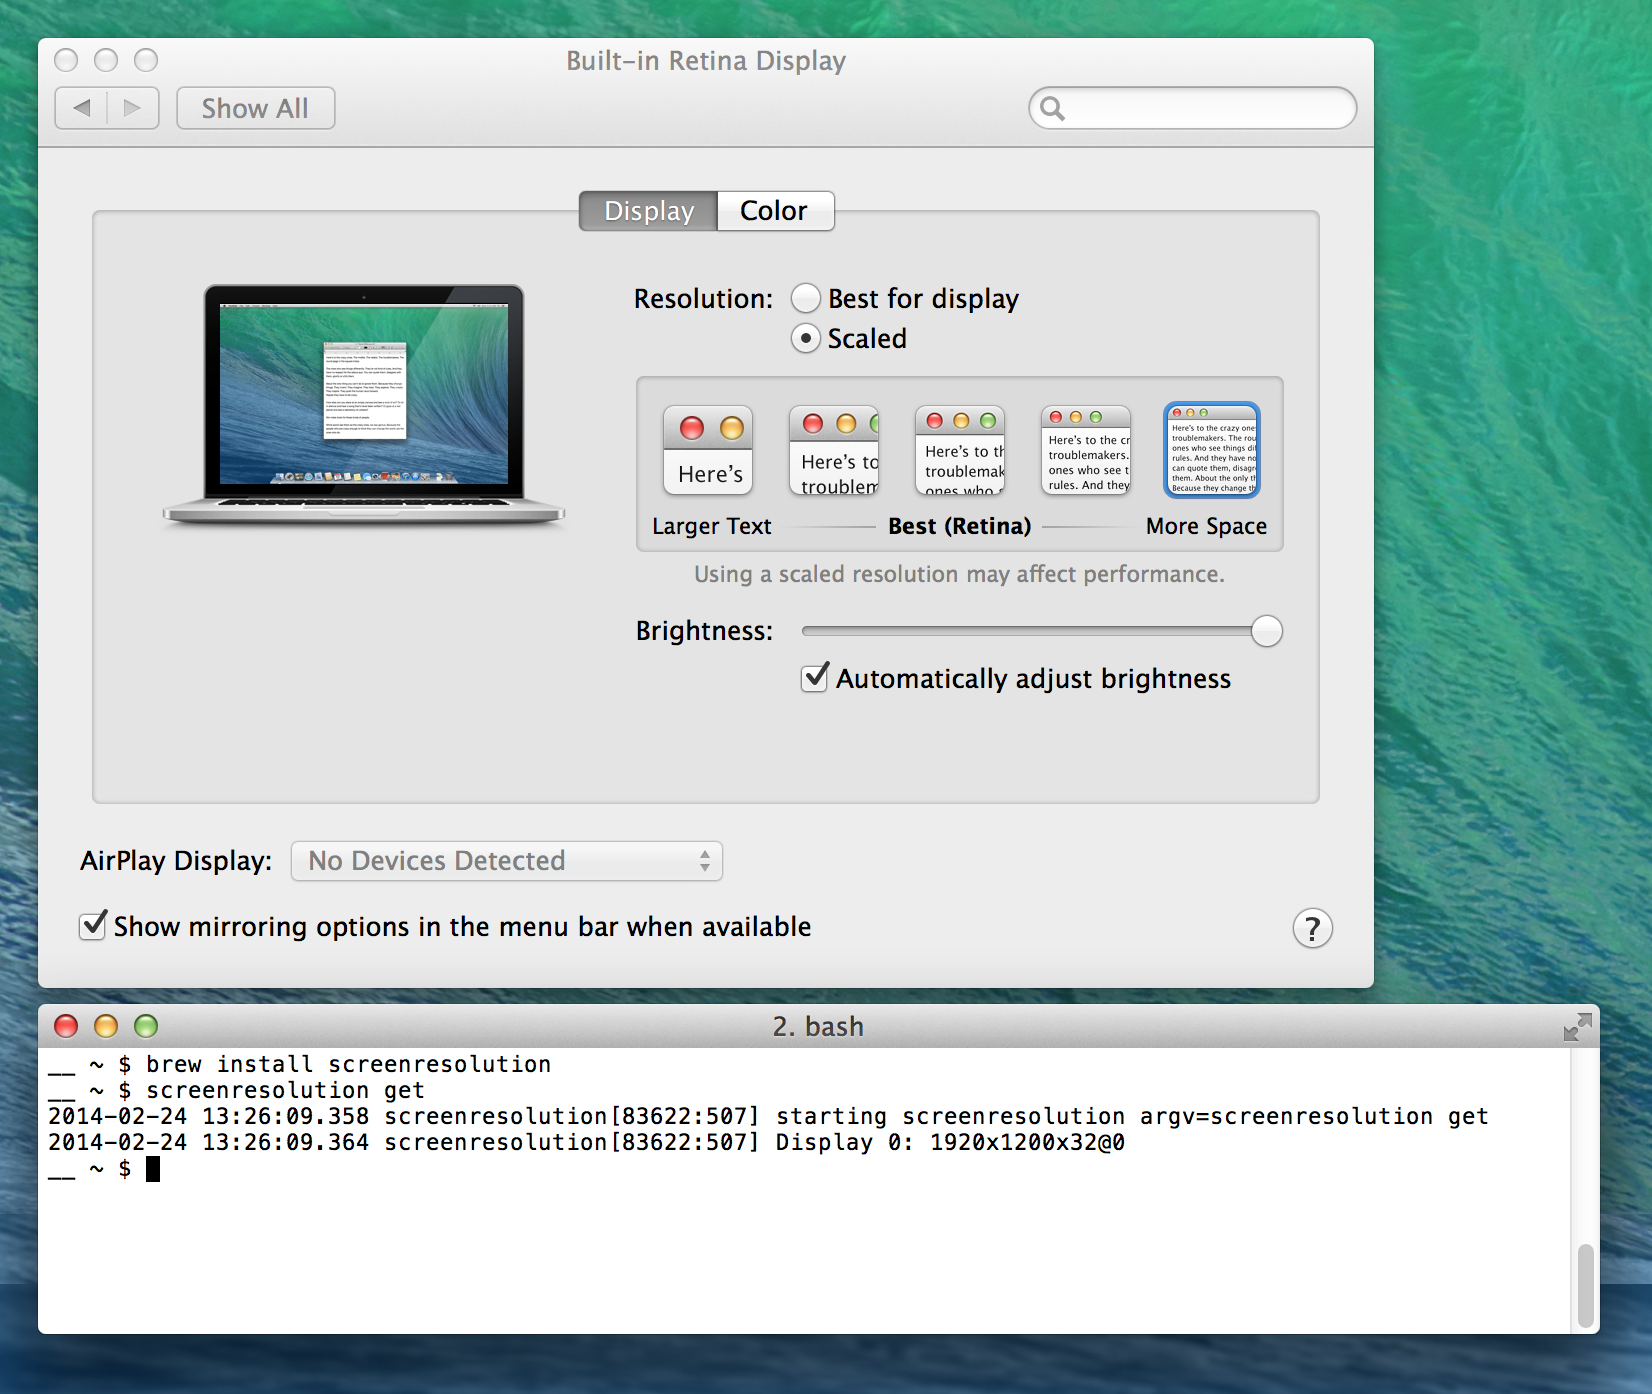
Out of the box you get a scaled resolution that looks like any standard MacOS laptop, rather than the full native resolution of the display. Apple then does some weird black magic with their UI layer, where the actual display is rendered on a massive virtual 3360 x 2100 resolution virtual display and is then scaled down to the actual display size of 2880 x 1800 pixels.
The actual resolutions available to the end user aren’t real resolutions, but rather different modes that essentially look/feel like 1920×1200, 1680×1050, 1440×900 (the default for Retina), 1280×800 and 1024×640, but in the background MacOS is just scaling application windows to these sizes.
If you come from a Windows or GNU/Linux world where the screen resolution is what it says on the box, it’s a really weird mindshift. You’ll quickly find this approach is common to the Apple ecosystem – so much stuff that I understand about computers is difficult to figure out with MacOS due to the way Apple hides everything and instead of using the technical terminology, hides it behind their own terminology designed to make it “easier” for normal users. And maybe it does… but for me, it’s more of a hindrance, rather than a help.
Apple’s Settings window isn’t that helpful at explaining the real resolutions underneath, in my case I had to get “screenresolution” from Brew in order to figure out what resolution this machine was actually displaying.
So which size and mode do I use? The stock screen resolution is OK for a laptop and maybe you’ll like it perfectly if you’re using Retina optimised applications (eg Aperture) where having a lower effective resolution, but high DPI for the content is useful.
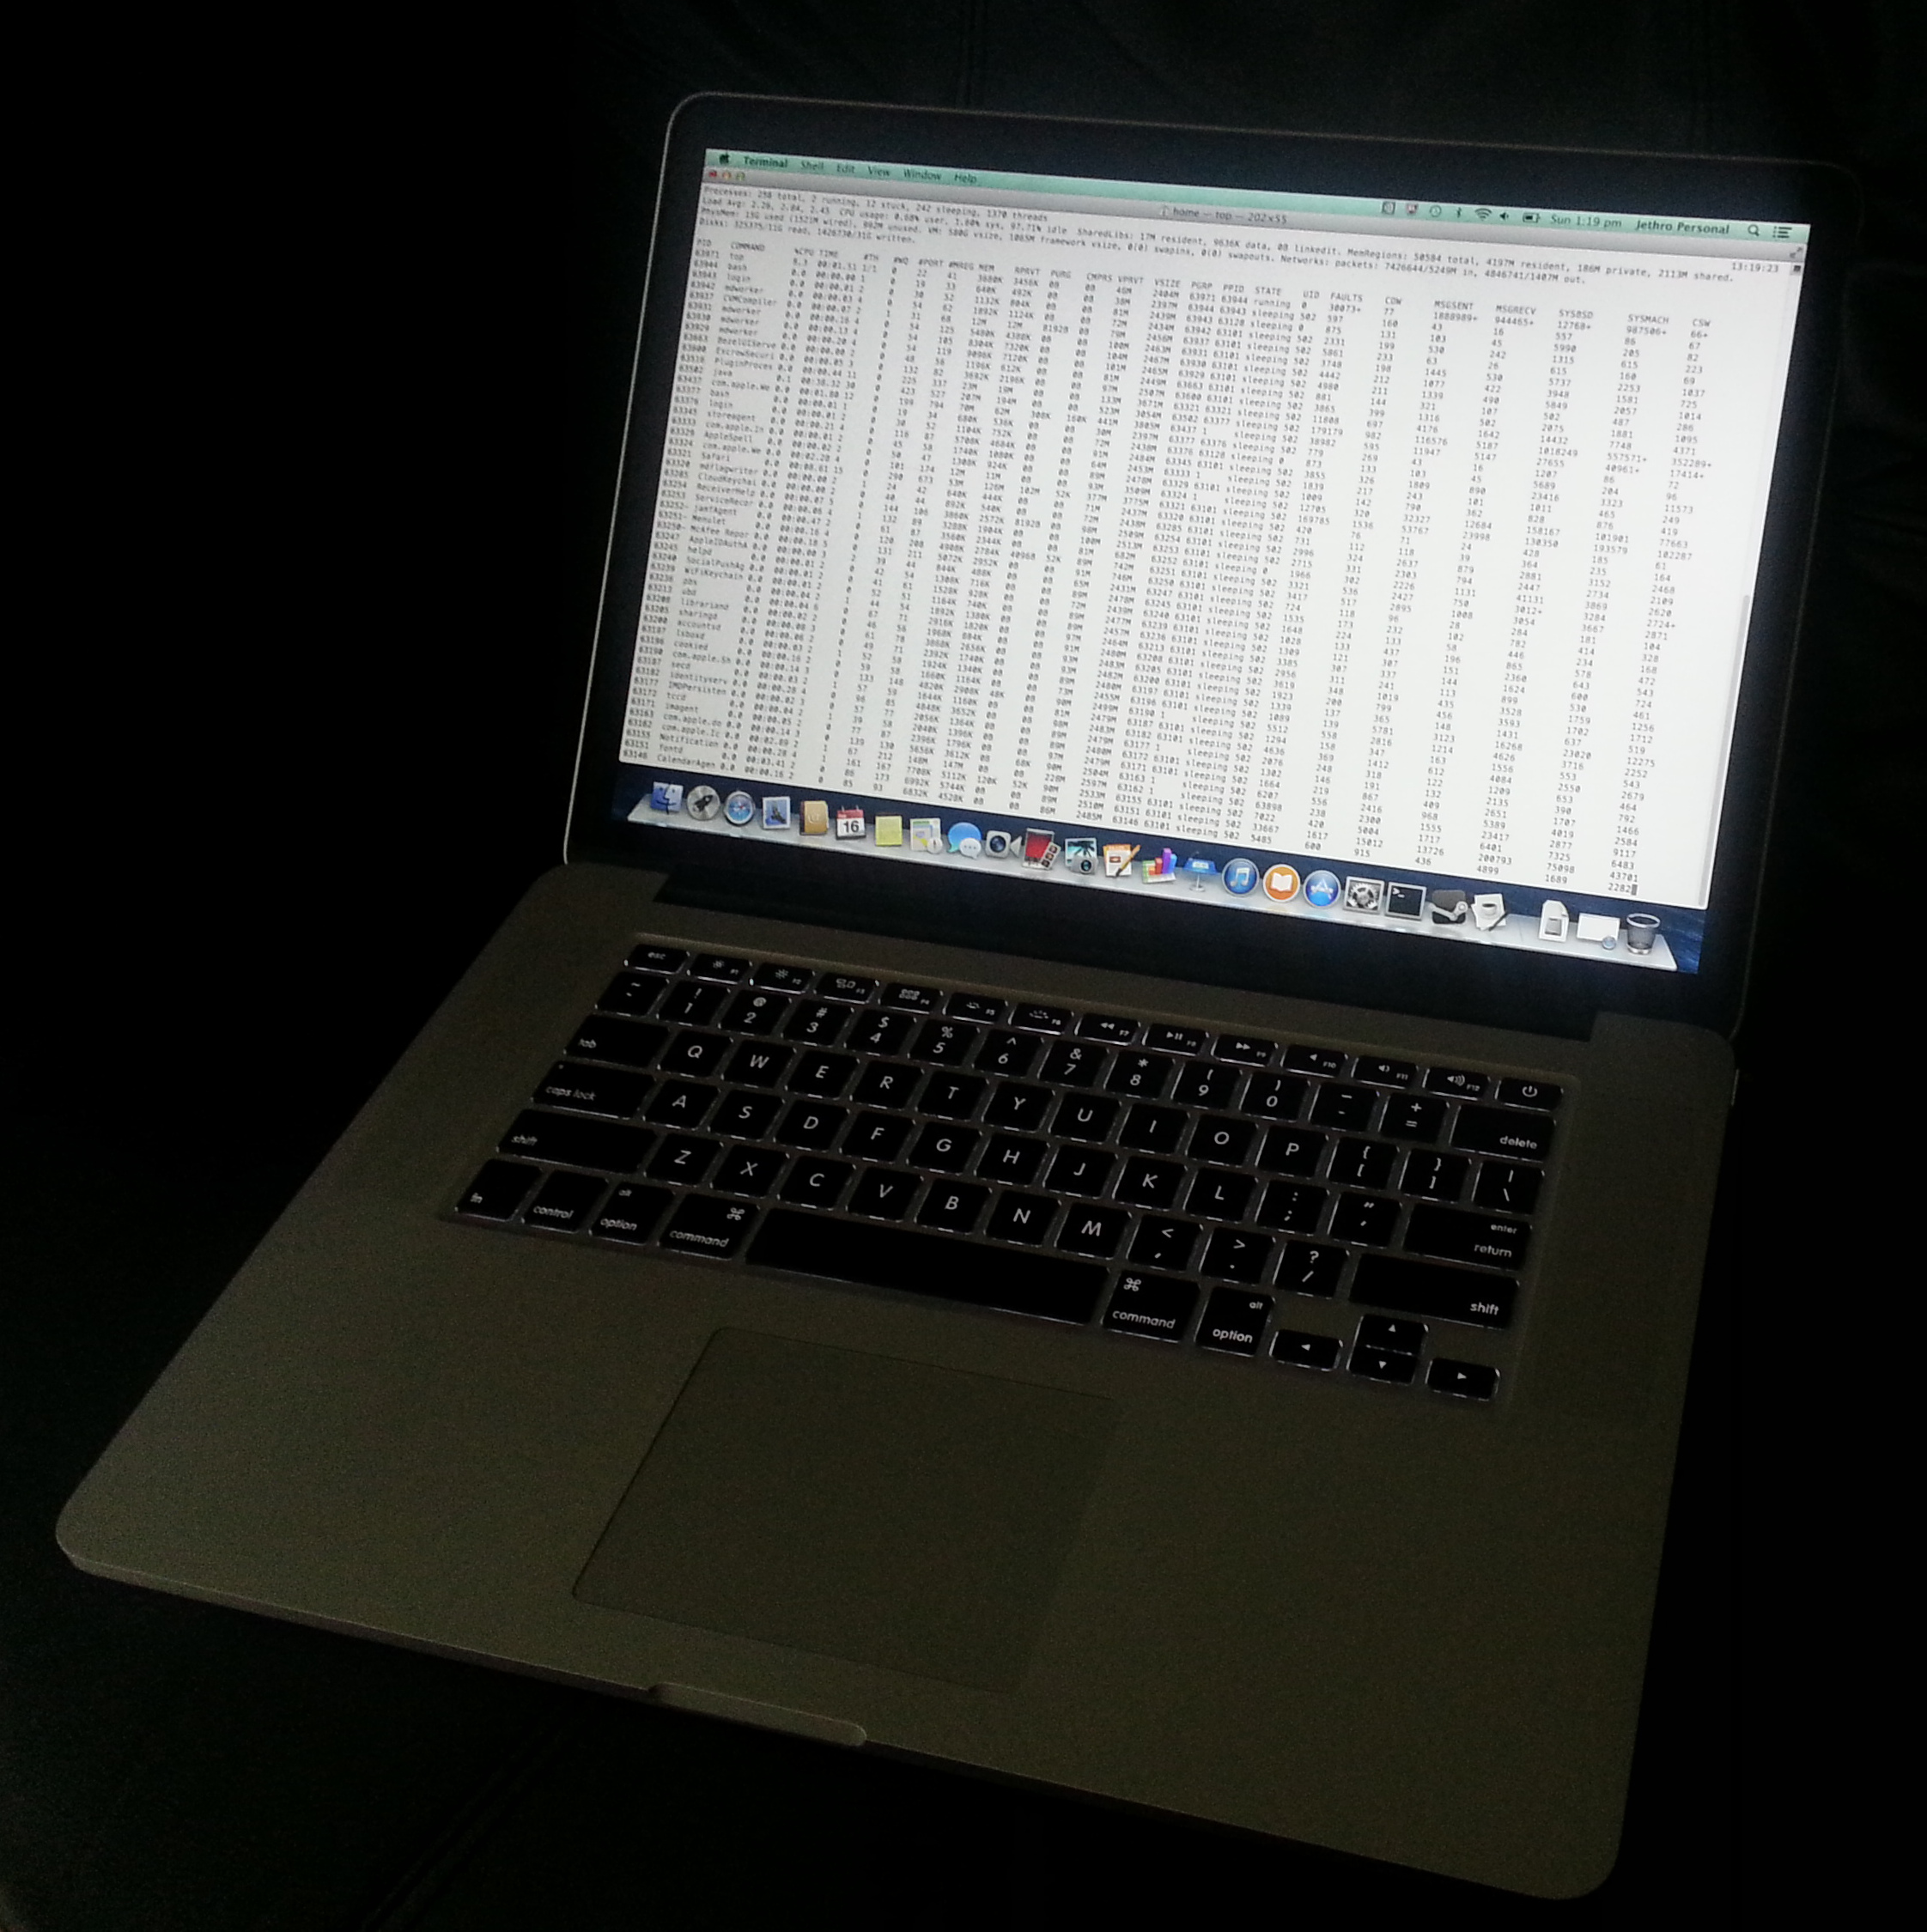
Default scaled mode – effectively 1440×900
However for me, where most of my use case is email, terminal and a browser, I wanted the ability to fit the most possible information onto the screen, so I ended up using the “More Space” resolution, which drives the display at a 1920×1200-like scaled resolution.
The “More Space” mode is handy for fitting decent amounts of console output.
Whilst the Retina display is an excellent equal to a 24″ monitor (which have a resolution around 1920×1080, almost the same as the “More Space” mode), it doesn’t quite meet my dream hope which was that it would equal a 27″ monitor.
27″ monitors are the holy grail for me, since they have a resolution of 2560 x 1080, which is big enough to fit two large A4 sized windows on the screen at the same exact time.
It’s functional, but not as natural-feeling as doing the same on a 27″ monitor – still feels like trying to squeeze everything in.
It is possible to bypass Apple’s limitations on resolution get a higher resolution using third party tools, but I can only just read the 1920×1200 comfortably. I tried DisplayMenu (as suggested by Kai in the comments), but whilst the resulting resolution is amazing, I find reading text on it just a bit too small for prolonged periods.
The full 2880×1800 is lovely, but I might need glasses to read it…
The other issue with the Retina displays, is that due to the way Apple does the scaling, some applications just end up looking bad and fuzzy due to bitmap stretching and other nastiness – this impacted me with KeepassX, as well as some company-internal web applications.
But when you do get a properly Retina compatible application, things do look beautiful – Google Maps both in vector map and also satellite view look incredibly sharp and clear.
Vectorised graphics were made for Retina
If I was choosing between a laptop with a high resolution display like this and one without, I’d be choosing the former all other factors being considered equal. But I’m not convinced that it’s worth splashing lots of cash on for my particular requirements of terminals and browsing – the Retina screen probably wouldn’t add much for me over a laptop that features a resolution like 1920×1200 native instead of downscaling.
See other posts in this series via the jethro does mac tag as I explore using MacOS after years of GNU/Linux only.