Tag Archives: amazon

How much swap should I use on my VM?

Lately a couple people have asked me about how much swap space is “right” for their servers – especially in the context of running low spec machines like AWS t2.nano/t2.micro or Digital Ocean boxes with low allocations like 1GB or 512MB RAM.

The old fashioned advice was always “your swap space should be double your RAM” but this doesn’t actually make a lot of sense any more. Really swap should be considered a tool of last resort – a hack even – to squeeze a bit more performance out of systems and should be used sparingly where it makes sense.

I tend to look after two different types of systems:

  1. Small systems running a specific dedicated service (eg microservices). These systems might do nothing more than run Nginx/Apache or something like PHP-FPM or Unicorn with a few workers. They typically have 512MB-1GB of RAM.
  2. Big heavy servers running heavy weight applications, typically Java. These systems will be configured with large memory allocations (eg 16GB) and be configured to allocate a specific amount of memory to the application (eg 10GB Java Heap) and to keep the rest free for disk cache and background apps.

The latter doesn’t need swap. There’s no time I would ever want my massive apps getting pushed into swap for a couple reasons:

  • Performance of these systems is critical. We’ve paid good money to allocate them specific amounts of memory which is essentially guaranteed – we know how much the heap needs, how much disk cache we need and how much to allocate to the background apps.
  • If something does go wrong and starts consuming too much RAM, rather than having performance degrade as the server tries to swap, I want it to die – and die fast. If Puppet has decided it wants 7 GB of RAM, I want the OOM to step in and slaughter it. If I have swap, I risk everything on the server being slowed down as it moves tasks into the horribly slow (even on SSD) swap space.
  • If you’re paying for 16GB of RAM, why do you want to try and get an extra 512MB out of some swap space? It’s false economy.

For this reason, our big boxes are all swapless. But what about the former example, the small microservice type boxes, or your small personal VPS type systems?

Like many things in IT, “it depends”.

If you’re running stateless clusters, provided that the peak usage fits within the memory allocation, you don’t need swap. In this scenario, your workload is sized appropriately and if anything goes wrong due to an unexpected issue, the machine will either kill the errant process or die and get removed from the pool entirely.

I run a lot of web app workers this way – for example a 1GB t2.micro can happily run 4 Ruby Unicorn workers averaging around 128MB each, plus have space for Puppet, monitoring and delayed jobs. If something goes astray, the process gets killed and the usual automated recovery processes handle things.

However you may need some swap if you’re running stateful systems (pets) where it’s better for them to go slow than to die entirely, or if you’re running a system where the peak usage won’t fit within the memory allocation due to tight budget constraints.

For an example of tight budget constraints – I run this blog on a small machine with only 512MB RAM. With an allocation this small, there’s just not enough memory to run applications like Apache and also be able to handle the needs of background daemons and Puppet runs which can use several hundred MB just by themselves.

The approach I took was to create a small swap volume and size the worker counts in Apache so that the max workers at average size would just fit within the real memory allocation. However any background or system tasks, would have to fight over the swap space.

Screen Shot 2016-03-03 at 23.52.58

What you can see from the above is that I’m consuming quite a bit of swap – but my disk I/O is basically nothing. That’s because most of what’s in swap on this machine isn’t needed regularly and the active workload, i.e. the apps actually using/freeing RAM constantly, fit within the available amount of real memory.

In this case, using swap allows me to get better value for money, than using the next size up machine – I’m paying just enough to run Apache and squeezing in the management tools and background jobs onto the otherwise underutilized SSD storage. This means I can spend $5 to run this blog, vs $10. Excellent!

In respects to sizing, I’m running with a 1GB swap on a 512MB RAM server which is compliant with the traditional “twice your RAM” approach to sizing. That being said, I wouldn’t extend past this, even if the system had more RAM (eg 2GB) you should only ever use swap as a hack to squeeze a bit more out of a system. Basically don’t assume swap will scale linearly as memory scales.

Given I’m running on various cloud/VPS environments, I don’t have a traditional swap partition – instead I create an image file on the root filesystem and format it as swap space – I use a third party Puppet module (https://forge.puppetlabs.com/petems/swap_file) to do this:

swap_file::files { 'default':
  ensure            => present,
  swapfile         => '/tmp/swapfile',
  swapfilesize  => '1000 MB’
}

The performance impact of using a swap file ontop of a filesystem is almost nothing and this dramatically simplifies management and allocation of swap space. Just make sure you’re not using tmpfs for that /tmp path or you’ll find that memory benefit isn’t as good as it seems.

Your cloud pricing isn’t webscale

Thankfully in 2015 most (but not all) proprietary software providers have moved away from the archaic ideology of software being licensed by the CPU core – a concept that reflected the value and importance of systems back when you were buying physical hardware, but rendered completely meaningless by cloud and virtualisation providers.

Taking it’s place came the subscription model, popularised by Software-as-a-Service (or “cloud”) products. The benefits are attractive – regular income via customer renewal payments, flexibility for customers wanting to change the level of product or number of systems covered and no CAPEX headaches in acquiring new products to use.

Clients win, vendors win, everyone is happy!

Or maybe not.


Whilst the horrible price-by-CPU model has died off, a new model has emerged – price by server. This model assumes that the more servers a customer has, the bigger they are and the more we should charge them.

The model makes some sense in a traditional virtualised environment (think VMWare) where boxes are sliced up and a client runs only as many as they need. You might only have a total of two servers for your enterprise application – primary and DR – each spec’ed appropriately to handle the max volume of user requests.

But the model fails horribly when clients start proper cloud adoption. Suddenly that one big server gets sliced up into 10 small servers which come and go by the hour as they’re needed to supply demand.

DevOps techniques such as configuration management suddenly turns the effort of running dozens of servers into the same as running a single machine, there’s no longer any reason to want to constrain yourself to a single machine.

It gets worse if the client decides to adopt microservices, where each application gets split off into it’s own server (or container aka Docker/CoreOS). And it’s going to get very weird when we start using compute-less computing more with services like Lambda and Hoist because who knows how many server licenses you need to run an application that doesn’t even run on a server that you control?


Really the per-server model for pricing is as bad as the per-core model, because it no longer has any reflection on the size of an organisation, the amount they’re using a product and most important, the value they’ve obtaining from the product.

So what’s the alternative? SaaS products tend to charge per-user, but the model doesn’t always work well for infrastructure tools. You could be running monitoring for a large company with 1,000 servers but only have 3 user accounts for a small sysadmin team, which doesn’t really work for the vendor.

Some products can charge based on volume or API calls, but even this is risky. A heavy micro-service architecture would result in large number of HTTP calls between applications, so you can hardly say an app with 10,000 req/min is getting 4x the value compared to a client with a 2,500 req/min application – it could be all internal API calls.


To give an example of how painful the current world of subscription licensing is with modern computing, let’s conduct a thought exercise and have a look at the current pricing model of some popular platforms.

Let’s go with creating a startup. I’m going to run a small SaaS app in my spare time, so I need a bit of compute, but also need business-level tools for monitoring and debugging so I can ensure quality as my startup grows and get notified if something breaks.

First up I need compute. Modern cloud compute providers *understand* subscription pricing. Their models are brilliantly engineered to offer a price point for everyone. Whether you want a random jump box for $2/month or a $2000/month massive high compute monster to crunch your big-data-peak-hipster-NoSQL dataset, they can deliver the product at the price point you want.

Let’s grab a basic Digital Ocean box. Well actually let’s grab 2, since we’re trying to make a redundant SaaS product. But we’re a cheap-as-chips startup, so let’s grab 2x $5/mo box.

Screen Shot 2015-11-03 at 21.46.40

Ok, so far we’ve spent $10/month for our two servers. And whilst Digital Ocean is pretty awesome our code is going to be pretty crap since we used a bunch of high/drunk (maybe both?) interns to write our PHP code. So we should get a real time application monitoring product, like Newrelic APM.

Screen Shot 2015-11-03 at 21.37.46

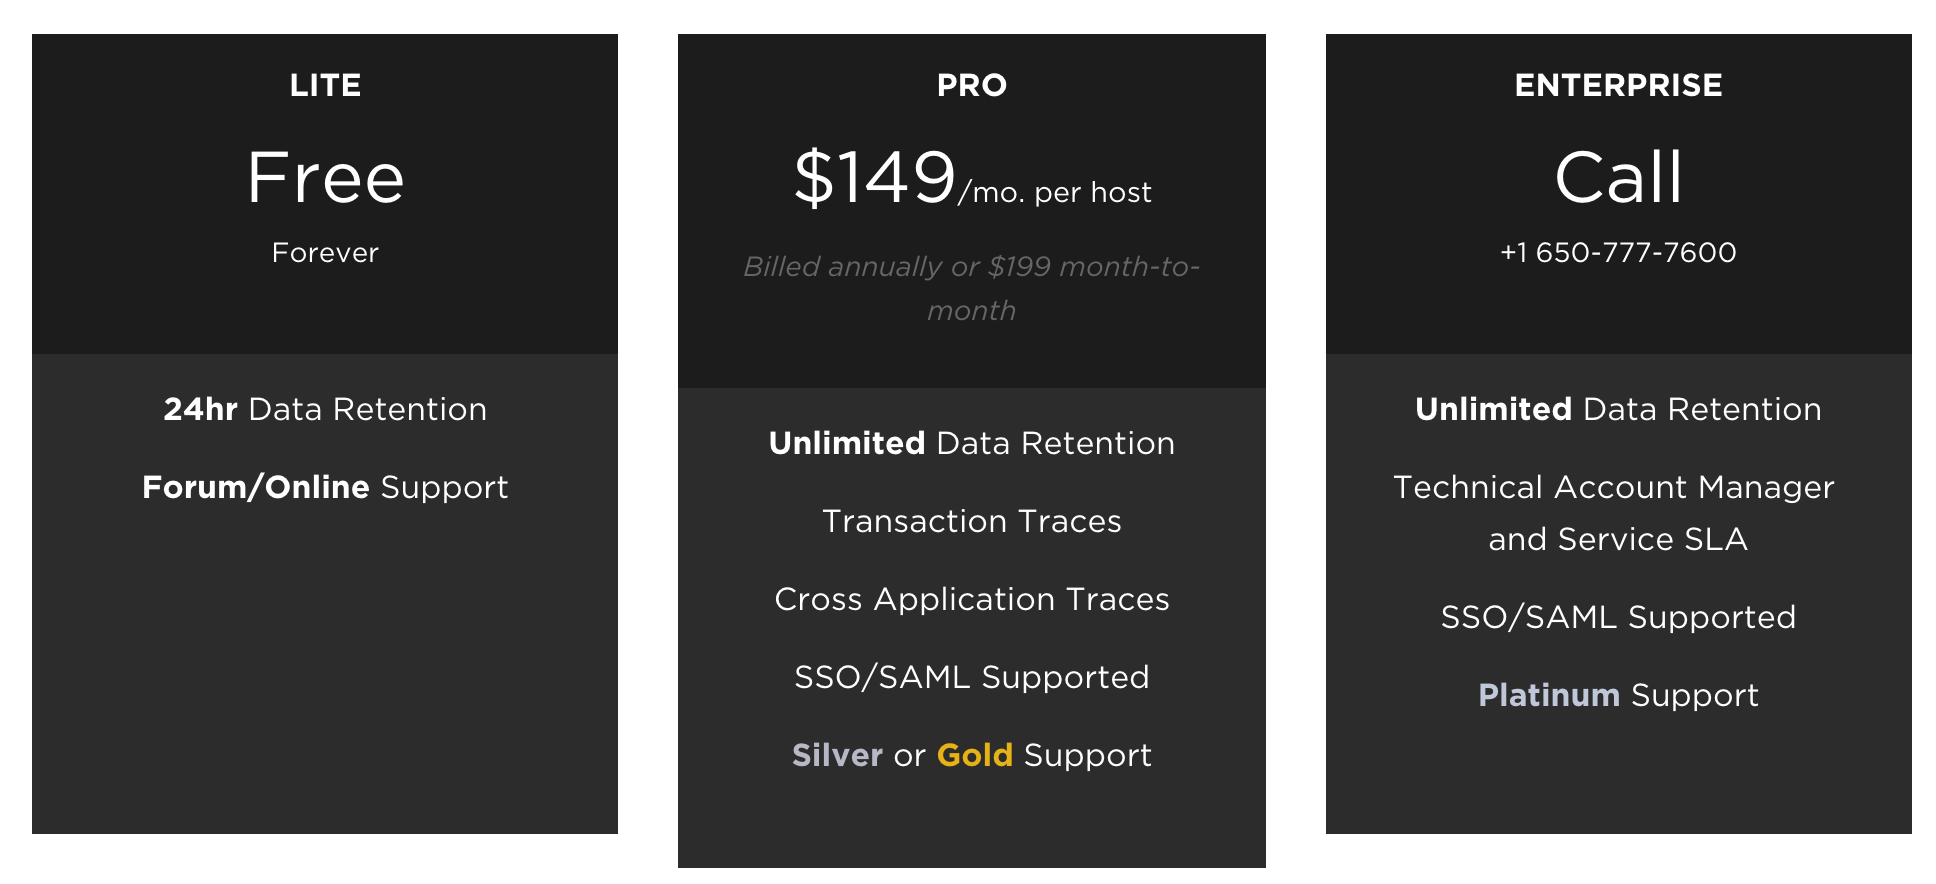
Woot! Newrelic have a free tier, that’s great news for our SaaS application – but actually it’s not really that useful, it can’t do much tracing and only keeps 24 hours history. Certainly not enough to debug anything more serious than my WordPress blog.

I’ll need the pro account to get anything useful, so let’s add a whopping $149/mo – but actually make that $298/mo since we have two servers. Great value really. :-/


Next we probably need some kind of paging for oncall when our app blows up horribly at 4am like it will undoubtably do. PagerDuty is one of the popular market leaders currently with a good reputation, let’s roll with them.

Screen Shot 2015-11-03 at 21.52.57

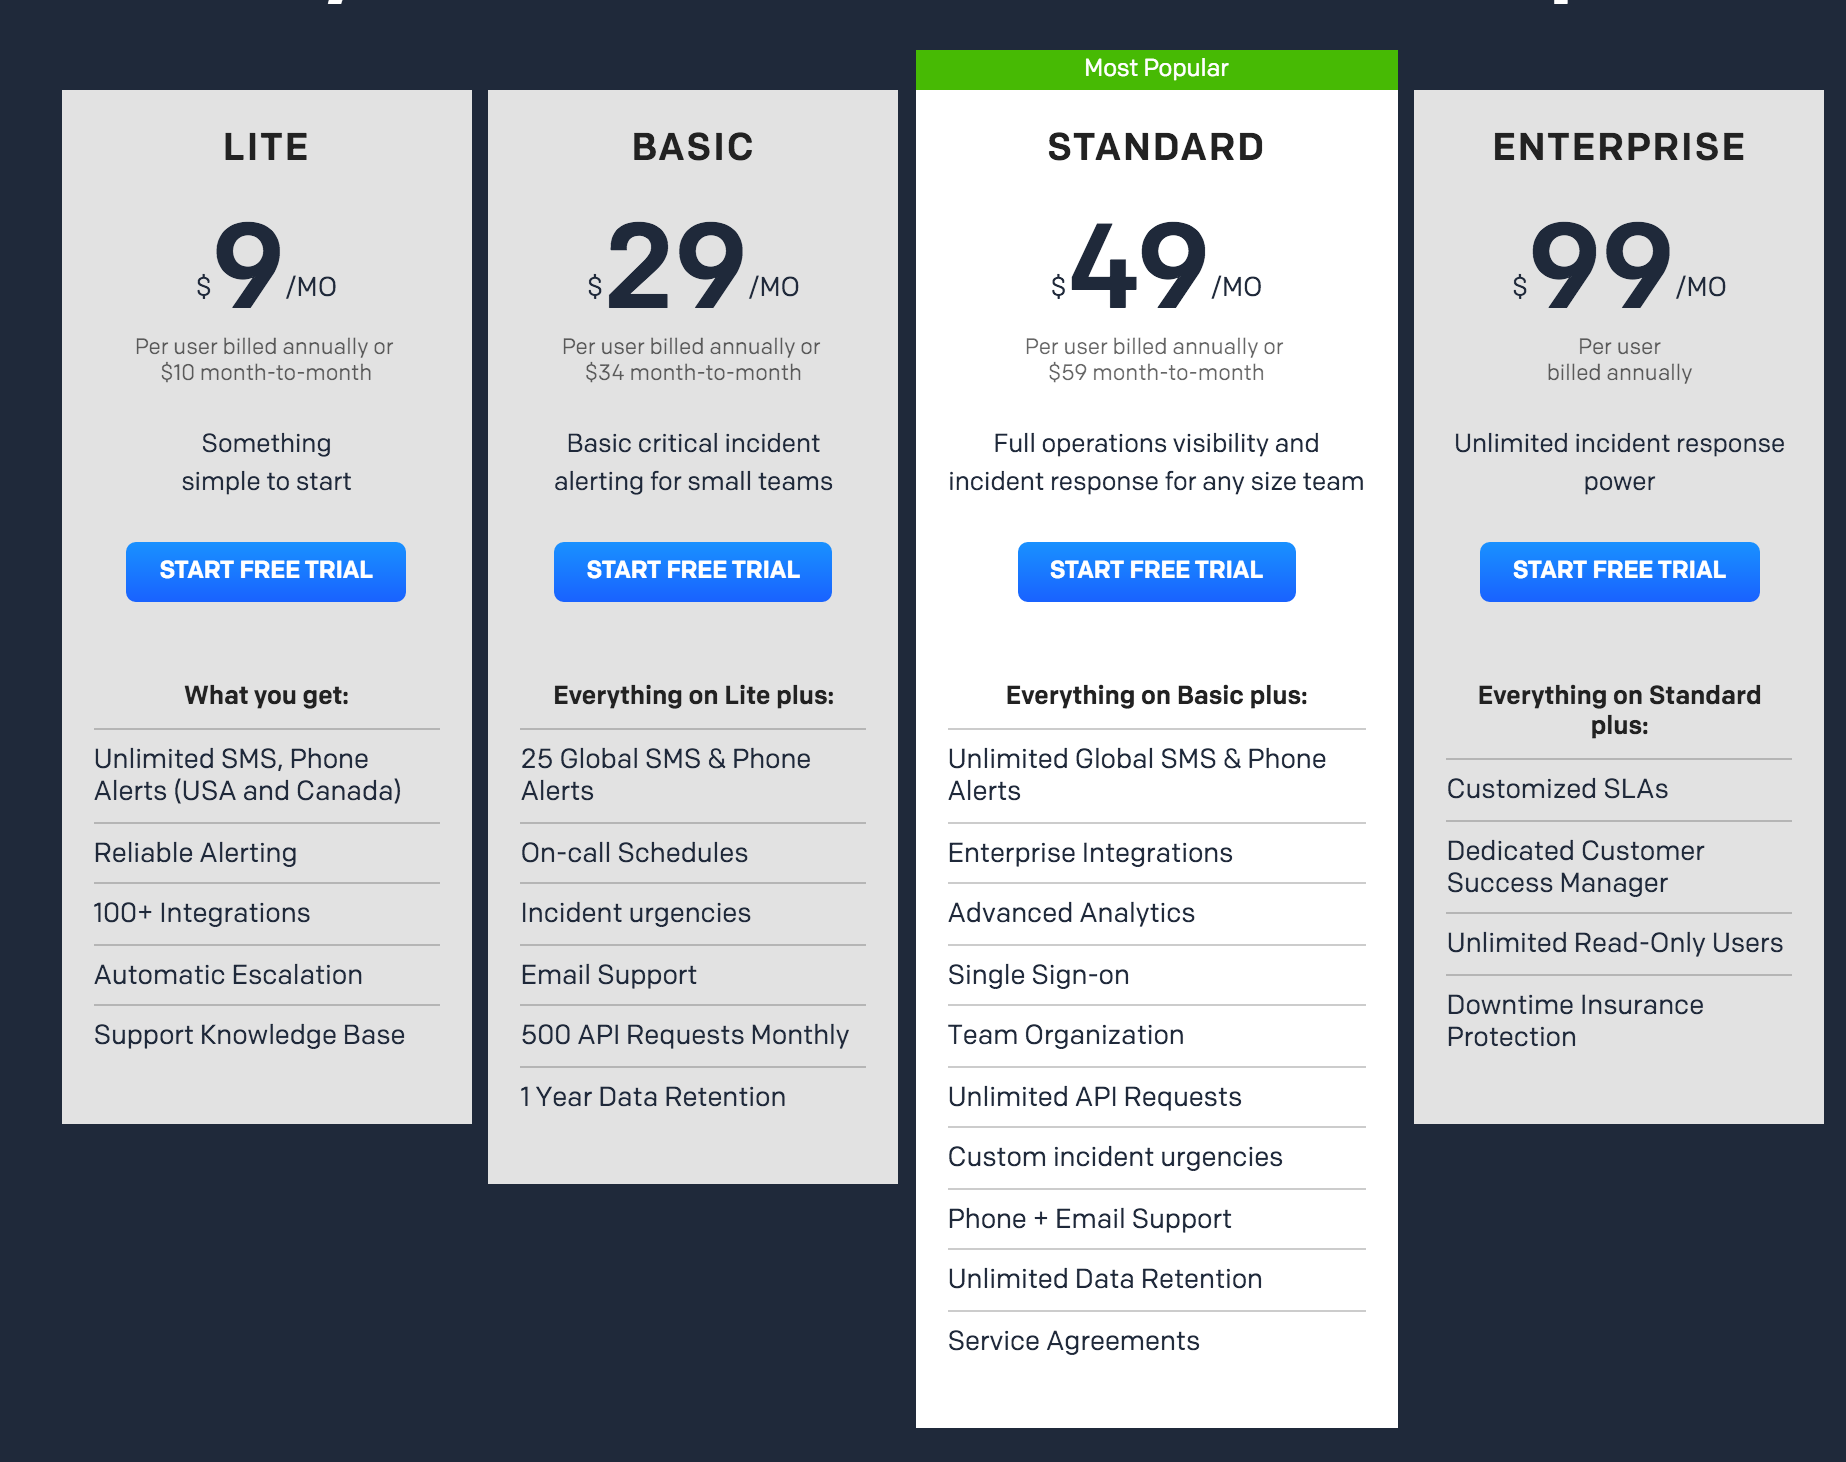
Hmm I guess that $9/mo isn’t too bad, although it’s essentially what I’m paying ($10/mo) for the compute itself. Except that it’s kinda useless since it’s USA and their friendly neighbour only and excludes us down under. So let’s go with the $29/mo plan to get something that actually works. $29/mo is a bit much for a $10/mo compute box really, but hey, it looks great next to NewRelic’s pricing…


Remembering that my SaaS app is going to be buggier than Windows Vista, I should probably get some error handling setup. That $298/mo Newrelic APM doesn’t include any kind of good error handler, so we should also go get another market leader, Raygun, for our error reporting and tracking.

Screen Shot 2015-11-03 at 22.00.54

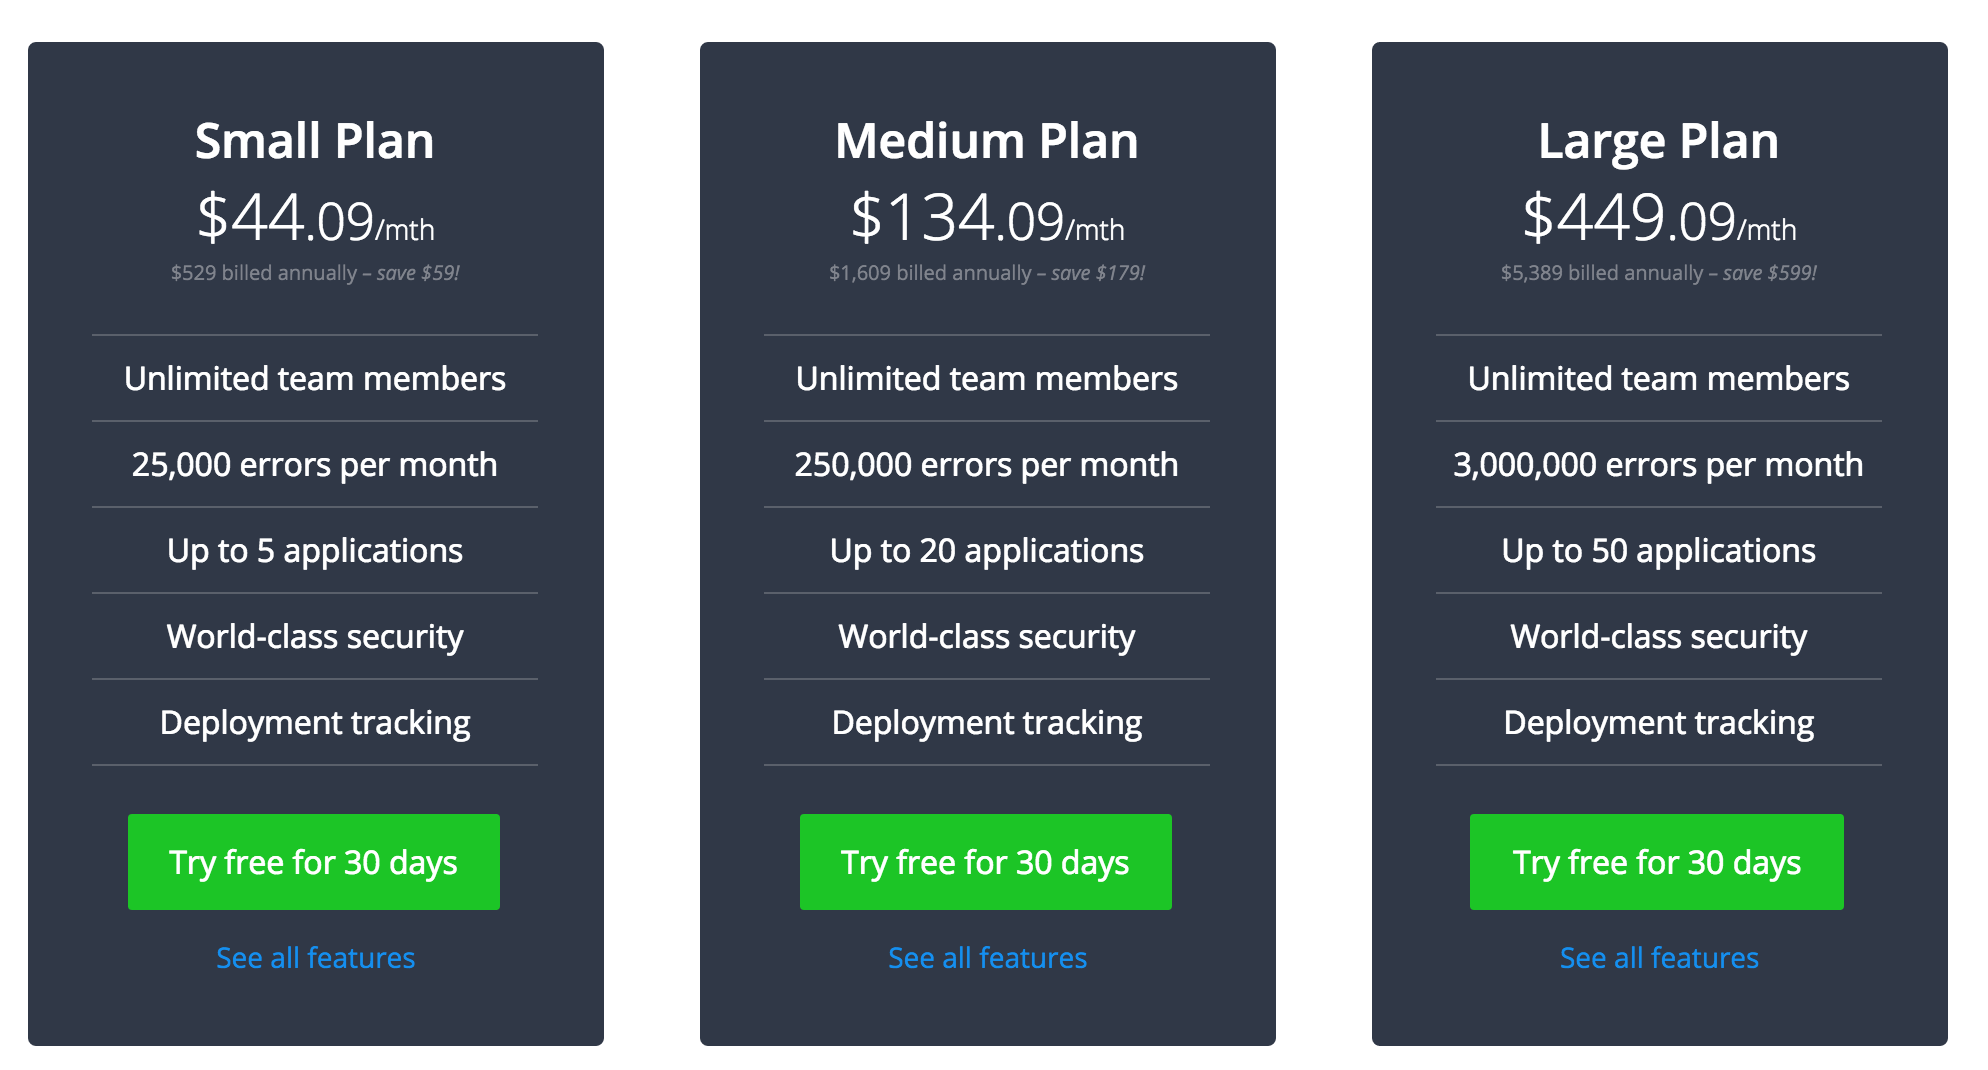
For a small company this isn’t bad value really given you get 5 different apps and any number of muppets working with you can get onboard. But it’s still looking ridiculous compared to my $10/mo compute cost.

So what’s the total damage:

Compute: $10/month
Monitoring: $371/month

Ouch! Now maybe as a startup, I’ll churn up that extra money as an investment into getting a good quality product, but it’s a far cry from the day when someone could launch a new product on a shoestring budget in their spare time from their uni laptop.


Let’s look at the same thing from the perspective of a large enterprise. I’ve got a mission critical business application and it requires a 20 core machine with 64GB of RAM. And of course I need two of them for when Java inevitably runs out of heap because the business let muppets feed garbage from their IDE directly into the JVM and expected some kind of software to actually appear as a result.

That compute is going to cost me $640/mo per machine – so $1280/mo total. And all the other bits, Newrelic, Raygun, PagerDuty? Still that same $371/mo!

Compute: $1280/month
Monitoring: $371/month

It’s not hard to imagine that the large enterprise is getting much more value out of those services than the small startup and can clearly afford to pay for that in relation to the compute they’re consuming. But the pricing model doesn’t make that distinction.


So given that we know know that per-core pricing is terrible and per-server pricing is terrible and (at least for infrastructure tools) per-user pricing is terrible what’s the solution?

“Cloud Spend Licensing” [1]

[1] A term I’ve just made up, but sounds like something Gartner spits out.

With Cloud Spend Licensing, the amount charged reflects the amount you spend on compute – this is a much more accurate indicator of the size of an organisation and value being derived from a product than cores or servers or users.

But how does a vendor know what this spend is? This problem will be solving itself thanks to compute consumers starting to cluster around a few major public cloud players, the top three being Amazon (AWS), Microsoft (Azure) and Google (Compute Engine).

It would not be technically complicated to implement support for these major providers (and maybe a smattering of smaller ones like Heroku, Digital Ocean and Linode) to use their APIs to suck down service consumption/usage data and figure out a client’s compute spend in the past month.

For customers whom can’t (still on VMWare?) or don’t want to provide this data, there can always be the fallback to a more traditional pricing model, whether it be cores, servers or some other negotiation (“enterprise deal”).


How would this look?

In our above example, for our enterprise compute bill ($1280/mo) the equivalent amount spent on the monitoring products was 23% for Newrelic, 3% for Raygun and 2.2% for PagerDuty (total of 28.2%). Let’s make the assumption this pricing is reasonable for the value of the products gained for the sake of demonstration (glares at Newrelic).

When applied to our $10/month SaaS startup, the bill for this products would be an additional $2.82/month. This may seem so cheap there will be incentive to set a minimum price, but it’s vital to avoid doing so:

  • $2.82/mo means anyone starting up a new service uses your product. Because why not, it’s pocket change. That uni student working on the next big thing will use you. The receptionist writing her next mobile app success in her spare time will use you. An engineer in a massive enterprise will use you to quickly POC a future product on their personal credit card.
  • $2.82/mo might only just cover the cost of the service, but you’re not making any profit if they couldn’t afford to use it in the first place. The next best thing to profit is market share – provided that market share has a conversion path to profit in future (something some startups seem to forget, eh Twitter?).
  • $2.82/mo means IT pros use your product on their home servers for fun and then take their learning back to the enterprise. Every one of the providers above should have a ~ $10/year offering for IT pros to use and get hooked on their product, but they don’t. Newrelic is the closest with their free tier. No prizes if you guess which product I use on my personal servers. Definitely no prizes if you guess which product I can sell the benefits of the most to management at work.


But what about real earnings?

As our startup grows and gets bigger, it doesn’t matter if we add more servers, or upsize the existing ones to add bigger servers – the amount we pay for the related support applications is always proportionate.

It also caters for the emerging trend of running systems for limited hours or using spot prices – clients and vendor don’t have to worry about figuring out how it fits into the pricing model, instead the scale of your compute consumption sets the price of the servers.

Suddenly that $2.82/mo becomes $56.40/mo when the startup starts getting successful and starts running a few computers with actual specs. One day it becomes $371 when they’re running $1280/mo of compute tier like the big enterprise. And it goes up from there.


I’m not a business analyst and “Cloud Spend Licensing” may not be the best solution, but goddamn there has to be a more sensible approach than believing someone will spend $371/mo for their $10/mo compute setup. And I’d like to get to that future sooner rather than later please, because there’s a lot of cool stuff out there that I’d like to experiment with more in my own time – and that’s good for both myself and vendors.


Other thoughts:

  • I don’t want vendors to see all my compute spend details” – This would be easily solved by cloud provider exposing the right kind of APIs for this purpose eg, “grant vendor XYZ ability to see sum compute cost per month, but no details on what it is“.
  • I’ll split my compute into lots of accounts and only pay for services where I need it to keep my costs low” – Nothing different to the current situation where users selectively install agents on specific systems.
  • This one client with an ultra efficient, high profit, low compute app will take advantage of us.” – Nothing different to the per-server/per-core model then other than the min spend. Your client probably deserves the cheaper price as a reward for not writing the usual terrible inefficient code people churn out.
  • “This doesn’t work for my app” – This model is very specific to applications that support infrastructure, I don’t expect to see it suddenly being used for end user products/services.

Baking images with Packer & Pupistry

One of the common issues when building modern infrastructure-as-code style systems is that whilst automation is great, it also has a habit of failing at the worst possible time. There’s nothing quite like the fun of trying to autoscale only to find that a newer version of a package breaks compatibility or the repository mirror or Puppet master has gone offline breaking the whole carefully tuned process.

Naturally this is an issue. And whilst I’ve seen some organisations simply ignore the issue and place trust in their repos and configuration management servers, I’m also too pessimistic about technology to trust numerous components for any mission critical applications.

Fortunately there is a solution – we can bake a machine image that has all the applications and configuration pre-applied, so that autoscaling has no third party dependencies (or as close to no dependencies as we can get).

Baking has negative connotations of the bad old days when engineers would assemble custom machine images by hand and then copy them to build new systems, but it doesn’t have to be that way. We can still respect infrastructure-as-code principals and use modern tools like Puppet and Packer to reliably build consistent images as needed.

These images could be as simple as a base AMI image for Amazon AWS which includes the stock OS image plus your Puppet setup. Or they could be as complex as a fully configured and provisioned application server ready-to-go at the first boot.

To make baking images easier, I’ve added support for generating Packer templates pre-loaded with bootstrap data into Pupistry, making it quick and easy to get started. Here’s how you can use it:

Assumptions/prerequisites:

  • You’ve already got Pupistry setup and functional (No? Read the tutorial here)
  • You’ve installed the third party Packer utility.
  • You have an Amazon AWS account for doing the AMI build. Note that Packer isn’t exclusive to Amazon, so you can also use the same technique with other providers including Digital Ocean and OpenStack – but you’ll have to write your own template.

First we can list what Packer templates are available with Pupistry. If the OS/platform of your choice isn’t included, it’s not particularly hard to add it – these are mostly intended to provide a good starting point for customising your own.

pupistry packer

Screen Shot 2015-05-31 at 23.57.20

We can select a template with –template NAME and also pass the resulting output to a file with –file NAME.  The following will build an Amazon Linux template pre-loaded with Pupistry and the default manifest applied:

pupistry packer --template aws_amazon-any --file output.json

Screen Shot 2015-06-01 at 00.00.01

The generated template is a JSON file that includes various instructions to Packer on how to build the image, as well as the bootstrap data that can also be generated independently with pupistry bootstrap. Various variables can be tweaked, we can export out the variables available and see their default settings with:

packer inspect output.json

Screen Shot 2015-06-01 at 00.02.00

You can see here that we must set a VPC ID and Subnet ID – this is because they differ per AWS account and need to be provided. (Side note: technically you can do EC2 classic with Packer and avoid this, but the VPC instance types like t2 are cheaper to run… and we like cheap :-).

The AWS Region and AWS AMI values are interlinked. If you choose to build for a different region, eg us-west-1, you will need to lookup the appropriate AMI ID for that region and change both the aws_ami and aws_region variables when you bake your image. For some reason Amazon chose to make their AMI IDs specific to a particular region which really does make life a bit more difficult than it really needs to be. :-(

The hostname is worth noting. By default we set it to “packer” so you can target your manifests to handle it specifically, but you could make this anything you wanted such as a particular machine or application type. When using the sample puppet repo that ships by default with Pupistry, we have defined specific configuration to run on the Packer built images:

Screen Shot 2015-06-01 at 00.09.08

Assuming we are happy with the defaults, we just have to set the VPC and Subnet IDs to launch the current image in ap-southeast-2.

packer build \
 -var 'aws_vpc_id=vpc-example' \
 -var 'aws_subnet_id=subnet-example' \
 output.json

As soon as we kick off, we can see that Packer has built a machine in our AWS account to use for the image generation process.

Screen Shot 2015-06-01 at 00.13.53


It can take up to a minute for the machine to become available via SSH. Once this happens, Packer opens a connection and starts to feed in the bootstrap commands that have been added into the template by Pupistry.

Screen Shot 2015-06-01 at 00.14.23

This process can take a number of minutes – remember you’re having to install all the various OS updates and then packages and dependencies needed to run Puppet and of course Pupistry itself.

Once all the dependencies are done, Pupistry will run and provision the machine with your Puppet manifests and then return the ID of the AMI that has been generated:

Screen Shot 2015-06-01 at 00.31.57


We can see that Packer has now terminated our temporary machine:

Screen Shot 2015-06-01 at 00.22.28

And given us a shiny new AMI in return:

Screen Shot 2015-06-01 at 00.34.14


We can now use that AMI to launch a new machine and check out what Pupistry did. For convenience, there is a launch button on the AMI page that will build a new machine for the selected AMI, however you can also take the AMI ID and use it in CloudFormation, from the API or from the usual instance creation screen.

Connecting to the newly spun up instance using our fresh AMI, we can see that it has had the Pupistry rules for the packer node applied and we can also set that the daemon is configured and running in the background.

Except that it took less than 1 minute, rather than needing 5+ minutes to do all the usual updates and dependency installation. And there was no risk of a broken repository or package preventing the launch of our machine. If it was an application server, we could have preloaded it and thrown it right into an ELB within 1 minute after it starting up – that’s ideal for autoscaling!

Screen Shot 2015-06-01 at 00.38.28

Packer supports a number of different options and different providers, so don’t be afraid to pull it down and experiment. You can even write your own custom providers if needed.

Sure you could always just write a script that does all the same things as Packer for your cloud provider of choice, but Packer provides a solid framework for doing this stuff in a reliable and reproducible way saving you time and keeping complexity down.

Recovering SW RAID with Ubuntu on Amazon AWS

Amazon’s AWS cloud service is a very popular and generally mature offering, but it does have it’s issues at times – in particular it’s storage options and limited debug facilities.

When using AWS, you have three main storage options for your instances (virtual machine servers):

  1. Ephemeral disk , storage attached locally to your instance which is lost at shutdown or if the instance terminates unexpectedly. A fixed amount is included with your instance, the size set depending on your instance size.
  2. Elastic Block Storage (EBS) which is a network-attached block storage exposed to your Linux instance as if it was a traditional local disk.
  3. EBS with provisioned IOPs – the same as the above, but with guarantees around performance – for a price of course. ;-)

With EBS, there’s no need to use RAID from a disk reliability perspective- the EBS volume itself has it’s own underlying redundancy (although one should still perform snapshots and backups to handle end user failure or systematic EBS failure), which is the common reason for using RAID with conventional physical hosts.

So with RAID being pointless for redundancy in an Amazon world, why write about recovering hosts in AWS using software RAID? Because there are still situations where you may end up using it for purposes other than redundancy:

  1. Poor man’s performance gains – EBS provisioned IOPs are the proper way of getting performance from EBS to meet your particular requirements. But it comes with a cost attached – you pay increasingly more for faster disk, but also need proportionally larger disks minimum sizes to go with the higher speeds (10:1 ratio IOPs:size) which can quickly make a small fast volume prohibitively expensive. A software RAID array can allow you to get more performance by combining numerous small volumes together at low cost.
  2. Merging multiple EBS volumes – EBS volumes have an Amazon-imposed limit of 1TB per volume. If a single filesystem of more than 1TB is required, either LVM or software RAID is needed to merge them.
  3. Merging multiple ephemeral volumes – software RAID can be used to also merge the multiple EBS volumes that Amazon provides on some larger instances. However being ephemeral, if your RAID gets degraded, there’s no need to repair it – just destroy the instance and build a nice new one.

So whilst using software RAID with your AWS Instances can be a legitimate exercise, it can also introduce it’s own share of issues.

Firstly you can no longer use EBS snapshotting to do backups of the EBS volumes, unless you first halt the entire RAID array/freeze the filesystem writes for the duration of all the snapshots to be created – which depending on your application may or may not be feasible.

Secondly you now have the issue of increased complexity of your I/O configuration. If using automation to build your instances, you need to do additional work to handle the setup of the array which is a one-time investment, but the use of RAID also adds complexity to the maintenance (such as resizes) and increases the risk of a fault occurring.

I recently had the excitement/misfortune of such an experience. We had a pair of Ubuntu 12.04 LTS instances using GlusterFS to provide a redundant NFS mount to some of our legacy applications running in AWS (AWS unfortunately lacks a hosted NFS filer service). To provide sufficient speed to an otherwise small volume, RAID 0 had been used with a number of small EBS volumes.

The RAID array was nearly full, so a resize/grow operation was required. This is not an uncommon requirement and just involves adding an EBS volume to the instance, growing the RAID array size and expanding the filesystem on top. Unfortunately something nasty happened between Gluster and the Linux kernel, where the RAID resize operation on one of the two hosts suddenly triggered a kernel panic and failed, killing the host. I wasn’t able to get the logs for it, but at this stage it looks like gluster tried to do some operation right when the resize was active and instead of being blocked, triggered a panic.

Upon a subsequent restart, the host didn’t come back online. Connecting to the AWS Instance’s console output (ec2-get-console-output <instanceid>) showed that the RAID array failure was preventing the instance from booting back up, even through it was an auxiliary mount, not the root filesystem or anything required to boot.

The system may have suffered a hardware fault, such as a disk drive
failure.  The root device may depend on the RAID devices being online. One
or more of the following RAID devices are degraded:
Personalities : [linear] [multipath] [raid0] [raid1] [raid6] [raid5] [raid4] [raid10] 
md0 : inactive xvdn[9](S) xvdm[7](S) xvdj[4](S) xvdi[3](S) xvdf[0](S) xvdh[2](S) xvdk[5](S) xvdl[6](S) xvdg[1](S)
      13630912 blocks super 1.2

unused devices: <none>
Attempting to start the RAID in degraded mode...
mdadm: CREATE user root not found
mdadm: CREATE group disk not found
[31761224.516958] bio: create slab <bio-1> at 1
[31761224.516976] md/raid:md0: not clean -- starting background reconstruction
[31761224.516981] md/raid:md0: reshape will continue
[31761224.516996] md/raid:md0: device xvdm operational as raid disk 7
[31761224.517002] md/raid:md0: device xvdj operational as raid disk 4
[31761224.517007] md/raid:md0: device xvdi operational as raid disk 3
[31761224.517013] md/raid:md0: device xvdf operational as raid disk 0
[31761224.517018] md/raid:md0: device xvdh operational as raid disk 2
[31761224.517023] md/raid:md0: device xvdk operational as raid disk 5
[31761224.517029] md/raid:md0: device xvdl operational as raid disk 6
[31761224.517034] md/raid:md0: device xvdg operational as raid disk 1
[31761224.517683] md/raid:md0: allocated 10592kB
[31761224.517771] md/raid:md0: cannot start dirty degraded array.
[31761224.518405] md/raid:md0: failed to run raid set.
[31761224.518412] md: pers->run() failed ...
mdadm: failed to start array /dev/md0: Input/output error
mdadm: CREATE user root not found
mdadm: CREATE group disk not found
Could not start the RAID in degraded mode.
Dropping to a shell.

BusyBox v1.18.5 (Ubuntu 1:1.18.5-1ubuntu4.1) built-in shell (ash)
Enter 'help' for a list of built-in commands.

Dropping to a shell during bootup problems is an approach that has differing perspectives – personally I want my hosts to boot regardless of how messed up things are so I can get SSH, but others differ and prefer the safety of halting and dropping to a recovery shell for the sysadmin to resolve. Ubuntu is configured to do the latter by default.

But regardless of your views on this subject, dropping to a shell leaves you stuck when running AWS instances, since there is no way to interact with this console – Amazon doesn’t have a proper console for interacting with instances like a traditional VPS provider, you’re limited to only seeing the console log.

Ubuntu’s documentation actually advises that in the event of a failed RAID array, you can still force a boot by setting a kernel option bootdegraded=true. This helps if the array was degraded, but in this case the array had entirely failed, rather than being degraded, and Ubuntu treats that differently.

Thankfully it is possible to recover the failed instance, by attaching it’s volume to another instance, adjusting the initramfs to allow booting even whilst the RAID is failed and then once booted, you can do a repair on the host itself.

To do this repair you require an additional Linux instance to use as a recovery host and the Amazon CLI tools to be installed on your workstation.

# Set some variables with your instance IDs (eg i-abcd3)
export FAILED=setme
export RECOVERY=setme

# Fetch the root filesystem EBS volume ID and set a var with it:
export VOLUME=vol-setme

# Now stop the failed instance, so we can detach it's root volume.
# (Note: wait till status goes from "stopping" to "stopped")
ec2-stop-instances --force $FAILED
ec2-describe-instances $FAILED | grep INSTANCE | awk '{ print $5 }'

# Attach the root volume to the recovery host as /dev/sdo
ec2-detach-volume $VOLUME -i $FAILED
ec2-attach-volume $VOLUME -i $RECOVERY -d /dev/sdo

# Mount the root volume on the recovery host
ssh recoveryhost.example.com
mkdir /mnt/recovery
mount /dev/sdo /mnt/recovery

# Disable raid startup scripts for initramfs/initrd. We need to
# unpack the old file and modify the startup scripts inside it.
cp /mnt/recovery/boot/initrd.img-LATESTHERE-virtual /tmp/initrd-old.img
cd /tmp/
mkdir initrd-test
cd initrd-test
cpio --extract < ../initrd-old.img
vim scripts/local-premount/mdadm
- degraded_arrays || exit 0
- mountroot_fail || panic "Dropping to a shell."
+ #degraded_arrays || exit 0
+ #mountroot_fail || panic "Dropping to a shell."
find . | cpio -o -H newc > ../initrd-new.img
cd ..
gzip initrd-new.img
cp initrd-new.img.gz /mnt/recovery/boot/initrd.img-LATESTHERE-virtual

# Disable mounting of filesystem at boot (otherwise startup process
# will fail despite the array being skipped).
vim /mnt/recovery/etc/fstab
- /dev/md0    /mnt/myraidarray    xfs    defaults    1    2
+ #/dev/md0    /mnt/myraidarray    xfs    defaults    1    2

# Work done, umount volume.
umount /mnt/recovery

# Re-attach the root volume back to the failed instance
ec2-detach-volume $VOLUME -i $RECOVERY
ec2-attach-volume $VOLUME -i $FAILED -d /dev/sda1

# Startup the failed instance.
# (Note: Wait for status to go from pending to running)
ec2-start-instances $FAILED
ec2-describe-instances $FAILED | grep INSTANCE | awk '{ print $5 }'

# Watch the startup console. Note: java.lang.NullPointerException
# means that there is no output from the console yet.
ec2-get-console-output $FAILED

# Host should startup, you can get access via SSH and repair RAID
# array via usual means.

The above is very Ubuntu-specific, but the techniques shown are transferable to other platforms as well – just note that the scripts inside the initramfs/initrd will vary per distribution, it’s one of the components of a GNU/Linux system that is completely specific to the distribution vendor.

Route53 with NamedManager 1.8.0

Just released NamedManager 1.8.0, my open source web-based DNS management tool. This release fixes some bugs with MySQL 5.6 and internationalized domain names, but also includes support for using Amazon AWS Route53 alongside the existing Bind9 support.

Just add a name server entry with the type of Route53 and your Amazon credentials and a background process will sync all DNS changes to Route53. You can mix and match thanks to the groups feature, so if you want some zones going to both Bind9 and Route53 and others going to just Route53 or Bind9, you can do so.

NamedManager, now with cloudy goodness.

NamedManager, now with cloudy goodness.

As always, the easiest installation is from the provided RPMs, however you can also install from tarball or from Git – just refer to the installation documentation.

This feature is considered stable, however it is new, so be wary for bugs and issues – and report any issues you encounter back to me via email or the project manager issue tracker.

Nginx, reverse proxies and DNS resolution

Nginx is a pretty awesome high performance web server and reverse proxy. It’s often used in conjunction with other HTTP servers such as Java/Tomcat and Ruby/Unicorn, as it allows static content to be served directly from disk by Nginx and for connections from slow clients to be queued and buffered by Nginx, rather than taking up time of the expensive/scarce application server worker processes.


A typical Nginx reverse proxy configuration to a single backend using proxy_pass to a local HTTP server application on port 8080 would look something like this:

server {
    ...
    proxy_pass http://localhost:8080
    ...
}

Another popular approach is having a defined upstream group (which can be used for multiple servers, or a single one if desired), for example:

upstream upstream-localhost {
    server localhost:8080;
}

server {
    ...
    proxy_pass http://upstream-localhost;
    ...
}

Generally this configuration works fine for most of our use cases – we typically have a 1-to-1 mapping between a backend application server and Nginx, so the configuration is very simple and reliable – any issues are usually with the backend application, rather than Nginx itself.


However on occasion there are times when it’s desirable to have Nginx talking to a backend on another server.

I recently implemented an OAuth2 gateway using Nginx-Lua, with the Nginx gateway doing the OAuth2 authentication in a small Lua module before passing the request through to the backend application. This configuration ran on a pair of bastion servers, which reverse proxy the request through to an Amazon ELB which load balances a number of application servers.

This works perfectly 95% of the time, but Amazon ELBs (even internal) have a tendency to change their IP addresses. Normally this doesn’t matter, since you never reference ELBs via their IP address and use their DNS name instead, but the default behaviour of the Nginx upstream and proxy modules is to resolve DNS at startup, but not to re-resolve DNS during the operation of the application.

This leads to a situation where the Amazon ELB IP address changes, Amazon update the DNS record, but Nginx never re-resolves the DNS record and stays pointing at the old IP address. Subsequently requests to the backend start failing once Amazon drops services from the old IP address.

This lack of re-resolution of backends is a known limitation/issue with Nginx. Thankfully there is a workaround to force Nginx to re-resolve addresses, as per this mailing list post by setting proxy_pass to a variable, which then forces re-resolution of the DNS names as Nginx treats variables differently to static configuration.

server {
    ...
    resolver 127.0.0.1;
    set $backend_upstream "http://dynamic.example.com:80";
    proxy_pass $backend_upstream;
    ...
}


A resolver (DNS server address) also needs to be configured. When using parametrised backends, a resolver must be configured in Nginx (it is unable to use the local OS resolver) and must point directly to a name server IP address.

If your name servers aren’t predictable, you could install something like dnsmasq to provide a local resolver on 127.0.0.1 which then forwards to the dynamically assigned name server, or take the approach of pulling the name server details from the host using something like Puppet Facts and then writing it into the configuration file when it’s generated on the host.

Nginx >= 1.1.9 will re-resolve DNS records based on their TTL, but it’s possible to override this with any value desired. To verify correct behaviour, tcpdump will quickly show whether re-resolution is working.

# tcpdump -i eth0 port 53
15:26:00.338503 IP nginx.example.com.53933 > 8.8.8.8.domain: 15459+ A? dynamic.example.com. (54)
15:26:00.342765 IP 8.8.8.8.domain > nginx.example.com.53933: 15459 1/0/0 A 10.1.1.1 (70)
...
15:26:52.958614 IP nginx.example.com.48673 > 8.8.8.8.domain: 63771+ A? dynamic.example.com. (54)
15:26:52.959142 IP 8.8.8.8.domain > nginx.example.com.48673: 63771 1/0/0 A 10.1.1.2 (70)

It’s a bit of an annoyance in an otherwise fantastic application, but as long as you are aware of the limitation, it is not too difficult to resolve the issue by a bit of configuration adjustment.

ELBs & Corporate Proxies

Following on from yesterday’s ELB post, it’s worth noting that there’s another common scenario where you can trigger issues when accessing ELBs – many corporates enforce the use of an HTTP proxy for all outgoing traffic, sometimes transparently, other times less so.

Having a multi-AZ ELB and accessing from your own data center isn’t too much of an issue, if each host does it’s own DNS lookup, your hosts should roughly end up with a 50/50 split across AZs, as each one resolves it’s own DNS record.

But when a proxy is added to the mix, it breaks this, since proxies tend to do their own DNS lookups and cache the results for use by other clients. Testing with Squid showed that the DNS caching for Squid would favour a particular AZ and send all traffic to that one AZ, before then flipping to the other AZ when the DNS cache expired and was refreshed – in my case, every 5mins when the TTL expired.

I'm so sick of these motherfucking ELBs in this motherfucking cloud!

Go home Amazon, you’re drunk

If you’re using Squid, there’s little you can do to work around this – whilst you can adjust the Squid DNS caching times and approaches, short of disabling DNS caching and taking the performance hit of a DNS lookup for every new outbound request, you will always end up with load jumping between both AZs and causing havoc..

There’s a few workaround options:

  • Have multiple Squid proxies for your outbound traffic and load balance between then on your network, if you load balance outgoing traffic across 4+ different outbound Squid servers, your load should end up going to different AZs a *bit* more evenly – but still not guaranteed.
  • Create an internal ELB and access via your VPC link, allowing you to bypass your company’s outbound network proxies (as traffic routes via VPN or Direct Connect) – but then you’re paying for 2x ELBs – one external for end users and one internal for your own systems.
  • Replace the ELB with something actually useful (eg a Varnish or HA-Proxy instance in Amazon).
  • Get rid of the outbound proxies please! I could write a business case for it based on the amount of money I’ve seen proxies waste at so many different companies (hint: engineers time debugging issues is much more expensive than a couple GB extra data usage).
  • Gin.

Russian roulette with ELBs and CDNs

In my day job, I look after a number of websites, all of which generally make heavy use of CDNs (Content Distribution Networks) to offload traffic to edge nodes near to an end user’s device. In our case we use Akamai, one of the largest and experienced providers in the world.

A large number of our clusters and applications now run on Amazon’s public cloud service here in Sydney, making use of EC2 instances and ELBs. Due to the important nature of our systems, we have almost all applications in active-active multi-AZ (Availability Zone) configurations. The intention of this design is that the ELB (Elastic Load Balancer) serves all incoming traffic by dividing it across each availability zone in equal proportions. If either Amazon AZ fails, the other will continue to serve requests like nothing is wrong.

It’s a nicer solution than the traditional data center approach of having an active-passive multi-site design, as with both AZs being constantly active serving requests, we know that production and “DR” are always in a functional working state, ready to handle traffic; plus your investment into DR isn’t going to waste like traditional servers sitting idle.

Unfortunately Amazon ELBs offer only the barest of no-frills features which makes them a bit stupid at times. In particular, Amazon’s multi-AZ ELBs actually consist two separate ELBs, once in each AZ. Incoming traffic selects an ELB by means of a DNS round robin and then is directed to a server in that particular AZ .

Thus, each availability zone has it’s own ELB, which adds it’s own IP address to the DNS round robin, and looks something like this:

www.example.com is an alias for www-example-com-elb.jws.elb.amazonaws.com.
www-example-com-elb.jws.elb.amazonaws.com. has address 172.16.32.1
www-example-com-elb.jws.elb.amazonaws.com. has address 192.168.0.1

The problem is that DNS round robin has no guarantee of balancing the load evenly across the two data centers. If a particular company’s proxy server caches one address, it may direct traffic for the whole company to AZ-A and deliver no traffic to AZ-B.

In reality, due to the large number of users getting assigned different IP addresses with round robin, users tend to be spread somewhat evenly across the different AZs, making the problem a somewhat moot point when you have sizeable visitor numbers.

But if you add Akamai to the mix, you can end up with interesting results – it turns out that Akamai Edge nodes in AU use a central source of DNS information, which can lead to them favouring a particular ELB IP address. And since *all* your traffic goes via the CDN, this in turn results in all your traffic going directly to a single AZ and ignoring the other one entirely.

In a real-world scenario of a 4 webserver cluster, we saw traffic jump between each AZ whenever Akamai’s edge servers updated DNS to a different IP address, as per the below graph:

Time to really test that your application is active-active!

Akamai decides to switch which ELB it’s using from A to B :-/

This swapping brings around some really nasty issues. In theory your active-active setup should be large enough to handle all your usual traffic load on just one AZ, but if that’s not the case, bad things will happen to your site performance and/or reliability.

The other nasty issue is when doing auto-scaling with Amazon, this swapping messes with your Cloud Watch metrics for autoscale policies/triggers – one AZ is complete idle, one AZ is maxed out, average stats show a half busy cluster, no need to autoscale upwards to handle the load.

And even if you’re clever and set your autoscaling to also trigger based on ELB latency/errors/throughput, you may still end up with issues, since the new host created during the autoscale may end up in the idle AZ, instead of the active AZ where you need it.

Using a smarter system for load balancing can negate the issue – for example using a pair of Varnish servers or HA-Proxy servers configured to do cross-AZ load balancing would workaround the issue, by spreading all the traffic coming into one AZ across all the servers in both AZs, but this does have increased costs (running EC2 instances, inter-AZ traffic). It also may have performance issues depending on the amount of traffic pouring into your instance.

Additionally, if you have a global audience, rather than a mostly single-country audience like us, you may not see the issue, since the different Akamai regions around the world will balance load somewhat equally across the two AZs.

To properly fix this behaviour with Akamai, you need to open a professional services request and have the SureRoute configuration adjusted so that Akamai forces the edge notes to lookup the origin IPs at the edge:

<!-- SR fix to handle multiple origin IP's -->
<forward:cache-parent.sureroute2.force-origin-ip-from-edge>on
</forward:cache-parent.sureroute2.force-origin-ip-from-edge>
<forward:cache-parent.sureroute2.round-robin.status>on
</forward:cache-parent.sureroute2.round-robin.status>

<!-- no host in sureroute stat-key -->
<forward:cache-parent.sureroute2.stat-key.host>off
</forward:cache-parent.sureroute2.stat-key.host>

With this fixed configuration, Akamai will correctly spread load evenly across our two AZs and our load graphs settled comfortably back into normality. I’m not entirely sure why this configuration isn’t default SureRoute behaviour, but like many things with Akamai, there are often mysterious adjustments that only professional services know about or can make.

Finally it’s worth noting that this issue isn’t unique to Amazon – you could get the same issue if you run active-active conventional data centers and use Akamai for offload. It may also be an issue with other CDNs by default, so double-check the behaviour of your particular vendor – it would be interesting to see if CloudFront (Amazon’s CDN) exhibits similar issues or not.

Credit to my colleague Andrew. for spotting this issue originally and having to deal with two different vendors support cases at once to get to the bottom of the root cause.

Ebook Debate

Lisa and I recently decided to purchase a Kindle – having first moved to Auckland and then Sydney, we were unable to take many books with us, something we both regretted – as the plan isn’t to settle in Sydney long term, it’s not worth shipping them over to only then have to ship them elsewhere again.

In the last 5+ years almost all the reading I’ve done has been on my laptop, but this has some unfortunate side effects:

  • It’s never as easy to lie on the beach or at the park with a laptop as it is for with a book, as a result, we do far less reading or lying outside than we would like.
  • Years of working in IT has turned me into a screen skim reader – I was always a fast reader, but in order to keep up with analysing logs and complex information, I’m become a very impatient skim reader. If I try to read any large textual content such as books on my computer, I’m liable to skip through content.
  • Computers make me context-shift – I’ll be reading a book, and then jump into email, then IM and lose all depth and concentration on what I was reading. Sometimes I just want a book to be a book.
  • LCD screens are very difficult to read outside in bright sunlight – this is particularly an issue, since we want to try and get outside and out of our apartment more to escape the crippling heat of Sydney.

We pondered getting a small tablet, such as the iPad Mini or Google Nexus 7, but these share a lot of the same problems as using our laptops, such as the LCD screen being poor for reading and the multi tasking nature of the device leading to context shifting and loss of focus.

In the end, we decided to buy one of the current generation of basic Kindle models, and if we like it, upgrade to having two of the newer generation Paperwhite Kindles once they launch in the AU market.

We had a bit of a mission getting one – the Paperwhite is currently only available in the US market and Amazon won’t ship to AU – but when we tried to order the regular model via Amazon, it kept refusing to ship to AU for some unstated reason:

Hi Amazon, I have a bug report for you...

Hi Amazon, I have a bug report for you…

I ended up giving up and shelling out an extra $20 to buy from Dick Smith’s who had the model we wanted in stock. It’s been a long time since I shopped retail, it’s certainly an interesting experience….

With the expensive prices, display models that were two generations out of date, display Kindles that hadn’t even been setup leaving them unusable for demonstrations and pushy sales pitches trying to offload warranties, cases and screen protectors, it’s no wonder that online shopping is decimating the AU retail market.

Aside from the purchasing hassles, the Kindle is shaping up to be a great device – at least based on what I’ve experienced so far, which is only the basics, as Lisa keeps stealing it away from me….

The e-ink display is excellent in daylight, although it suffers a bit in our apartment, which has somewhat dull lighting levels – the newer Paperwhite model with the front-lit display would help resolve this issue for us, so I expect we will look to upgrade once it’s released.

In bright sunlight or even just outdoors in general, the display is clear and easy to read, something that is a huge difference compared to my conventional LCD laptop and I expect we’ll make more park and beach trips for reading & relaxing now that we have it.

Kindle in the park. [lovingly stolen from Lisa's instagram feed since I forgot to take a picture myself]

Kindle in the park. [lovingly stolen from Lisa’s instagram feed since I forgot to take a picture myself]

I had some reservations about the Kindle, the DRM around their book store and the amount of control that they have over it is of some concern (see FSF for details), but we’ve decided to use it primarily as a side loaded device, where we download and store all our ebooks on our laptops (using a tool like Calibre) and then side load them onto the Kindle, which is easy to do via USB transfer or emailing them to the Kindle itself.

When buying books, I’ll stick to getting them in a downloadable DRM-free format, so that I can copy them to any device in future – this also solves the backup issue for the Kindle, since anything on my laptop or servers is backed up reliably.

Of course I have to try resisting hacking the Kindle and bricking it in some way, or I’ll have an angry fiancée on the warpath, so for now I’ll keep trying to treat it as a book only.  ;-)