The first generation Intel Apple Mac Mini (Macmini1,1) has a special place as the best bang-for-buck system that I’ve ever purchased.
Purchased for around $1k NZD in 2006, it did a stint as a much more sleep-friendly server back after I started my first job and was living at my parents house. It then went on to become my primary desktop for a couple of years in conjunction with my laptop. And finally it transitioned into a media centre and spent a number of years driving the TV and handling long running downloads. It even survived getting sent over to Sydney and running non-stop in the hot blazing hell inside my apartment there.
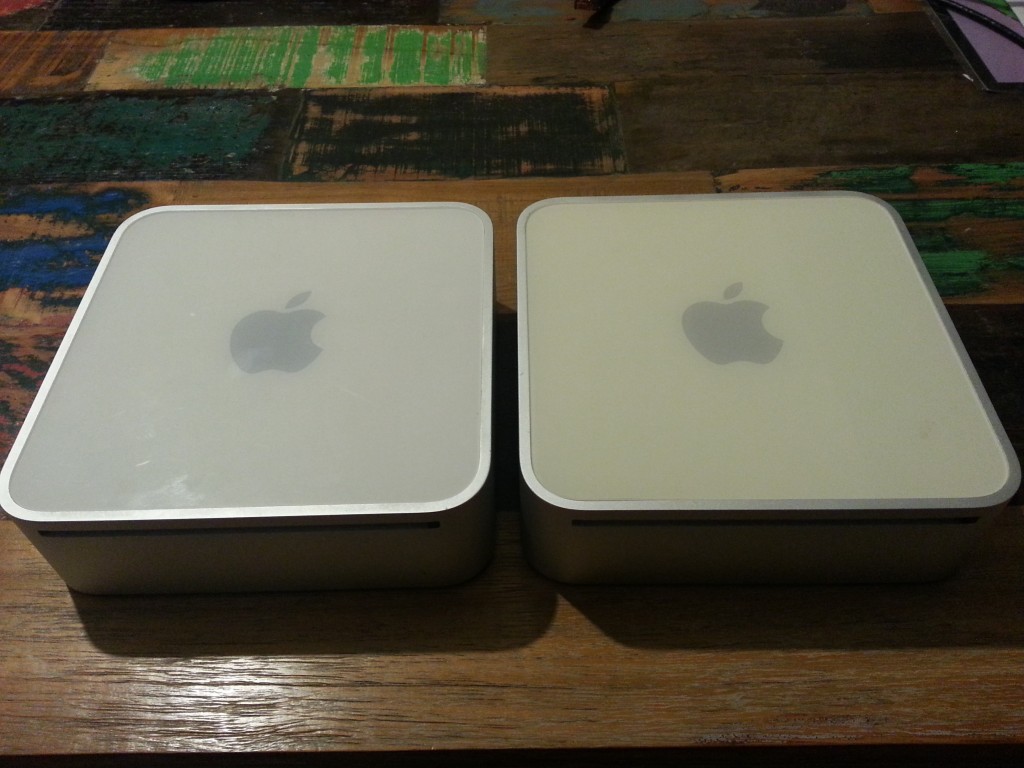
My long term relationship on the left and a more recent stray I obtained. Clearly mine takes after it’s owner and hasn’t seen the sun much.
Having now reached it’s 10th birthday, it’s started to show it’s age. Whilst it handles 720p content without an issue, it’s now hit and miss whether 1080p H264 content will work without unacceptable jitter.
It’s previously undergone a few upgrades. I bumped it from the original 512MB RAM to 2GB (the max) years ago and it’s had it’s 60GB hard drive replaced with a more modern 500GB model. But neither of these will help much with the video decoding performance.
Given we had recently obtained something that the people at Samsung consider a “Smart” TV, I decided to replace the Mac Mini with the Plex client running natively on the TV and recycle the Mac Mini into a new role as a small server to potentially replace a much more power hungry AMD Phenom II system that performs somewhat basic storage and network tasks.
Unfortunately this isn’t as simple as it sounds. The first gen Intel Mac Minis arrived on the scene just a bit too soon for 64-bit CPUs and so are packing the original Intel Core Solo or Intel Core Duo (1 or 2 cores respectively) which aren’t clocked particularly high and are only 32bit capable.
Whilst GNU/Linux *can* run on this, supported versions of MacOS X certainly can’t. The last MacOS version supported on these devices is Mac OS X 10.6.8 “Snow Leopard” 32-bit and the majority of app developers for MacOS have decided to set their minimum supported platform at 64-bit MacOS X 10.7.5 “Lion” so they can drop the old 32-bit stuff – this includes the popular Chrome browser which now only provides 64-built builds. Basically OS X Snow Leopard is the Win XP of the MacOS world.
Even running 32-bit GNU/Linux can be an exercise in frustration. Some distributions now only ship 64-bit builds and proprietary software vendors don’t always bother releasing 32-bit builds of their apps limiting what you can run on them.
On the plus side, this earlier generation of Apple machines was before Apple decided to start soldering everything together which means not only can you replace the RAM, storage, drives, WiFi card, you can also replace the CPU itself since it’s socketed!
Essentially you can replace the CPUs in the Macmini1,1 (2006) or Macmini2,1 (2007) models with any chip compatible with Intel Socket M, the highest spec model available being the Intel Core 2 Duo 2.33 Ghz T7600.
At ~$60NZD for the T7600, it was a bit more than I wanted to spend for a decade old CPU. However moving down slightly to the T7400, the second hand price drops to around ~$20NZD per CPU with international shipping included. And at 2.177Ghz it’s no slouch, especially when compared to the original 1.5Ghz single core CPU.
It took a while to get here, I used this seller after the first seller never delivered the item and refunded me when asked about it. One of my CPUs also arrived with a bent pin, so there was some rather cold sweat moments straightening the tiny pin with a screw driver. But I guess this is what you get for buying decade old CPUs from a mysterious internet trader.
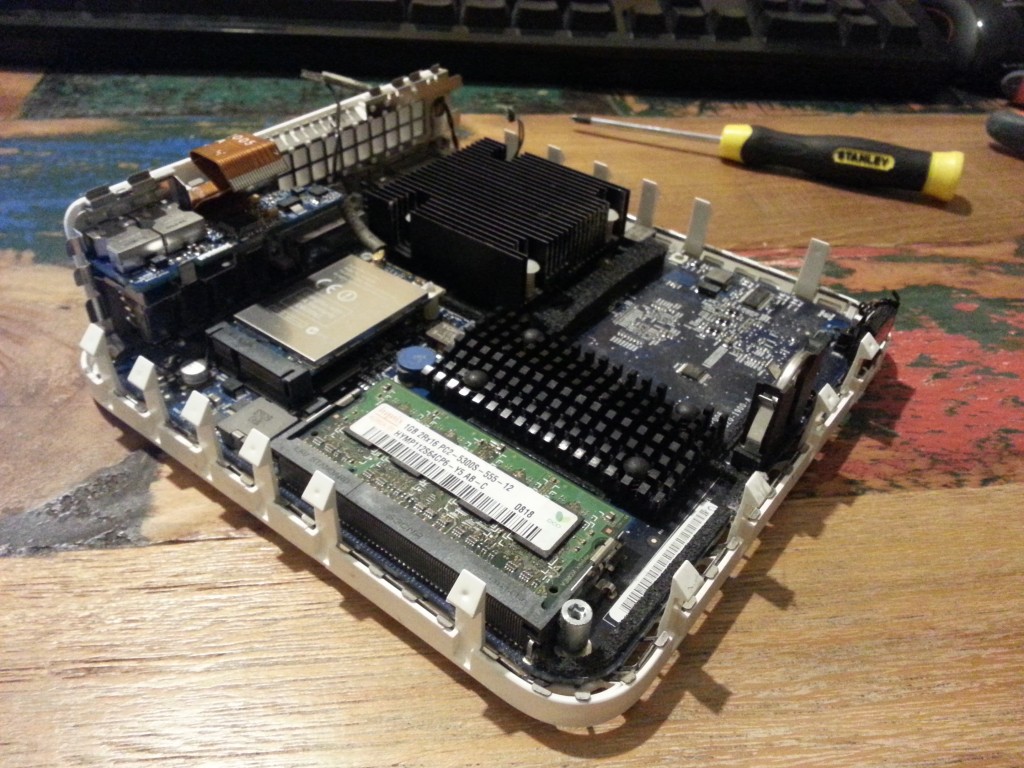
I was surprised at the lack of dust inside the unit given it’s long life, even the fan duct was remarkably dust-free.
The replacement is a bit of a pain, you have to strip the Mac Mini right down and take the motherboard out, but it’s not the hardest upgrade I’ve ever had to do – dealing with cheap $100 cut-your-hand-open PC cases were much nastier than the well designed internals of the Mac. The only real tricky bit is the addition and removal of the heatsink which worked best with a second person helping remove the plastic pegs.
I did it using a regular putty knife, needle-nose pliers, phillips & flat head screw drivers and one Torx screw driver to deal with a single T10 screw that differs from the rest of the ones in the unit.
Recommend testing this things *before* putting the main case back together, they’re a pain to open back up if it doesn’t work first run.
The end result is an upgrade from a 1.5 Ghz single core 32bit CPU to 2.17 Ghz dual core 64bit CPU – whilst it won’t hold much to a modern i7, it will certainly be able to crunch video and server tasks quite happily.
The next problem was getting an OS on there.
This CPU upgrade opens up new options for MacOS fans, if you hack the installer a bit you can get MacOS X 10.7.5 “Lion” on there which gives you a 64-bit OS that can still run much of the current software that’s available. You can’t go past Lion however, since the support for the Intel GMA 950 GPU was dropped in later versions of MacOS.
Given I want them to run as servers, GNU/Linux is the only logical choice. The only issue was booting it… it seems they don’t support booting from USB flash drives.
These Mac Minis really did fall into a generational gap. Modern enough to have EFI and no legacy ports, yet old enough to be 32-bit and lack support for booting from USB. I wasn’t even sure if I would even be able to boot 64-bit Linux with a 32-bit EFI…
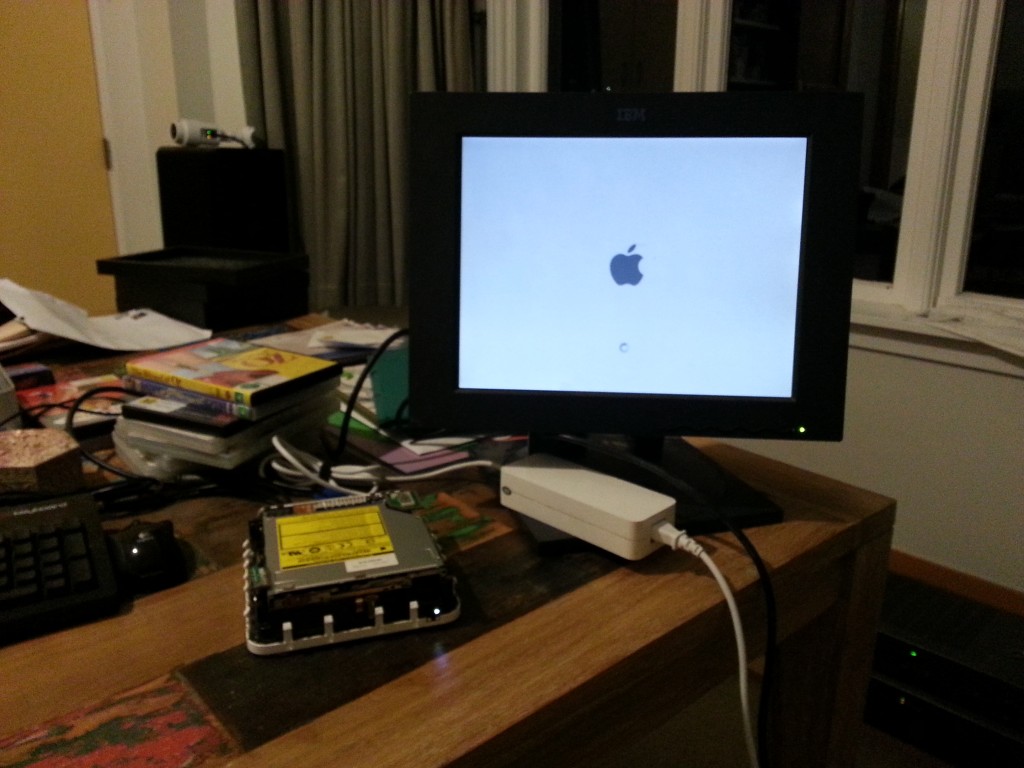
Given it doesn’t boot from USB and I didn’t have any firewire devices lying around to try booting from, I fell back to the joys of optical media. This was harder than it sounds given I don’t have any media and barely any working drives, but my colleague thankfully dug up a couple old CD-R for me.
“Daddy are those shiny things floppy disks?”
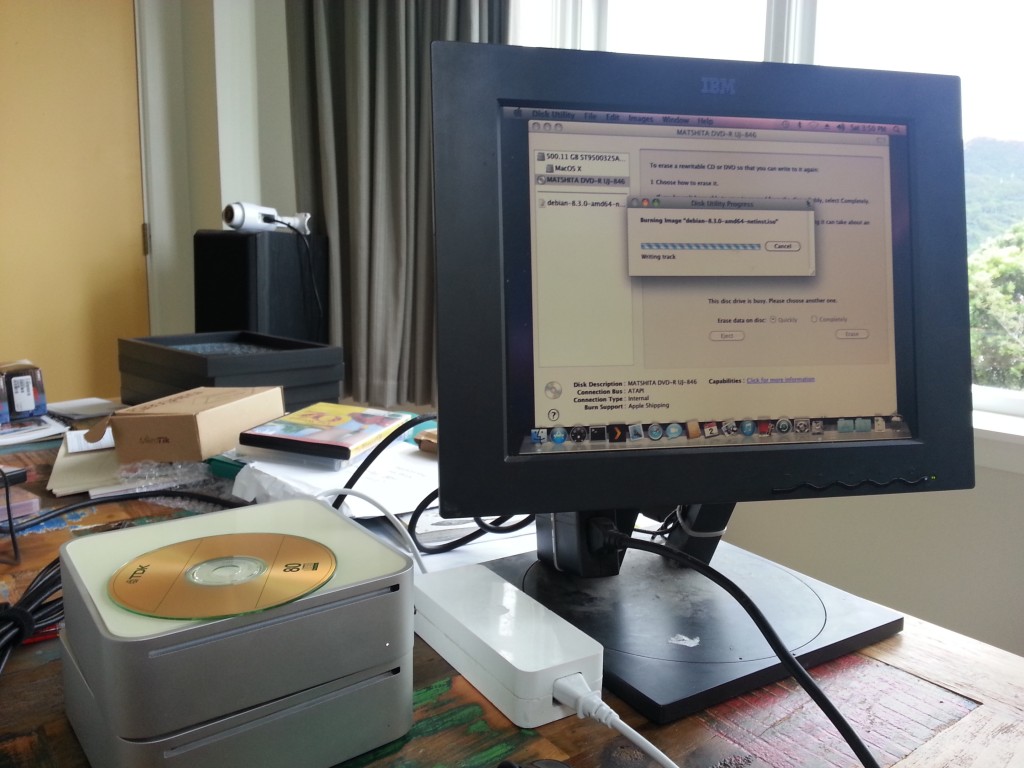
I also quickly remembered why we all moved on from optical media. My first burn appeared to succeed but crashed trying to load the bootloader. And then refused to eject. Actually, it’s still refusing to eject, so there’s a Debian 8 installer that might just be stuck in there until it’s dying days… The other unit’s optical drive didn’t even work at all, so I couldn’t even do the pain of swapping around hardware to get a working combination.
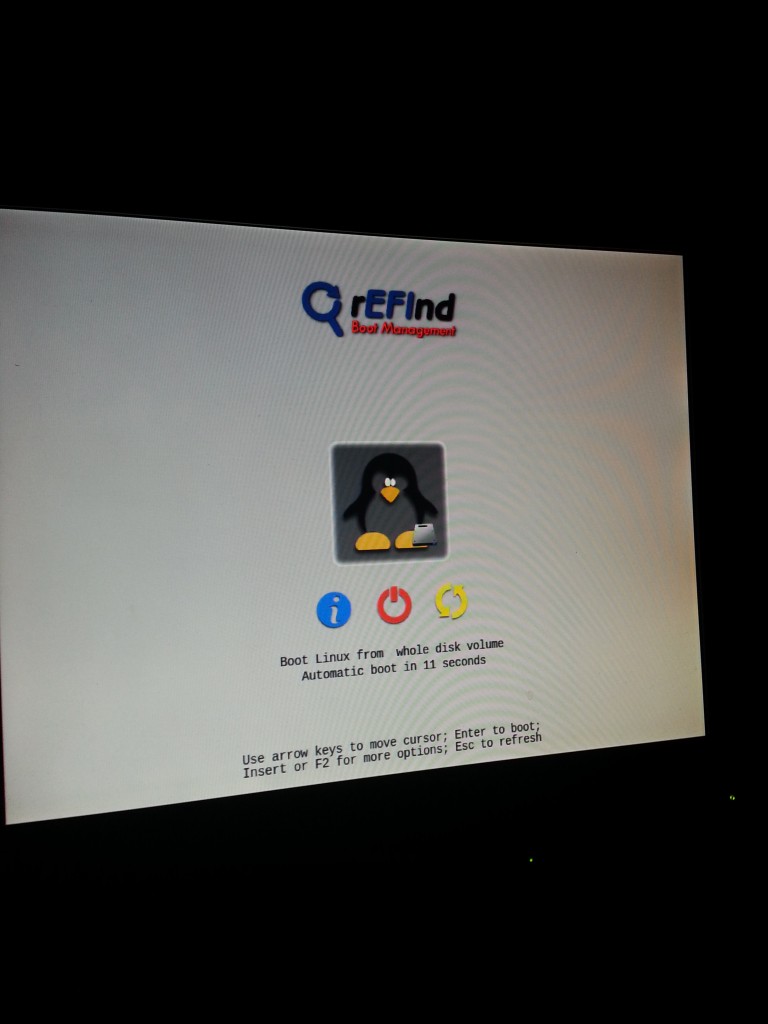
Having exhausted the optional of a old-school CD-based GNU/Linux install, I started digging into ways to boot from another partition on the machine’s hard drive and found a project called rEFInd.
This awesome software is an alternative boot manager for EFI. It differs from a boot loader slightly, in a traditional BIOS -> Boot Loader -> OS world, rEFInd is equivalent to a custom BIOS offering better boot functionality than the OEM vendor.
It works by installing itself into a small FAT partition that lives on the hard disk – it’s probably the easiest low-level tool I’ve ever installed – download, unzip, and run the installer from either MacOS or Linux.
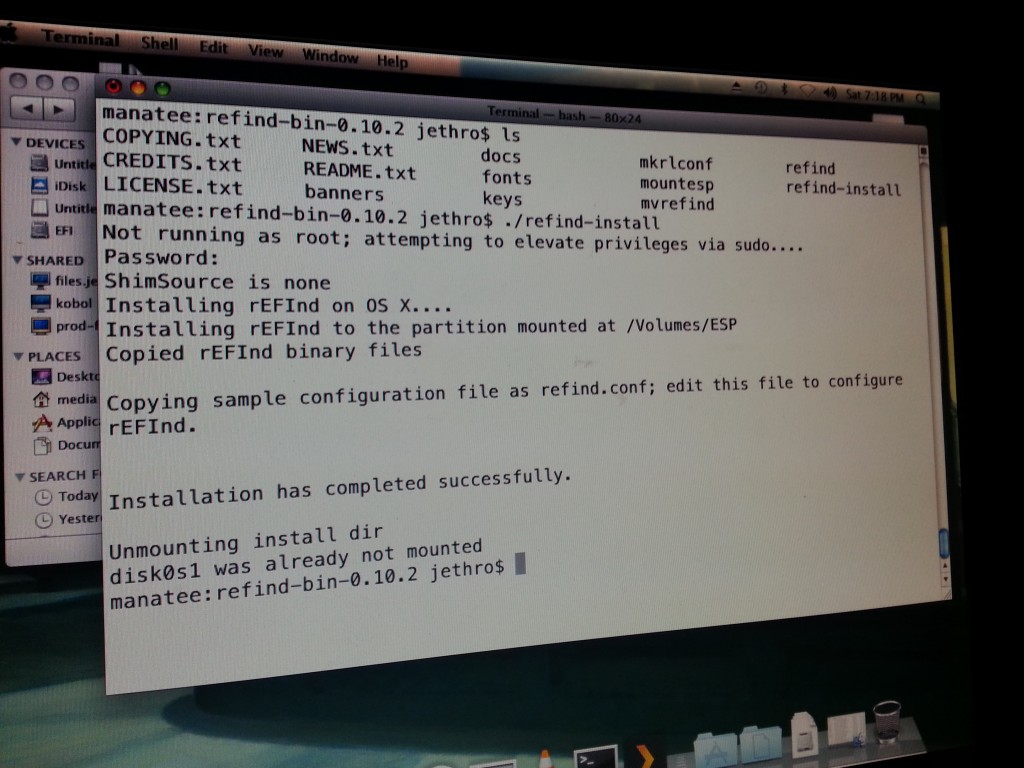
Disturbingly easy from the existing OS X installation
Once installed, rEFInd kicks in at boot and offers the ability to boot from USB flash drives, in addition to the hard drive itself!
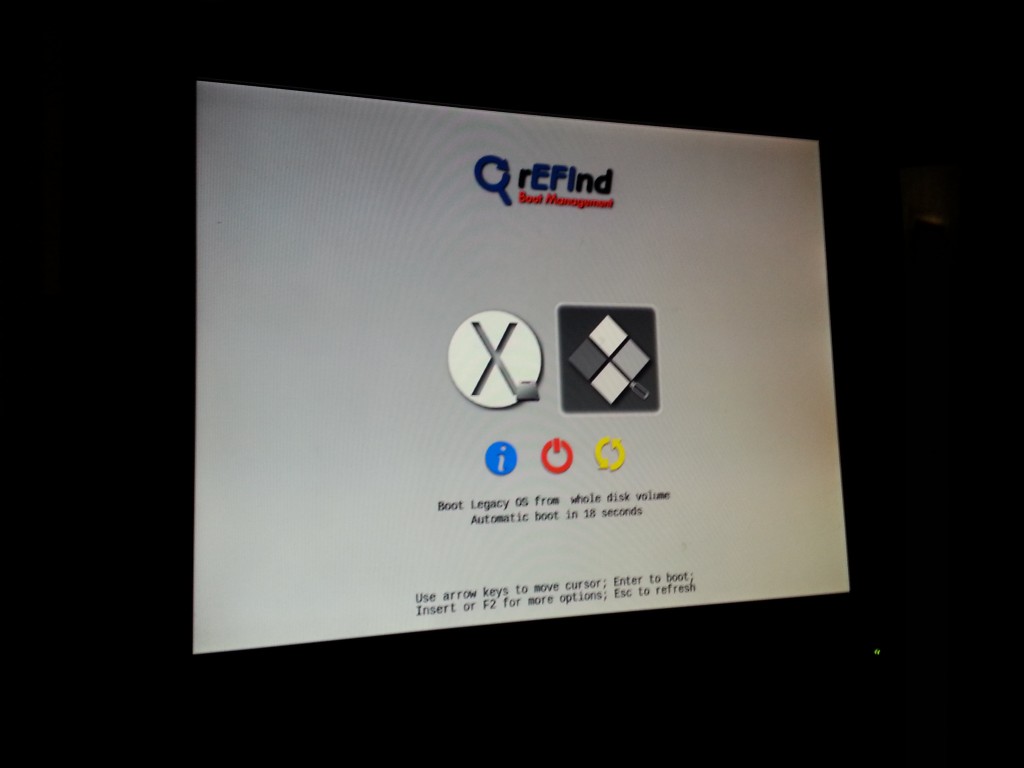
The USB flash installer has been detected as “Legacy OS from whole disk volume”.
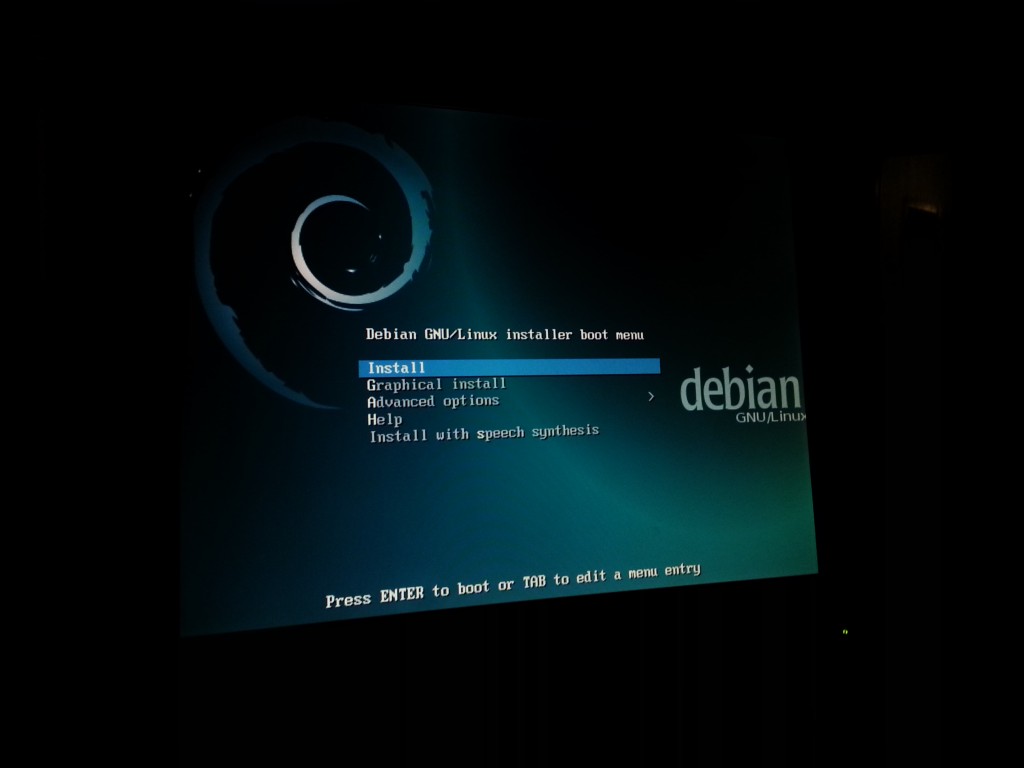
Yusss, Debian installer booted from USB via rEFInd!
A typical Debian installation followed, only thing I was careful about was not to delete the 209.7MB FAT filesystem used by EFI – I figured I didn’t want to find out what deleting that would mean on a box that was hard enough to boot as it is…
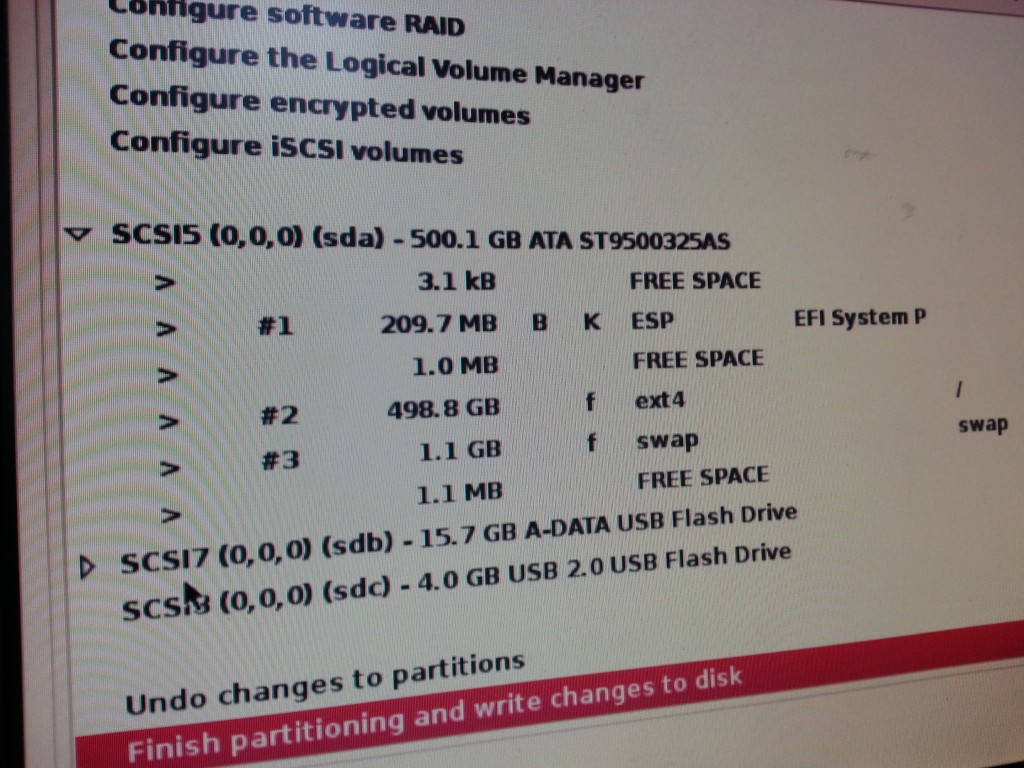
The small < 1MB free space between the partitions here irks me so much, I blame MacOS for aligning the partitions weirdly.
Once installed. rEFInd detected Linux as the OS installed on the hard drive and booted into GRUB and from there the usual Linux boot process works fine.
Launch the penguins!
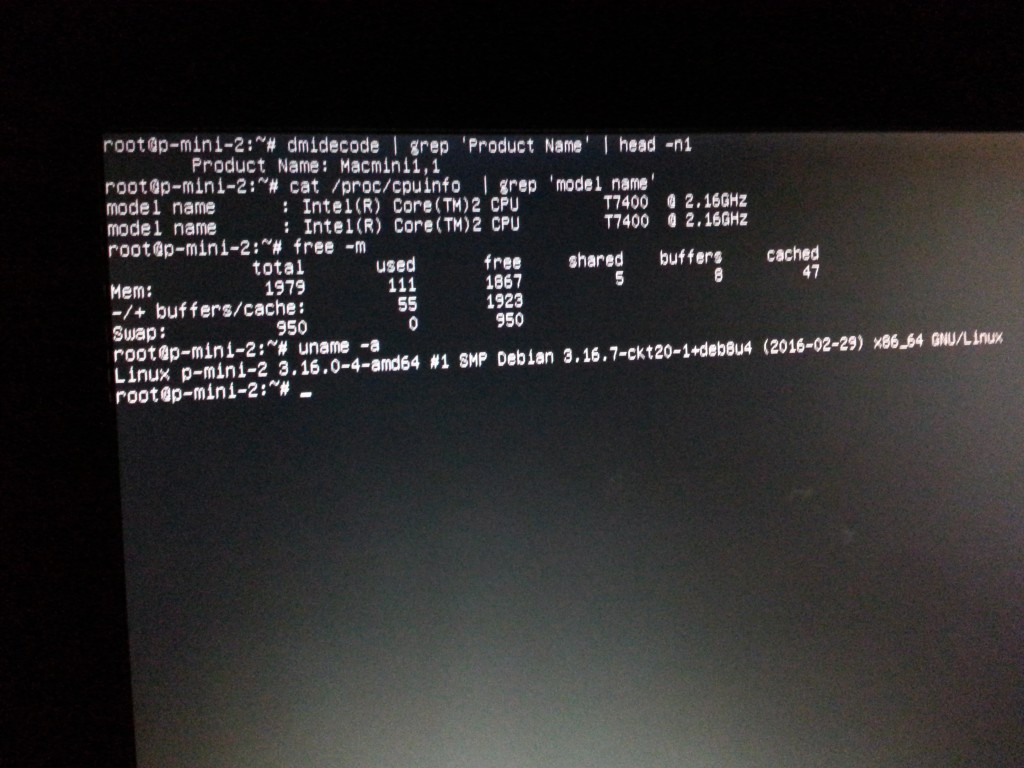
Final result -2GB RAM, 64bit CPU, delicious delicious GNU/Linux x86_64
I can confirm that both 32bit and 64bit Debian works nicely on this box (I installed 32-bit first by mistake) – so even without doing the CPU upgrade, if you want to get a bit more life out of these early unsupported Mac Minis, they’d happily run a 32-bit Debian desktop so you can enjoy wonders like a properly patched browser and operating system.
Not all other distributions will work – Ubuntu for example don’t include EFI support on their 32-bit installer which will probably cause some headaches. You should be OK with any of the major 64-bit distributions since they tend to always support EFI.
The final joy I ran into is that when I set up the Mac Mini as a headless box, it didn’t boot… it just turned on and never appeared on the network.
Seems that the Mac Minis (even the later unibody generation) have some genius firmware that disables the GPU hardware if no screen is attached, which then messes up most operating systems on it.
The easy fix, is to hack together a fake VGA load by connecting a 100Ω resister between pins 2 and 7 of a DVI-to-VGA adaptor (such as the one that ships with the Mac Mini).
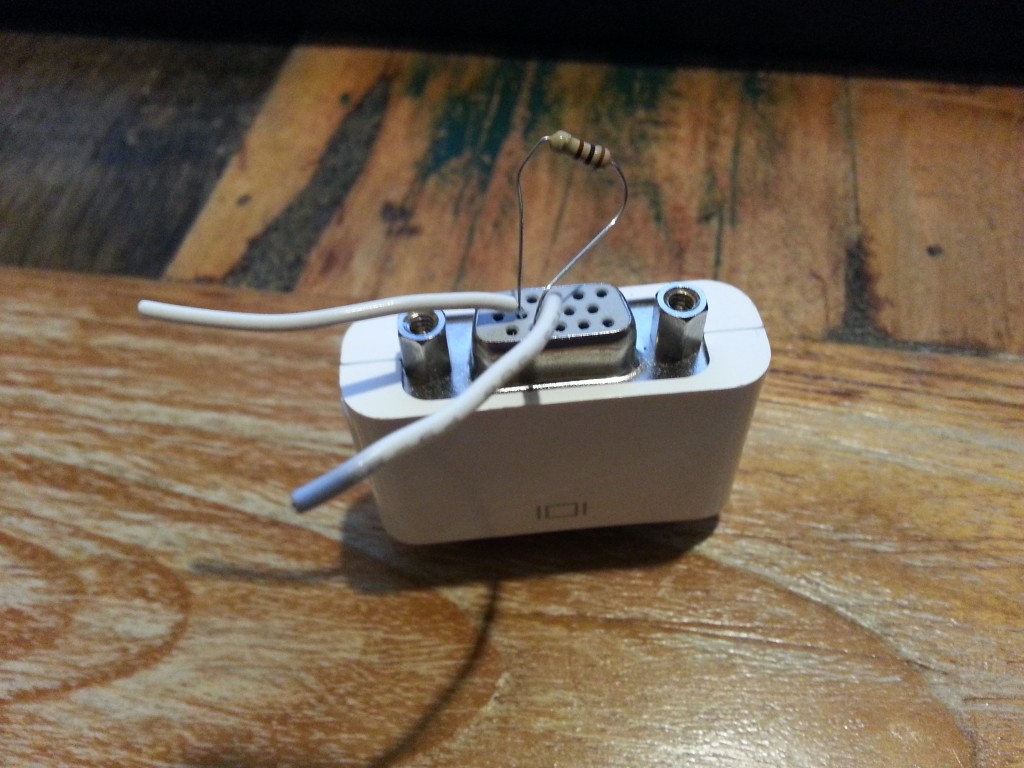
I need to make a tidier/better version of this, but it works!
No idea what engineer thought this was a good feature, but thankfully it’s an easy and cheap fix, especially since I have a box littered with these now-useless adaptors.
The end result is that I now have 2x 64-bit first gen Mac Minis running Debian GNU/Linux for a cost of around $20NZD and some time dismantling/reassembling them.
I’d recommend these small Mac Minis for server purposes, but the NZ second hand prices are still a bit too expensive for their age to buy specifically for this… Once they start going below $100 they’d make reasonable alternatives to something like the Intel NUC or Raspberry Pi for small serving tasks.
The older units aren’t necessarily problem free either. Whilst the build quality is excellent, after 10 years things don’t always work right. Both of my optical drives no longer function properly and one of the Mac Minis has a faulty RAM slot, limiting it to 1GB instead of the usual 2GB.
And of course at 10 years whom knows how much longer they’ll run for – but it’s been a good run so far, so here’s to another 10 years (hopefully)! The real limiting factor is going to be the 1GB/2GB RAM long term.
Also if you forget to enable resume-on-power-loss in MacOS before installing Linux, the good news is you can enable it with setpci – see http://smackerelofopinion.blogspot.co.nz/2011/09/mac-mini-rebooting-tweaks-setpci-s-01f0.html
One trap which bit me – this does not seem to persist across restarts. So add it to something like /etc/rc.local
setpci -s 0:1f.0 0xa4.b=0
For reference, to turn the Debian installer into a USB installer:
$ hdiutil convert -format UDRW -o debian.img debian-8.3.0-amd64-netinst.iso
$ sudo dd if=~/Downloads/debian.img.dmg of=/dev/rdiskX bs=2m
You’ll need to determine which /dev/rdiskX device to copy it to, I recommend listing with ls -l /dev/rdisk* before and after connecting the USB drive to determine. Get it wrong and you’ll have an impromptu restore-from-backup test to do ;-)
Good writeup Jethro, may take a stab at a 32 bit install on an old machine.
These great little machines can see more than 2Gb RAM once fitted with a Core2Duo, there is a hack to update the firmware of the Macmini1,1 to that of the Macmini 2.1. This allows the machine to see 3Gb RAM.
Hi Jethro,
You inspired me when I was losing faith, here is how I installed a dual boot on my Mac Mini 2.1:
1- Partition the main HD (Shrink the OS X partition and and leave 20Gb Free Space for Linux)
2- Install REFind (not sure I needed to do that but it felt reassuring)
3- Download the amd64 distro of Lubuntu 17.04
4- Modify it using the little C program provided by Matt Gadient: https://mattgadient.com/2016/07/11/linux-dvd-images-and-how-to-for-32-bit-efi-macs-late-2006-models/
5- Burn it on a DVD
6- Boot Lubuntu from the DVD (will not work if step 4 is not done, as Matt explains very well on his page)
7- Run the normal Lubuntu Install – it detects the free space on the main HD and installs Lubuntu gracefully alongside Mac OS X
Hi! Thanks for sharing your saga! I am now recovering my old Mac Mini 2,1 1.83MHz. It has a OSX 32bit 10.7.5 Lion (you should know it exists) and a Windows 7. There is a Windows 7 compilation in a DVD with a custom bootloader that make possible the dual boot without rEFInd, however, I honestly don’t know exaclty how it works. It was made for old PCs and works with old Macs too (I guess they don’t know).
I think you may install 4GB of RAM in your 2,1 Mac Mini, will run really better. You just have to find the right manifacturer, the way the chips are arranged make it visible. I used 4allmemory.
Great writeup! I encountered the same problem with my stock 1.83 GHz Core 2 Duo Mac Mini after installing Ubuntu 14.04 LTS server. Considering that I planned on running the machine headless, it didn’t seem necessary to connect a monitor. After some troubleshooting, I connected it to a DVI KVM switcher and bootup proceeded normally. Such a strange design…
I’ve ordered a T7600 2.3 GHz Core 2 Duo for ~$17 USD, which should give the machine a little more kick. But I must say that it works great with the stock 1.83 GHz processor and 4 GB RAM (only 3 GB usable).
For me it can’t install from USB at all, even with refind on the hard drive. I have a 2,1 Mac Mini. If I create a special install partition and dd the converted image to it instead of to a USB, refind lets me boot from the install partition. But then, the boot dies before even Linux starts with something like “can not find loadlin.sys” or something like that. Any ideas?
Yeah, same here. After I while I get a black screen which asks for a bootable partition and there it dies.
You can boot from the main SSD / HDD to install Mac OS X / Windows / Linux, whatever system you want to install Just make a small bootable partition and install your OS installation files there. I have done this many times. :-)
Once installed. rEFInd detectn usb on start up! THNX MEN ;D
running ubuntu 14
You say:
“Given I want them to run as servers, GNU/Linux is the only logical choice.”
What about {Free,Net,Open}BSD?