Having gone through three Wellington winters in our home, Lisa and I really didn’t want to make it a fourth this year. Whilst our property is fortunate enough to get a lot of sun during the day, it still can’t sustain a comfortable temperature in the middle of winter when we have weeks with day highs of 10c and lows of 5c. In the worst case, it’s gotten right down to 2c outside.
We insulated as much as possible shortly after we moved in, both the roof and floor, but unfortunately with house being very low to the ground, there were sections of the floor that simply couldn’t be insulated, so we ended up with approximately 60% coverage. We aren’t sure about the walls either, some of the ones we’ve had to cut open to do work have revealed insulation but we don’t know for sure if it is fully present in all walls of the house or not.
Insulation upgrade in progress
Most New Zealand homes are also only single glazed and ours is no exception, which means even with the roof (100%), floor (~ 60%) and walls (??%) insulated, we still have massive bay windows leaking heat like crazy. So regardless of the natural sun we get, a high capacity heat source is still critical to maintain a proper temperature at the property.
Which is also precisely what we lacked – when we moved in the house had a rusted wood fireplace in dubious condition and an unflued gas heater which are generally just a bad idea all-round. Neither of these were safe options, so we needed to replace them with something better.
We considered a few different options:
- A new wood fire would offer a nice ambience, but access to the property is a challenge and we’d go through most of the firewood we’ve ended up collecting from dropping overgrown trees. So long term, we’d be buying expensive firewood and having to shift it onto the property – plus we’d lose a good amount of space storing a winter’s worth of firewood.
- A gas fireplace was considered due to us already having existing piped gas. A modern flued gas fireplace is efficient and doesn’t exhaust into the living space, plus offers all the classic ambience of a fireplace. The only downside is that the heat would be focused in our lounge or dining rooms and wouldn’t propagate nicely through the rest of the house. There are some models that feature ducting that can exhaust some of the heat to other parts of the house (eg 2 or 3 other rooms) but our size of property wouldn’t be able to get full coverage meaning we’d need to looking at needing to install two fireplaces or additional heating to fully cover the property.
- We seriously considered a gas boiler and European style radiators emitting radiant heat in every room. This would result in us losing some wall space, although we would have been able to put them under the windows. Ultimately this option ended up not being possible, as our existing gas pipe is too small in diameter and the cost of running a new pipe from the street to the house is extremely uneconomical.
The gas pipe limitation also impacted our ability to drive other high consumption gas appliances, for example feeding large fireplaces could be tricky and we’d probably be unable to run more than a single instantaneous hot water system. Probably for the better anyway given that it’s a fossil fuel, but it’s so much more cost effective than electricity on a per kWh basis in NZ that it’s a compelling option if you have gas piped to your property.
Given the above issues, the only remaining option that made any sense was electric heat pumps. Heat pumps are generally 300-400% efficient, meaning although they use super expensive electricity, you get very good heat output compared to running traditional electric heaters.
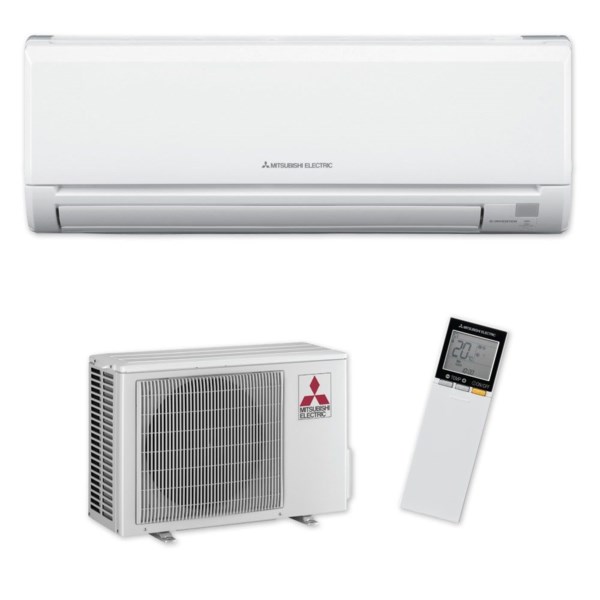
What most NZders will think of when you say “heat pump”
These are becoming quite popular now in NZ as an affordable upgrade (a fully installed basic unit might cost as little as $2-3k NZD) for existing properties – the purchase of a mini-split system such as the above allows for easy retrofit installation and you’ll often see these added to lounges to ensure a reliable heat source in the main living space.
Their weakness is that you don’t get the heat spreading from the primary room out into other parts of the house, such as bedrooms. And they’re not cheap enough that you would install one in every room to get the coverage, but even if you did, you’d then have to deal with managing them all in a sensible fashion so they don’t end up fighting each other when maintaining temperatures.
To solve this problem, we went for a less common (in NZ residential homes) option of putting in a central ducted heat pump. These units use the same essential technology (using a refrigerant to shift heat from the outside unit through pipes to an inside unit), but rather than having an on-wall unit, we have a large unit in the attic, with ducting pushing air into every room of the house, to be recirculated back via a hallway intake.
Due to the amount of specialist skills and tools required for this project, plus a lot of time climbing around the attic which I just love doing, we instead contracted Wasabi Air to perform the complete installation for us. They did a really good job, so pretty happy with that.

Diagram from Mitsubishi’s website illustrating how a ducted heat pump setup looks.
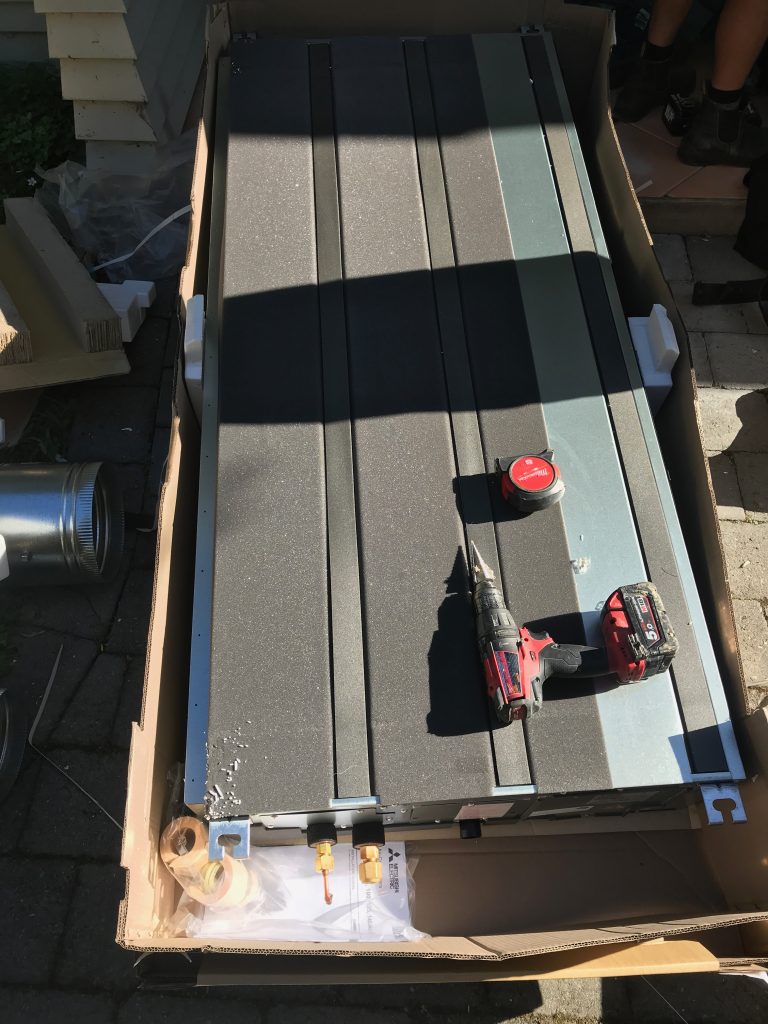
We went with a Mitsubishi PEAD 140 unit based on Wasabi’s recommendation as an appropriately sized unit. This unit is capable of 16 kW heat output or 13 kW cooling output and can consume up to 4 kW of electricity to operate at peak.
The installation is pretty full on, it took 3 days for a team to get everything installed and set up. I took a selection of photos during the install since I’m a weirdo who finds installing things like this interesting.
Firstly the exterior unit needed installation. Whilst modern heat pumps are “quiet” they’re still audible when working hard so you want them away from bedrooms – thankfully we had a convenient space between two bay windows where it could sit below the floor level of the house. The only slight downside of this location, is that I’ve noticed the deck has the tendency to slightly amplify the vibration of the unit at times, whereas if we had gotten it mounted on a concrete pad elsewhere it may have been less of an issue.
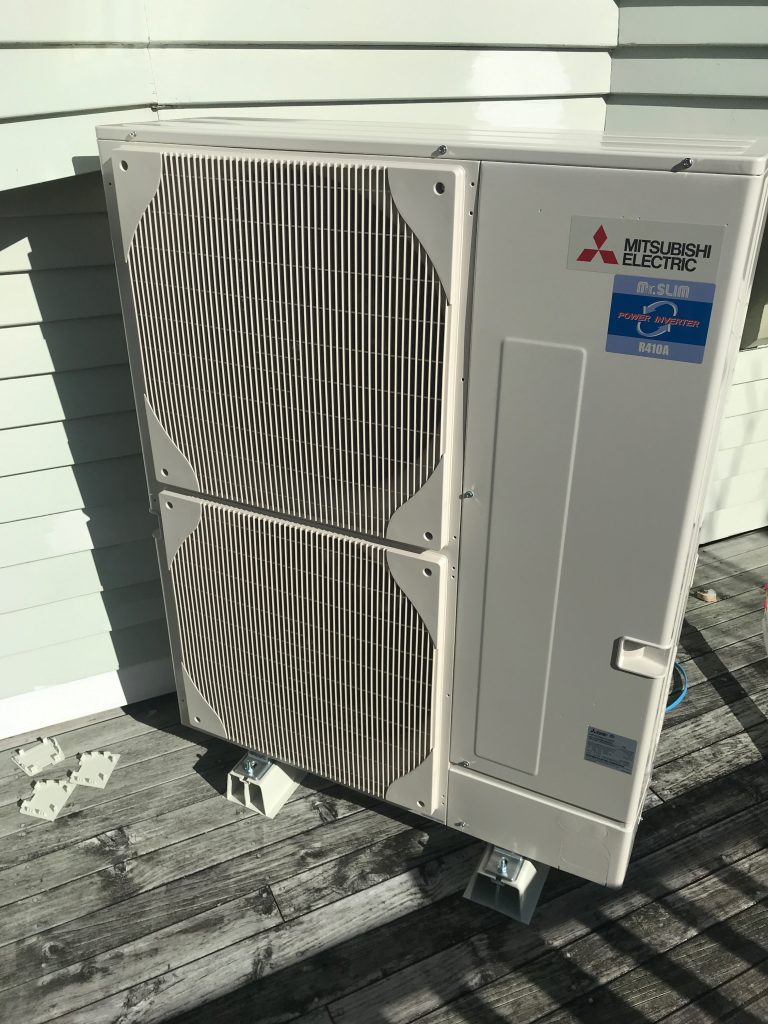
Exterior unit. This thing is *big* and shovels a significant amount of air through itself when operating.
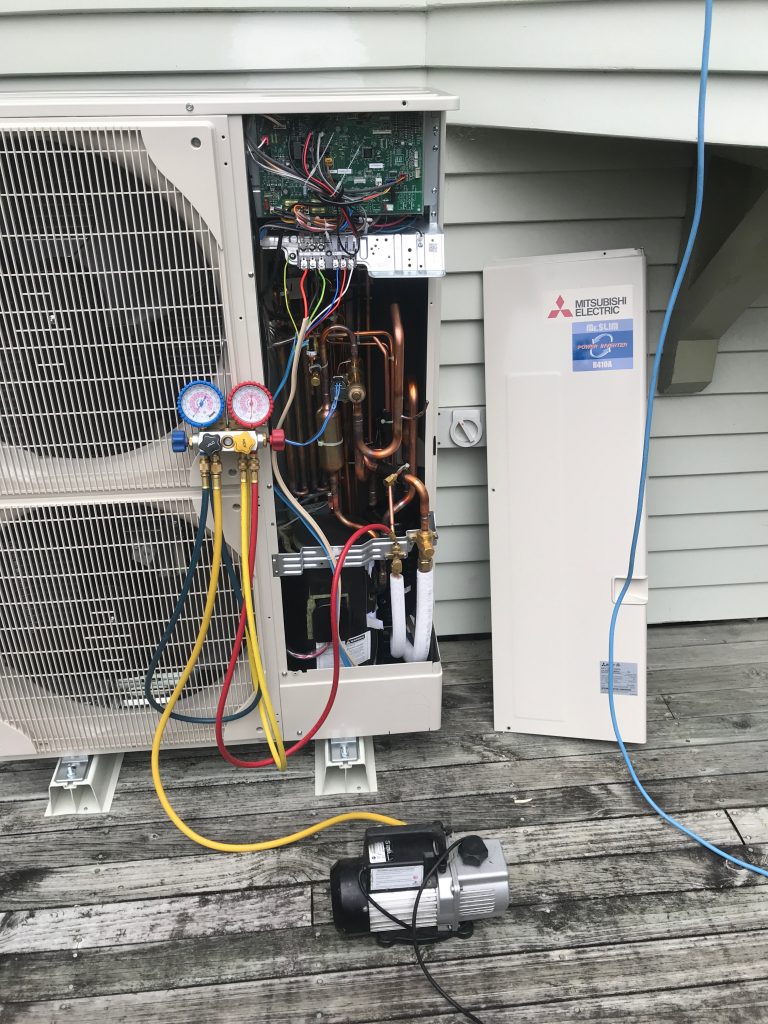
Vacuum pumping the refrigerant lines ready for the gas to go in.
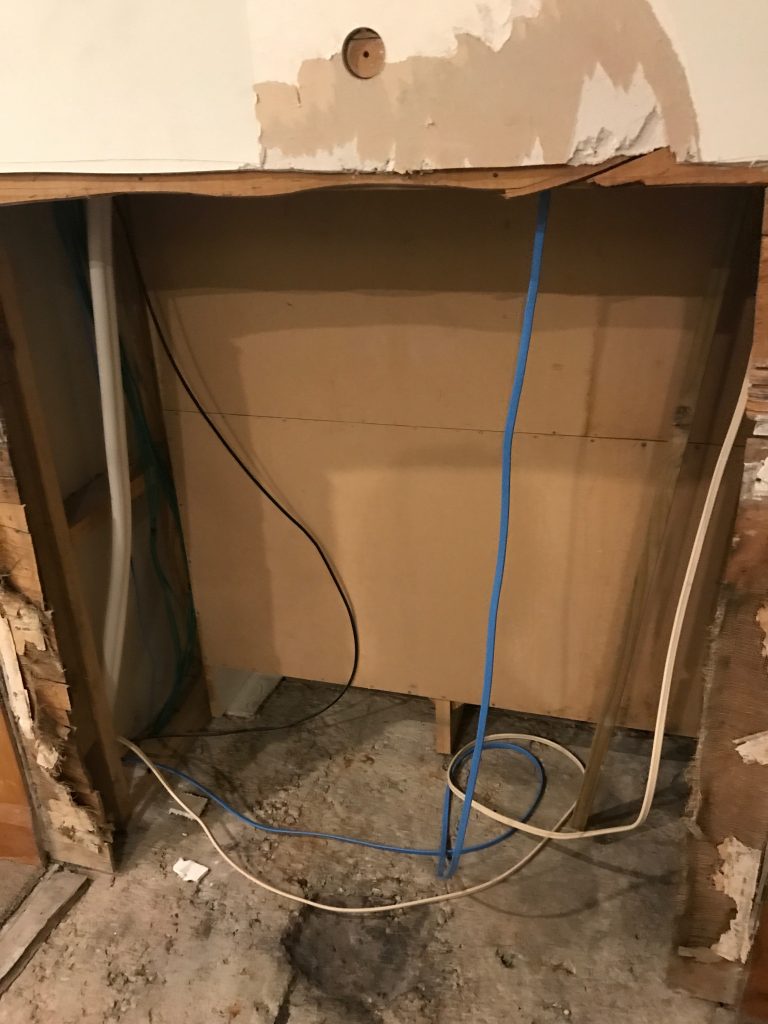
Because the exterior unit needs to run copper piping for the refrigerant, power and controls up into the roof of the house, we needed to go from under the floor to the attic at some point. Rather than an ugly boxed conduit on the outside of the house, we had it installed through the middle of the house.
As mentioned earlier, our fireplace was wrecked, so I knocked it out entirely a few months back (post coming once I finally finish the project) which has left a messy hole an accessible space from the floor to the attic that was perfect for linking the internal and external units.
Whilst the piping is copper, it has a surprising degree of flexibility so the team was able to feed it through and bend it varying degrees, whereas I had assumed it would all have to be right angles and welds. The piping is wrapped in a insulation tube which does a pretty good job at avoiding heat loss – even when running on full, the insulation is just mildly warm to the touch.
Piping and cabling going in.
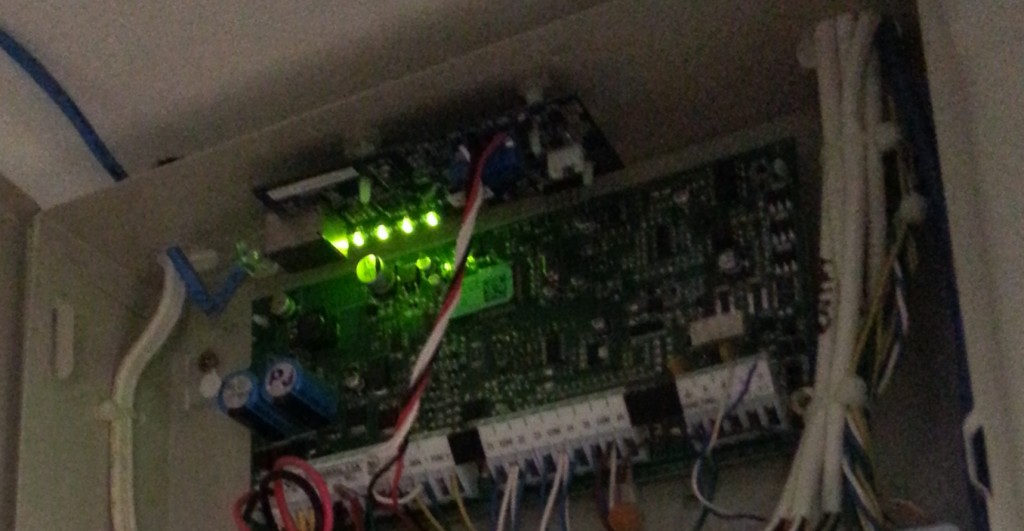
One of those big electrical cables had to go all the way back to the switch board to feed the unit with electricity. Unfortunately our switchboard is totally full, so the electrician ended up having to add a couple additional breakers off it to the side.
It’s not wonderful but it solved the problem – given future plans for the property (electrical hot water, induction cooking, car charging), I think we’ll end up doubling our switchboard and making it all tidy as a future project.
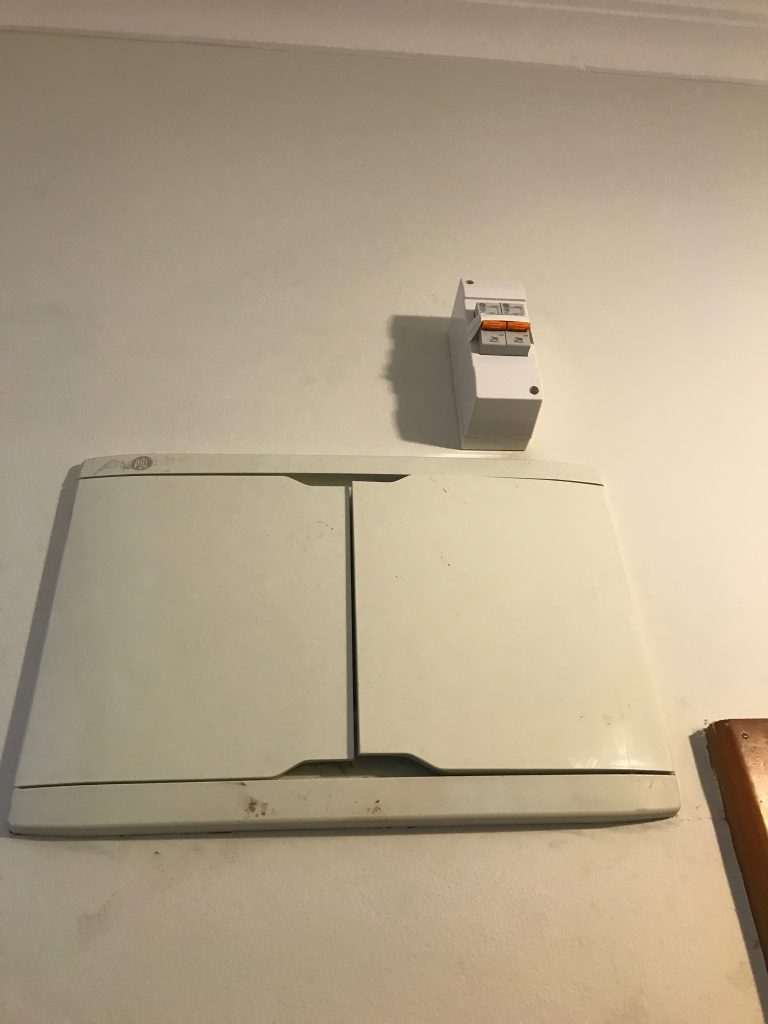
Not going to win any prettiness awards, but it’s safe and compliant.
Of course the exterior unit is just half the fun – we also needed the interior unit installed and all the ducting connected. We had what is considered a slim unit, but it’s still a very sizeable item to try and lift up into a roof space!
Indoor unit before going into the roof and having ducting connected.

Impromptu skylight
As there’s no way to get the unit into the roof via existing access ways, the team cut a massive hole in the hallway roof. They then swung the unit up into the roof with a team of guys who do a lot more physical activity than me and backfilled the space with the intake vents.
Intake vents going into the hallway to nicely fill the big hole that got made earlier.
Once fitted in the roof, it takes up even more space for all the ducting to be connected. A large amount of our spacious attic is now consumed with this unit and associated ducting. I’m just glad we’d already done insulation and most of the cabling work we’ll want to do in there for the foreseeable future as it’s a lot more difficult to navigate now.
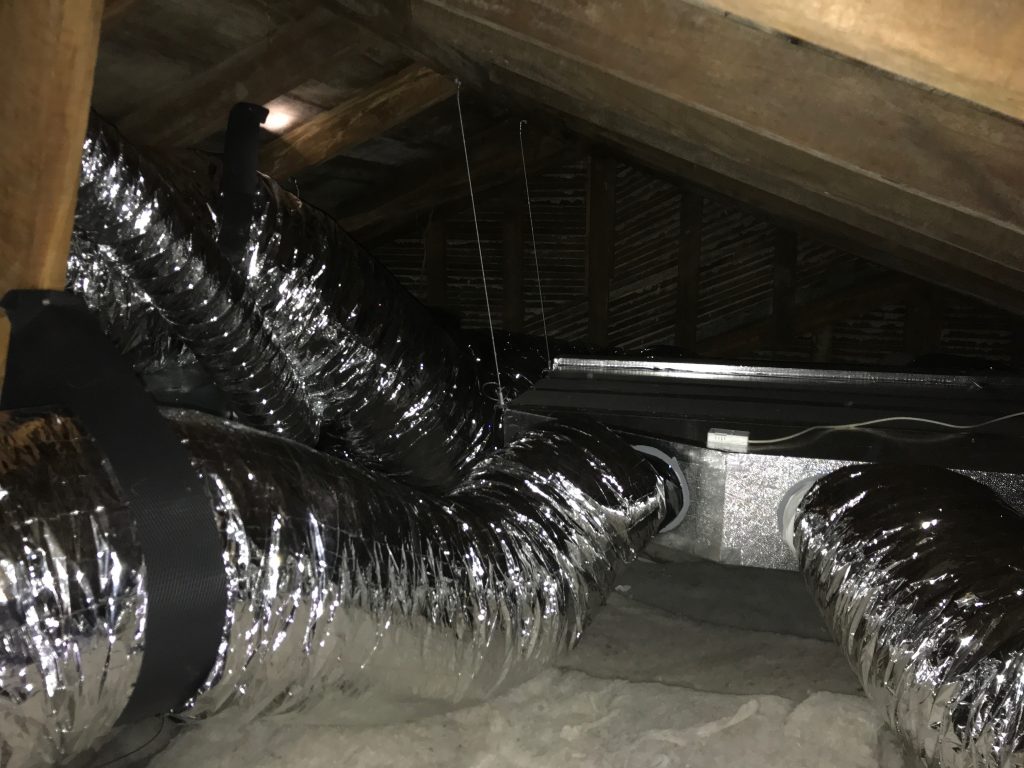
Fully installed in the attic space
Despite being above the bedroom, the unit is really quiet when operating and we can barely hear it. I took some video of the installation to give an idea of it’s low level of background noise even when inside the attic.
We decided to install outlets into every single bedroom (x4), one in the lounge and one in the dining room for a total of x6 outlets. The hallway features the intake vents for recirculating the air.
Note that there are two key downsides to the ducted heat pump option vs radiators here:
- The first is that you can’t directly heat damp areas like the bathrooms or kitchen, as pumping air into those areas will force moisture out into other parts of the house. Radiators have the upper hand here, since you can get appliances such as towel rail radiators to directly provide warmth. That being said, our bathroom gets enough residual heat from being in the middle of the house and when we renovate the second one I plan to look at putting in underfloor heating as it’s on a concrete pad, so it’s not a big issue for us.
- The second is that you don’t get per-room control. Whilst it’s technically possible to install dampeners (manual or electronic), when you close off one vent you can unbalance the system a bit and make other rooms too breezy or noisy. So it’s recommended to just heat the whole place and enjoy a fully warm house, rather than trying to create hot + cold rooms.

Ducting getting prepped pre-installation
The above photo showing the ducting being prepared shows the built-in dampeners used to balance the system when it’s installed. These are used to restrict/open the flow of air to each outlet to handle the fact that outlets have different length ducting runs and sizes. It also makes it possible to do things such as setting the heat output in the bedrooms to be a bit lower than that of the living spaces by keeping their volume of air output a little lower.
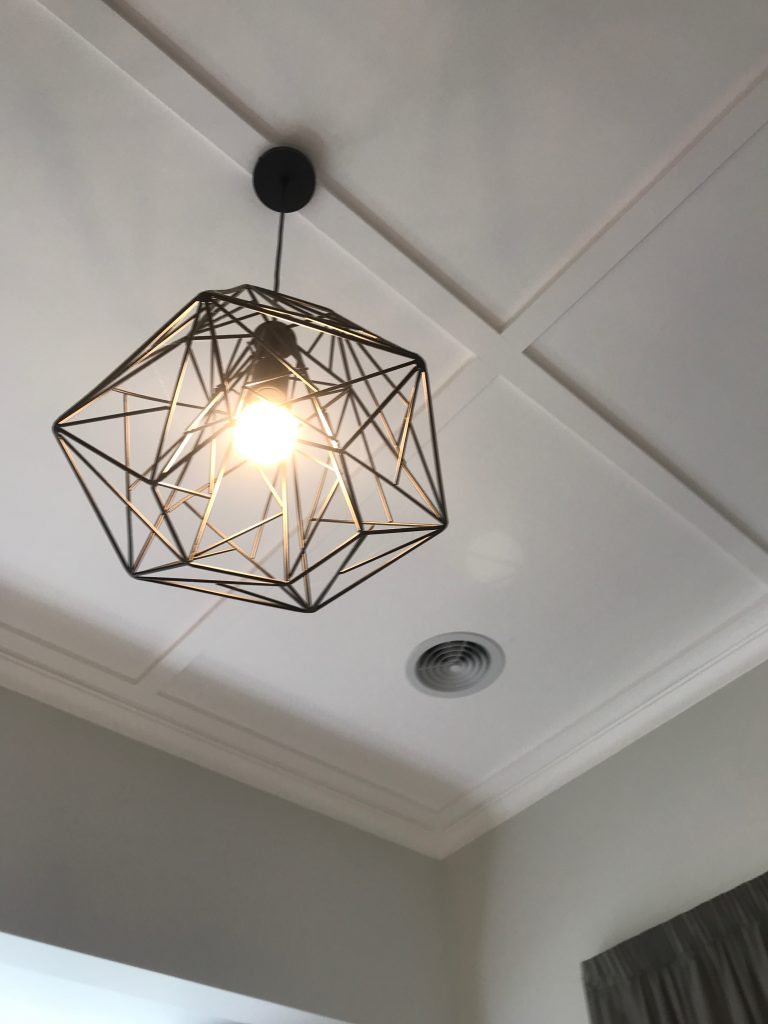
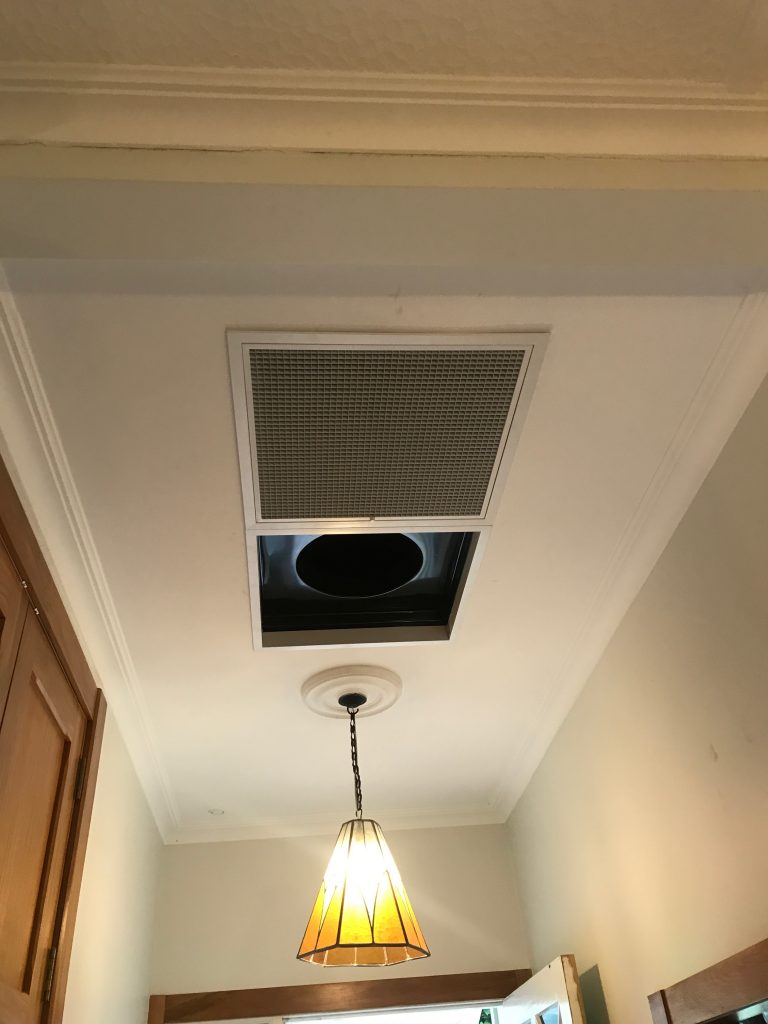
Once installed, the outlets are unobtrusive in the corner of each room.
I had some concerns around how the vents would handle our high ceilings and we do get some degree of heat blanketing when the system first starts heating the house (warm head, cold toes), but once it brings up the whole house to temperature the high ceilings aren’t a major issue.
That being said, it does mean there’s a lot more air to heat than a property with lower ceiling heights and certainly on the coldest days we’ve found the system takes too long to bring the house house up to a comfortable temperature if we’ve let the house get very cold. The solution is pretty simple, we just leave the house on a lower temperature when away from home to ensure it’s only a few degrees off our comfortable temperature when we come home (typically found 20c when awake and 18c when sleeping is our preferred climate).
It works well – for the first time we’ve actually had a comfortable time in winter, rather than huddling for warmth in only a couple rooms with the rest of the house closed off trying to conserve heat.
Whilst the heat pump ensures the house can now always be at a comfortable temperature, it won’t prevent moisture build up. It can reduce window condensation on account of the warmth and even be put into a drying mode, but it’s ultimately not a ventilation system and doesn’t cycle out moist stale air if you fail to manually ventilate your house.
Our house wasn’t too bad with moisture (not compared to many other NZ properties) on account of the kitchen and bathrooms all featuring extractor fans which ensured the bulk of moisture produced in the house is vented out, but the simple act of living in the house is enough to create moisture and having weeping windows in the morning was still not uncommon for us, especially during winter when opening windows isn’t very compelling.
Given the fact that we have long and cold winters, we decided to invest a bit more and had Mitsubishi’s ventilation product (Lossnay) installed as part of this project. This unit integrates with the ducted heat pump and regularly cycles out stale air and sucks in fresh air, recovering most of the energy in the process so you’re not constantly discarding the energy you just spent heating (or cooling) the house.
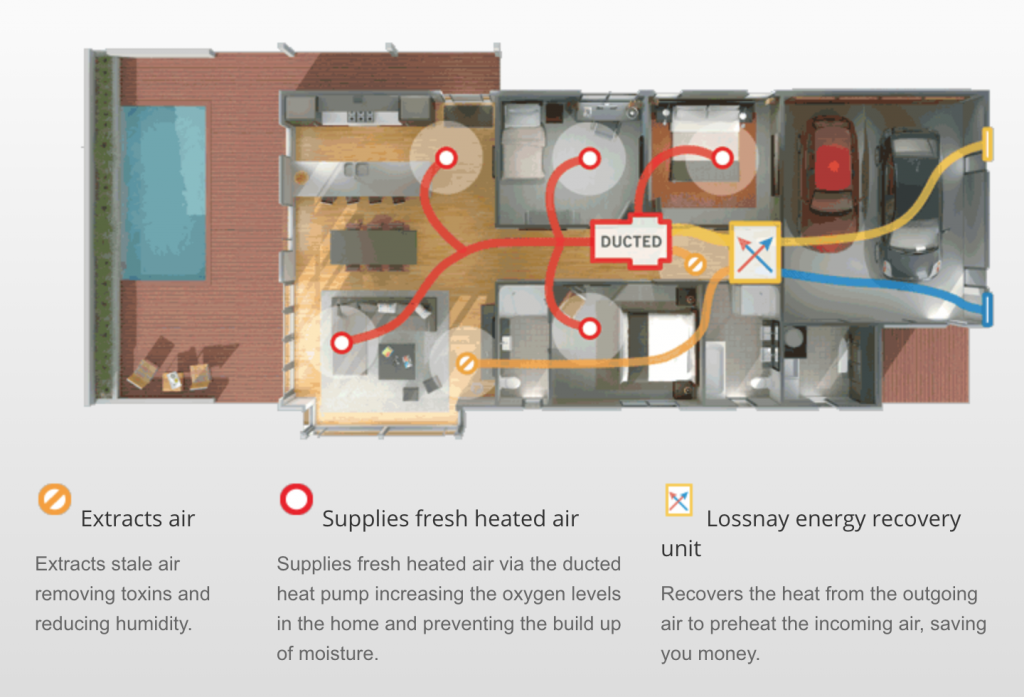
Diagram from Mitsubishi’s website illustrating how a Lossnay connects to the ducted heat pump system.
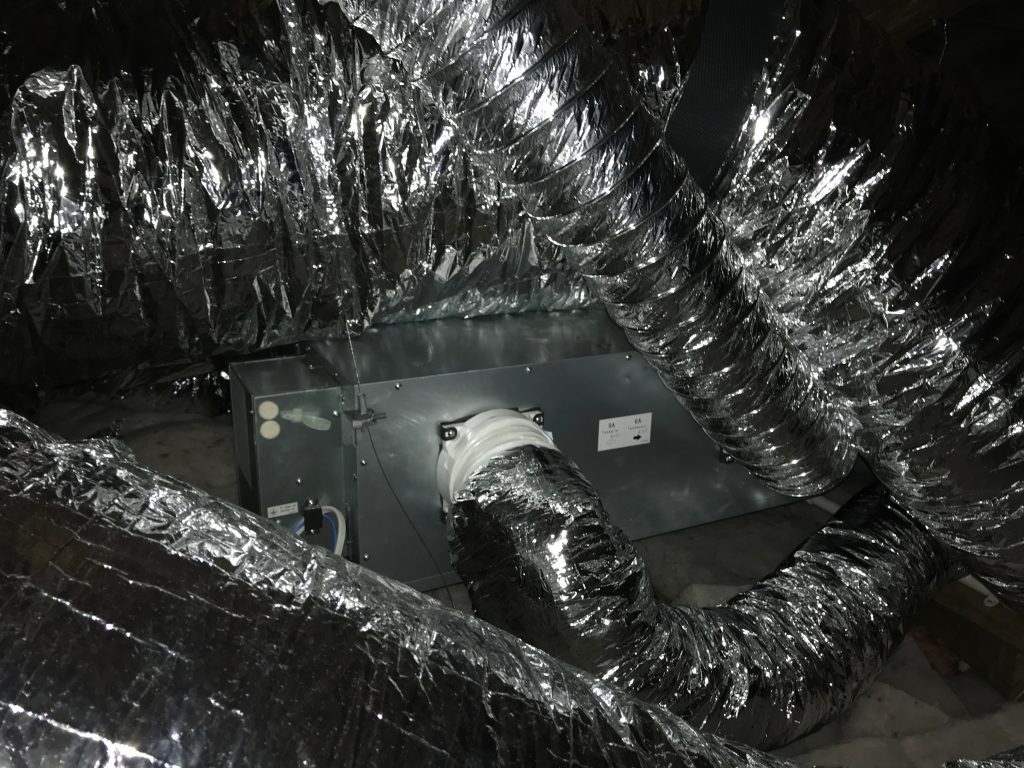
Lossnay unit operating away quietly in the maze of ducting.
Because of the layout of the house, the two Lossnay vents ended up having to go through the roof – the egress near the existing bathroom fan vent and the intake a number of meters away on the other side to prevent just recirculating the same air, so we now have a few more mushrooms to add to the other unsightly appearance of our roof. Summer 2018-2019 has a painting project on my list to tidy it all up with a fresh coat of paint.
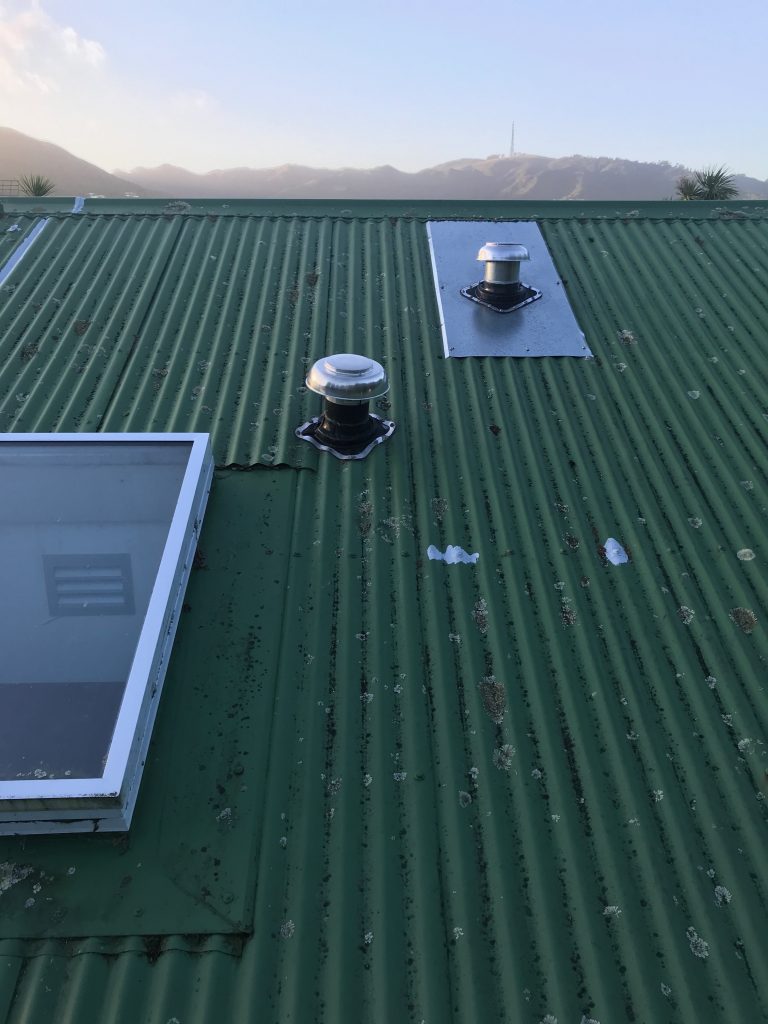
Lossnay vent (R) alongside existing bathroom vent (L)
The end result is that we have a completely moisture free property and I haven’t opened the windows once all June, since the system is constantly ensuring we have fresh, dry and warm air in the property. Even on the coldest days, the windows are now completely dry which is just fantastic.
To control the combined system, there’s a central thermostat and control interface installed underneath the return intake. It’s pretty basic, capable of setting modes, fan speeds, temperatures and timers, but does the fundamentals nicely enough.
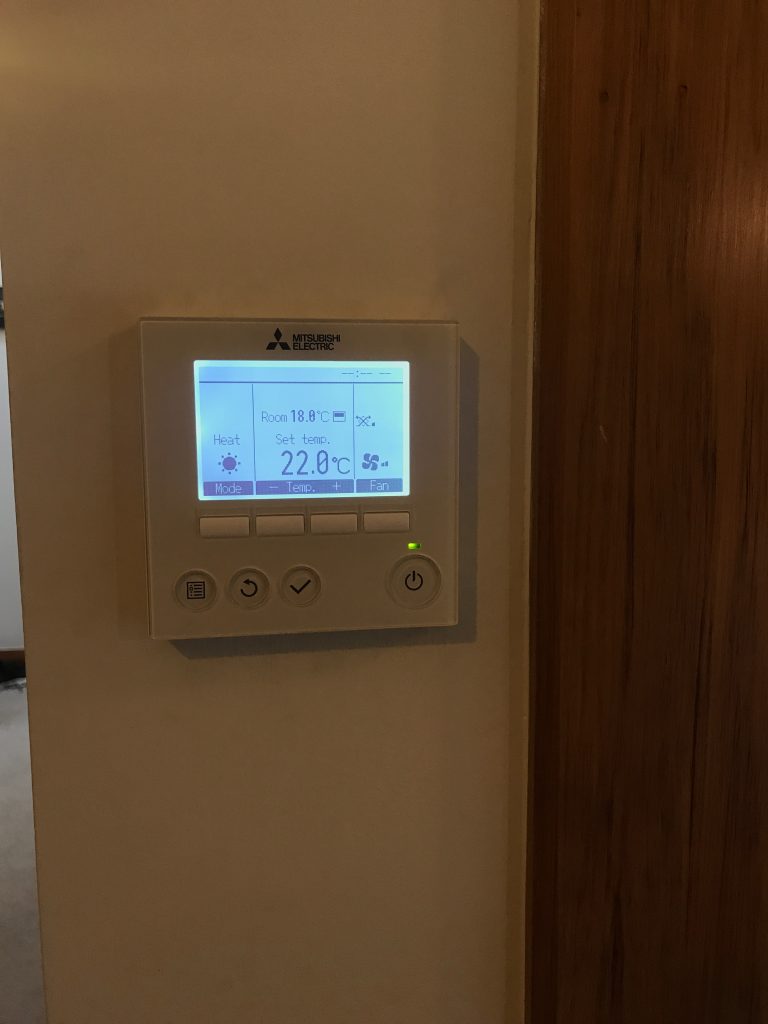
Nice modern look but it’s not all that intelligent.
Ultimately I wanted proper IP control of the system to allow a range of integrations rather than the manual drudgery of having to touch actual buttons with my actual hands.
Surprisingly for 2018 this isn’t standard for all heat pumps like this, some vendors seem to lack options entirely and whilst Mitsubishi have their “WiFi Control” product, it’s still sold as an extra ~$250 add-on, rather than being natively built into the control interface as standard feature.
Essentially it works by connecting a small embedded computer to the heat pump via it’s onboard serial port (You can see the little white box on one of the earlier photos of the attic install with the trailing cable going to the unit’s control circuit). It then bidirectionally syncs with Mitsubishi’s cloud services, which then allows you to control it from anywhere via your phone app. The experience is well polished and Mitsubishi is even doing HTTPS for their connections which was a (positive) surprise. Plus the WiFi module was designed/built by a local New Zealand company on behalf of Mitsubishi, so that’s kinda cool.
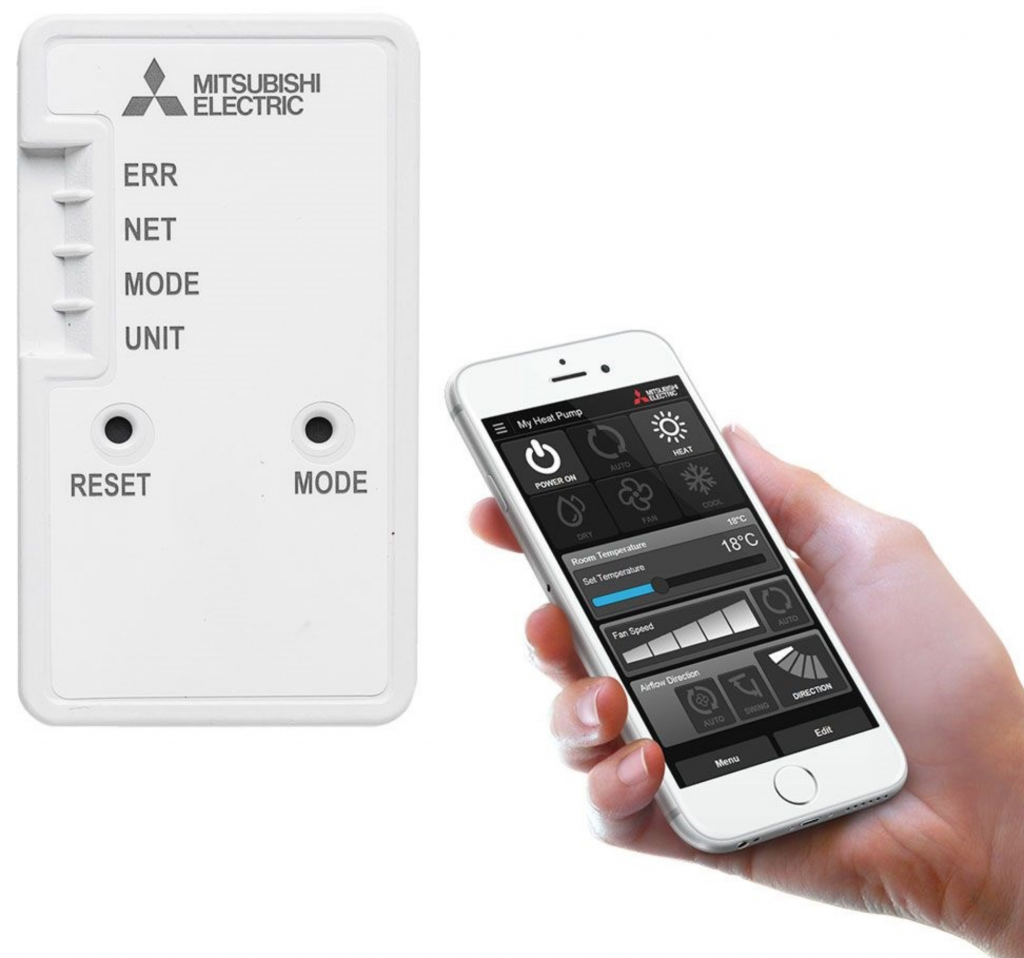
WiFi module + app
Note that I mentioned serial before – this isn’t too tricky to interface with and it is possible to build your own module – I’m not great with hardware and didn’t want the hassle and warranty risks, but if that’s your kind of thing, take a look at this blog post on Nicegear.
Overall it’s a pretty decent Internet of Things product, the only issue I had with it is that it relies entirely on their cloud service. And whilst Mitsubishi’s cloud app is *probably* going to stick around for a while, I wanted local control to allow me to link it to Home Assistant to make it part of a holistic smart house, not just an independent appliance. Getting it into Home Assistant also makes it possible to then control via Apple HomeKit, something not possible with the off-the-shelf product.
I had a bit of fun figuring out how I could interface with it locally (see my talk at the inargural Wellington Home Automation Hackers if interested) but ultimately I discovered that the latest version of the IP module (MAC-568IF-E) supported a Japanese standard called ECHONET Lite. This standard allows for completely local network control of various smart home appliances, including heat pumps, which allowed me to then write a bridge application between Home Assistant (using MQTT) and the heat pump (using ECHONET Lite).
The source code for this bridge application is available at https://github.com/jethrocarr/echonetlite-hvac-mqtt-service including a Docker image for easy installation.
The only limitation is that I have not found a way to control the Lossnay via ECHONET Lite – given that the official Mitsubishi app also lacks control, I suspect they simply haven’t developed functionality into the WiFI control module to expose the options for the Lossnay, it’s probably not a massively popular addon
End result is that I now have the ability to control the mode and temperature via HomeKit from my iPhone/iPad – and since HomeKit links with the wider Apple Ecosystem and the fact we have an Apple TV, it’s possible for both Lisa and myself to control the heat pump (and all the other linked stuff) remotely from anywhere without a VPN needed. It also makes things super trivial to delegate and revoke access to guests when visiting.
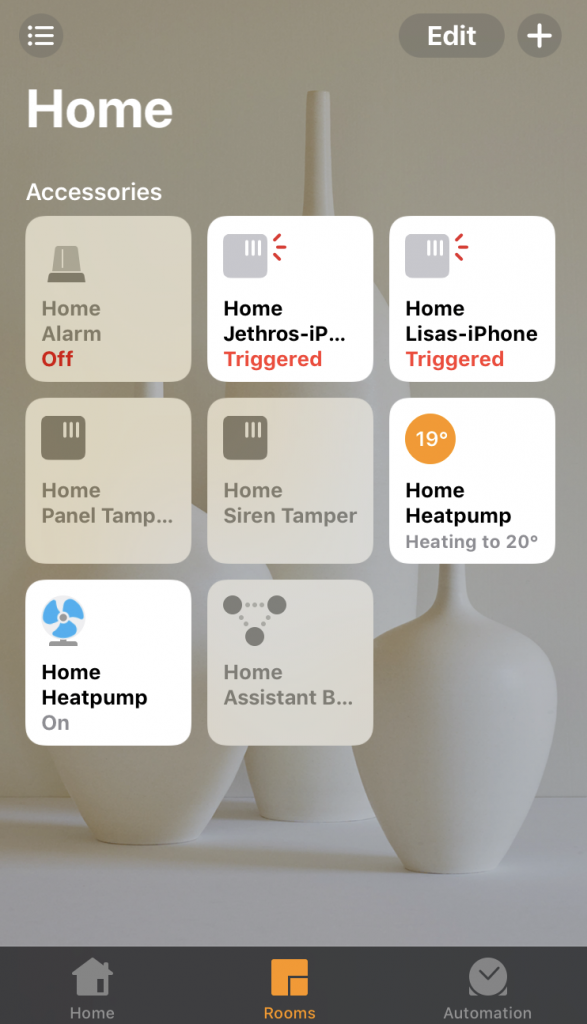
Heating controls in HomeKit!
The other main drive to integrate locally is that I want to be able to setup smarter rules inside Home Assistant. Some of the stuff I’m planning is:
- Automatically set the temperature when we are away from home vs at home. We already have occupancy data from a range of metrics that we can use so this won’t be too tricky.
- Take exterior temperature into account, eg if the day is going to heat up there could be hours where we can shutdown the system entirely for power savings.
- Being able to read temperatures from sensors around the house rather than the averaged thermostat reading near the return intake and take into consideration when setting temperatures – eg “I always want the bedrooms at 18c, even if it means the hallway and lounge end up slightly warmer than they should otherwise”.
- Automatically shut down the system if someone leaves the front/back door open for more than a minute.
- A smarter night setback mode. The current behaviour of the system is to always run the fans whether actively heating or not, but this can sometimes be annoying at night when the breeze can be felt more noticeably. I’d like to program in logic to automatically shutdown the aircon when the temp is above 18, but if it drops below 18, heat back up to 20 then switch off again – thus only running the fans when actively heating but still ensuring the house stays warm. So no breezes other than when heating. The system has this with “night setback” but it just turns on if it gets below a threshold, it doesn’t then turn off again once it’s at a comfortable level.
So aside from the remaining automation work, project complete! We are super happy with this solution, it’s completely changed the liveability of the property during winter and it’s an upgrade I would absolutely make to any other property that I ever buy in future or recommend to anyone else living in our climate here in NZ.
It’s not a cheap solution – expect to spend $15-20k NZD for a 3-4 bedroom home, although it will vary considerably based on sizing and installer effort needed. Like most home upgrades, labour is a huge component of the ultimate bill. Our final bill came in around $22k, but this also included the Lossnay ventilation unit.
There’s also the electrical cost to operate. This one is super subjective since it depends on your usage patterns, house, etc. Our first winter month bill at ~$450 NZD seemed super high, but when we compared with previous years, it was only 30% more and instead of having two rooms barely liveable, we got an entire house that was comfortable. In fact it’s efficient enough that we’re likely to still come in just on or under the 8,000 kWh yearly low user consumption, given that our hot water is currently gas. Once we go full electric with our hot water, we will probably surpass that and need to go to the standard plan (cheaper per kWh rate, higher line charges).
I’m expecting to get 15 years lifespan on the system, maybe longer. At 15 years, it’s essentially $1,460 per year deprecation for the asset, which isn’t too bad for the level of comfort it provides. If we get longer, or can refurbish to extend beyond that period, even better. It’s also worth noting that even if the mechanical components need replacing at their end of life, we have all the ducting, piping, electrical etc already installed which would be reusable, making a replacement project at it’s EOL considerably cheaper than a new installation given how much of the cost is the labour doing ducting runs, cutting holes, etc.
Whilst there are many other reputable brands out there, we went with the Mitsubishi offering for two main reasons.
- It had an IP module (“WiFi control”) available. If you’re buying a unit, make sure to research this closely, not every vendor has one and you don’t want to get burnt with a system that’s extremely difficult to get integrated into your wider smart home.
- The integration with the ventilation product ensured that we could get a single vendor solution for the complete system, rather than trying to mix one vendor’s ventilation system with another vendor’s heat pump system and having to figure out which one was at fault if they didn’t cooperate nicely. This may depend on who your installer is as well, ours only did the one ventilation product, so kinda made the choice easy.
Having seen the effort and complexity that went into this installation, I’m glad I got the pros to do it. It would have taken ages to do by myself over weekends, etc and there’s a number of specialist steps (eg filling the refrigerant lines with gas) which are non-trivial plus just the experience of knowing how to size and setup the ducting runs appropriately for the property. So I’d recommend staying away from a DIY project on this one, despite the temptation given the costs involved. A good friend went through a project to do most of the work on his own install himself and it ultimately didn’t save as much as expected and created a number of headaches along the way.