Tag Archives: lambda

FailberryPi – Diverse carrier links for your home data center

Given the amount of internet connected things I now rely on at home, I’ve been considering redundant internet links for a while. And thanks to the affordability of 3G/4G connectivity, it’s easier than ever to have a completely diverse carrier at extremely low cost.

I’m using 2degrees which has a data SIM sharing service that allows me to have up to 5 other devices sharing the one data plan, so it literally costs me nothing to have the additional connection available 24×7.

My requirements were to:

  1. Handle the loss of the wired internet connection.
  2. Ensure that I can always VPN into the house network.
  3. Ensure that the security cameras can always upload footage to AWS S3.
  4. Ensure that the IoT house alarm can always dispatch events and alerts.

I ended up building three distinct components to build a failover solution that supports flipping between my wired (VDSL) and wireless (3G) connection:

  1. A small embedded GNU/Linux system that can bridge a USB 3G modem and an ethernet connection, with smarts to recover from various faults (like crashed 3G stick).
  2. A dynamic DNS solution, since my mobile telco certainly isn’t going to give me a static IP address, but I need inbound traffic.
  3. A DNS failover solution so I can redirect inbound requests (eg home VPN) to the currently active endpoint automatically when a failure has occurred.


The Hardware

I considered using a Mikrotik with USB for the 3G link – it is a supported feature, but I decided to avoid this route since I would need to replace my perfectly fine router for one with a USB port, plus I know from experience that USB 3G modems are fickle beasts that would be likely to need some scripting to workaround various issues.

For the same reason I excluded some 3G/4G router products available that take a USB modem and then provide ethernet or WiFi. I’m very dubious about how fault tolerant these products are (or how secure if consumer routers are anything to go by).

I started off the project using a very old embedded GNU/Linux board and 3G USB modem I had in the spare parts box, but unfortunately whilst I did eventually recycle this hardware into a working setup, the old embedded hardware had a very poor USB controller and was throttling my 3G connection to around 512kbps. :-(

Initial approach – Not a bomb, actually an ancient Gumstix Verdex with 3G modem.

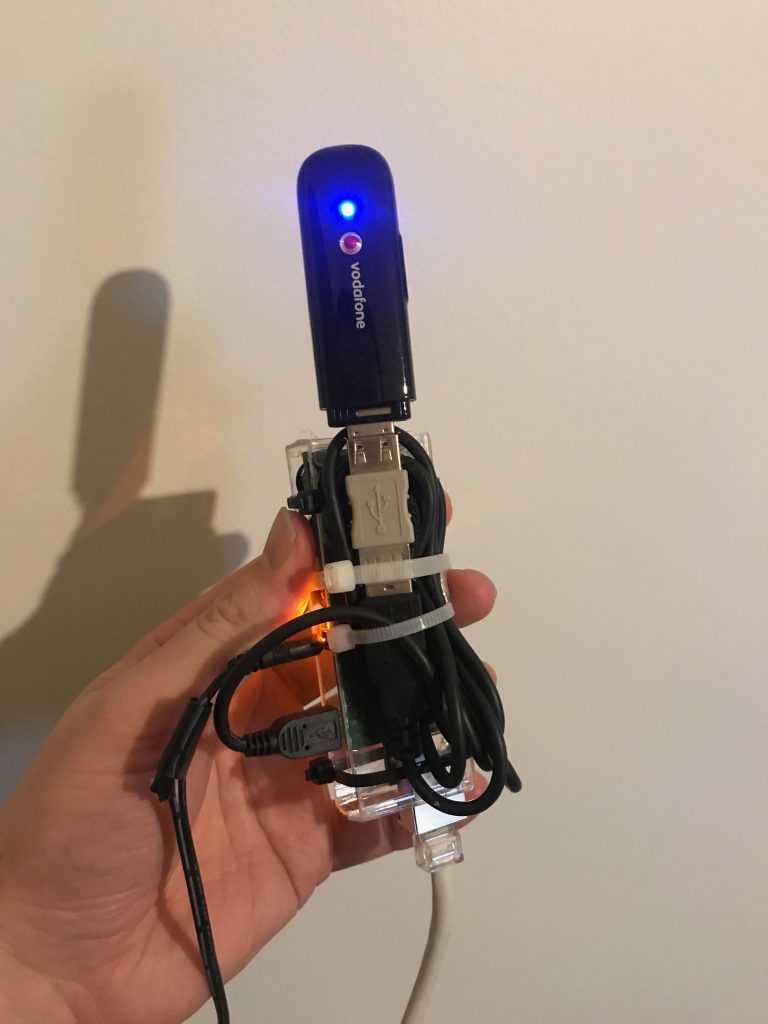
So I started again, this time using the very popular Raspberry Pi 2B hardware as the base for my setup. This is actually the first time I’ve played with a Raspberry Pi and I actually really enjoyed the experience.

The requirements for the router are extremely low – move packets between two interfaces, dial a modem and run some scripts. It actually feels wasteful using a whole Raspberry Pi with it’s whole 1GB of RAM and Quad Core ARM CPU, but they’re so accessible and cost affordable, it’s not worth the time messing around with any more obscure embedded boards.

Pie ingredients

It took me all of 5 mins to assemble and boot an OS on this thing and have a full Debian install ready for work. For this speed and convenience I’ll happily pay a small price premium for the Raspberry Pi than some other random embedded vendors with much more painful install and upgrade processes.
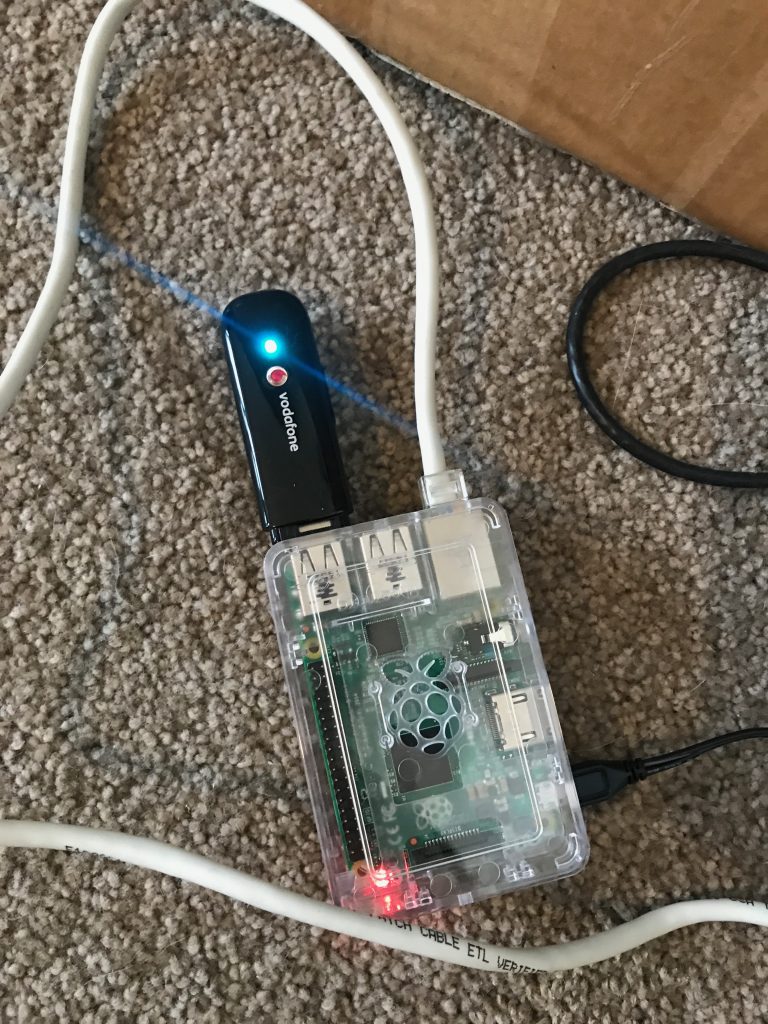
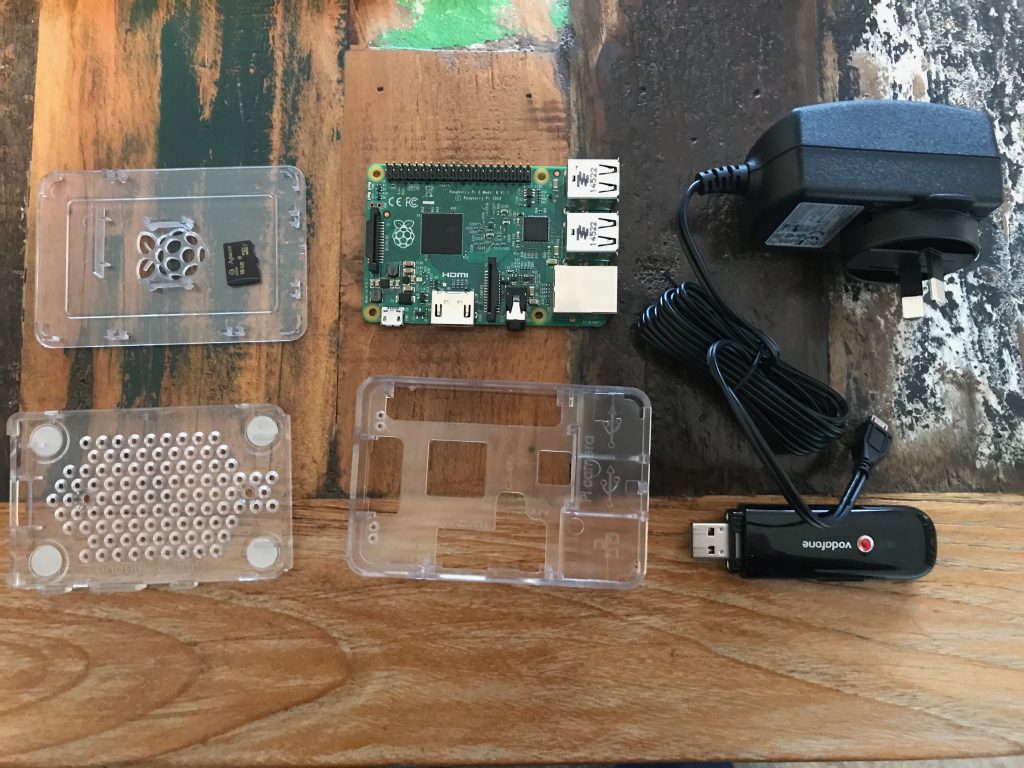
Baked!

It’s important to get a good power supply – 3G/4G modems tend to consume the full 500mW available to them. I kept getting under voltage warnings (the red light on the Pi turns off) with a 2.1 Amp phone charger I was using. Ended up buying the official 2.5 Amp Raspberry Pi charger, which powers the Raspberry Pi 2 + the 3G modem perfectly.

I brought the smallest (& cheapest) class 10 Micro SDHC card possible – 16GB. Of course this is way more than you actually need for a router, 4GB would have been plenty.

The ZTE MF180 USB 3G modem I used is a tricky beast on Linux, thanks to the kernel seeing it as a SCSI CDROM drive initially which masks the USB modem features. Whilst Linux has usb_modeswitch shipping as standard these days, I decided to completely disable the SCSI CDROM feature as per this blog post to avoid the issue entirely.


The Software

The Raspberry Pi I was given (thanks Calcinite! ?) had a faulty GPU so the HDMI didn’t work. Fortunately Raspberry Pi doesn’t let such a small issue like no display hold it back – it’s trivial to flash an image to the SD card from another machine and boot a headless installation.

  1. Download Raspbian minimal/lite (Debian + Raspberry Pi goodness).
  2. Installed image to the SD card using the very awesome Etcher.io (think “safe dd” for noobs) as per the install instructions using my iMac.
  3. Enable SSH as per instructions: “SSH can be enabled by placing a file named ssh, without any extension, onto the boot partition of the SD card. When the Pi boots, it looks for the ssh file. If it is found, SSH is enabled, and the file is deleted. The content of the file does not matter: it could contain text, or nothing at all.”
  4. Login with username “pi” and password “raspberry”.
  5. Change the password immediately before you put it online!
  6. Upgrade the Pi and enable automated updates in future with:
    apt-get update && apt-get -y upgrade
    apt-get install -y unattended-upgrades

The rest is somewhat specific to your setup, but my process was roughly:

  1. Install apps needed – wvdial for establishing the 3G connection via AT commands + PPP, iptables-persistent for firewalling, libusb-dev for building hub-ctrl and jq for parsing JSON responses.
    apt-get install -y wvdial iptables-persistent libusb-dev jq
  2. Configure a firewall. This is very specific to your network, but you’ll want both ipv4 and ipv6 rules in /etc/iptables/rules.* Generally you’d want something like:
    1. Masquerade (NAT) traffic going out of the ppp+ and eth0 interfaces.
    2. Permit forwarding traffic between the interfaces.
    3. Permit traffic in on port 9000 for the health check server.
  3. Enable IP forwarding (net.ipv4.ip_forward=1) in /etc/sysctl.conf.
  4. Build hub-ctrl. This utility allows the power cycling of the USB controller + attached devices in the Raspberry Pi, which is extremely useful if your 3G modem has terrible firmware (like mine) and sometimes crashes hard.
    wget https://raw.githubusercontent.com/codazoda/hub-ctrl.c/master/hub-ctrl.c
    gcc -o hub-ctrl hub-ctrl.c -lusb
  5. Build pinghttpserver. This is a tiny C-based webserver which we can use to check if the Raspberry Pi is up (Can’t use ICMP as detailed further on).
    wget -O pinghttpserver.c https://gist.githubusercontent.com/jethrocarr/c56cecbf111af8c29791f89a2c30b978/raw/9c53f66fbed609d09652b8c4ceff0194876c05a3/gistfile1.txt
    make pinghttpserver
  6. Configure /etc/wvdial.conf. This will vary by the type of 3G/4G modem and also the ISP in use. One key value is the APN that you use. In my case, I had to set it to “direct” to ensure I got a real public IP address with no firewalling, instead of getting a CGNAT IP, or a public IP with inbound firewalling enabled. This will vary by carrier!
    [Dialer Defaults]
    Init1 = ATZ
    Init2 = ATQ0 V1 E1 S0=0 &C1 &D2 +FCLASS=0
    Init3 = AT+CGDCONT=1,"IP","direct"
    Stupid Mode = 1
    Modem Type = Analog Modem
    Phone = *99#
    Modem = /dev/ttyUSB2
    Username = { }
    Password = { }
    New PPPD = yes
  7. Edit /etc/ppp/peers/wvdial to enable “defaultroute” and “replacedefaultroute” – we want the wireless connection to always be the default gateway when connected!
  8. Create a launcher script and (once tested) call it from /etc/rc.local at boot. This will start up the 3G connection at boot and launch various processes we need. (this could be nicer and be a collection of systemd services, but damnit I was lazy ok?). It also handles reboots and powercycling USB if problems are encountered for (an attempt) at automated recovery.
    wget -O 3g_failover_launcher.sh https://gist.githubusercontent.com/jethrocarr/a5dae9fe8523cf74d30a065d77d74876/raw/57b5860a9b3f6a048b02b245f3628ee60ea766dc/3g_failover_launcher.sh

At this point, you should be left with a Raspberry Pi that gets a DHCP lease on it’s eth0, dials up a connection with your wireless telco and routes all traffic it receives on eth0 to the ppp interface.

In my case, I setup my Mikrotik router to have a default GW route to the Raspberry Pi and the ability to failover based on distance weightings. If the wired connection drops, the Mikrotik will shovel packets at the Raspberry Pi, which will happily NAT them to the internet.


The DNS Failover

The work above got me an outbound failover solution, but it’s no good for inbound traffic without a failover DNS record that flips between the wired and wireless connections for the VPN to target.

Because the wireless link would be getting a dynamic IP addresses, the first requirement was a dynamic DNS service. There are various companies around offering free or commercial products for this, but I chose to use a solution built around AWS Lambda that can be granted access directly to my DNS hosted inside Route53.

AWS have a nice reference dynamic DNS solution available here that I ended up using (Sadly not using the Serverless framework so there’s a bit more point+click setup than I’d like, but hey).

Once configured and a small client script installed on the Raspberry Pi, I had reliable dynamic DNS running.

The last bit we need is DNS failover. The solution I used was the native AWS Route53 Health Check feature, where AWS adjust a DNS record based on the health of monitored endpoints.

I setup a CNAME with the wired connection as the “primary” and the wireless connection as the “secondary”. The DNS CNAME will always point to the primary/wired connection, unless it’s health check fails, in which case the CNAME will point to the secondary/wireless connection. If both fail, it fails-safe to the primary.

A small webserver (pinghttpserver) that we built earlier is used to measure connectivity – the Route53 Health Check feature unfortunately lacks support for ICMP connectivity tests hence the need to write a tiny server for checking accessibility.

This webserver runs on the Raspberry Pi, but I do a dst port NAT to it on both the wired and wireless connections. If the Pi should crash, the connection will always fail safe to the primary/wired connection since both health checks will fail at once.

There is a degree of flexibility to the Route53 health checks. You can use a CloudWatch alarm instead of the HTTP check if desired. In my case, I’m using a Lambda I wrote called “lambda-ping” (creative I know) which is a Lambda that does HTTP “pings” to remote endpoints and recording the response code, plus latency. (Annoyingly it’s not possible to do ICMP pings with Lambda either, since the container that Lambda execute inside of lack the CAP_NET_RAW kernel capability, hence the “ping-like” behaviour).

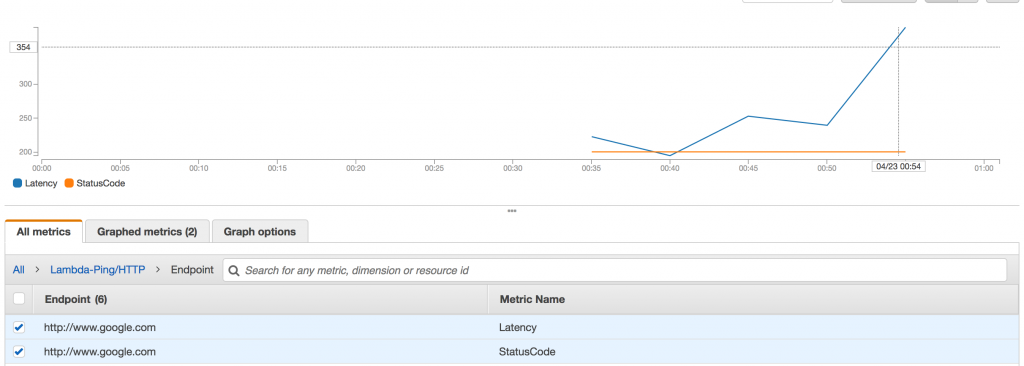
lambda-ping in action

I use this, since it gives me information for more than just my failover internet links (eg my blog, sites, etc) and acts like my Pingdom / Newrelic Synthetics alternative.


Final Result

After setting it all up and testing, I’ve installed the Raspberry Pi into the comms cabinet. I was a bit worried that all the metal casing would create a faraday cage, but it seems to be working OK (I also placed it so that the 3G modem sticks out of the cabinet surrounds).

So far so good, but if I get spotty performance or other issues I might need to consider locating the FailberryPi elsewhere where it can get clear access to the cell towers without disruption (maybe sealed ABS box on the roof?). For my use case, it doesn’t need to be ultra fast (otherwise I’d spend some $ and upgrade to 4G), but it does need to be somewhat consistent and reliable.

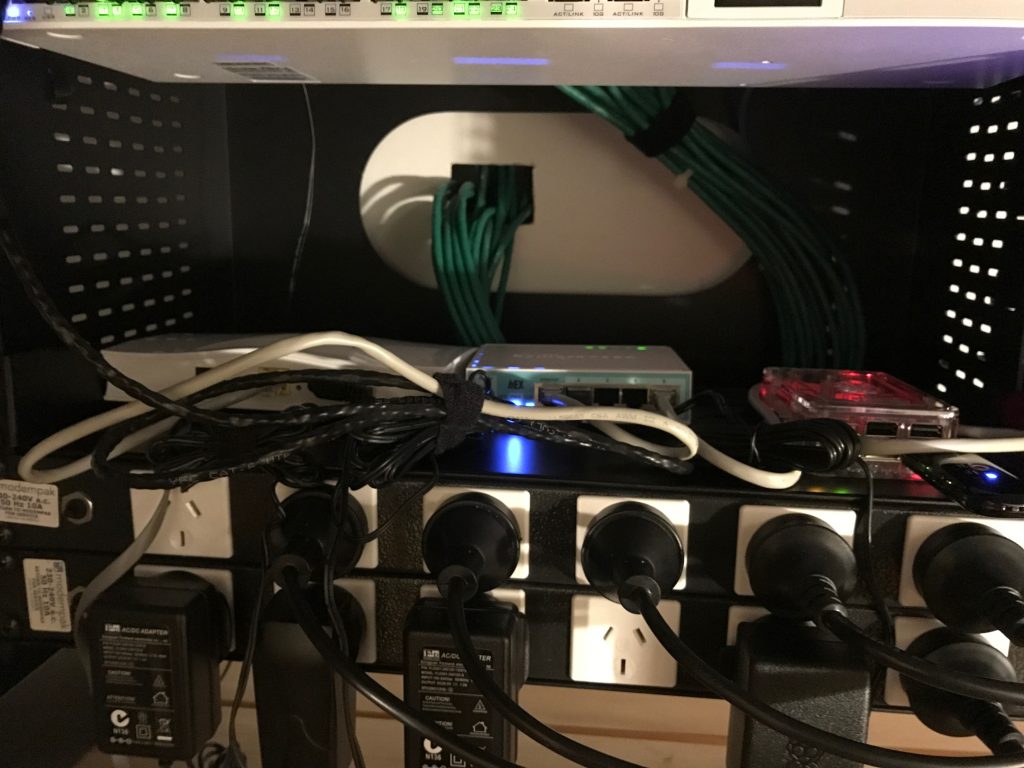
Installed on a shelf in the comms cabinet, along side the main Mikrotik router and the VDSL modem

So far it’s working well – the outbound failover could do with some tweaking to better handle partial failures (eg VDSL link up, but no international transit), but the failover for the inbound works extremely well.

Few remaining considerations/recommendations for anyone considering a setup like this:

  1. If using the one telco for both the wireless and the wired connection, you’re still at risk of a common fault taking out both services since most ISPs will share infrastructure at some level – eg the international gateway. Use a completely different provider for each service.
  2. Using two wired ISPs (eg Fibre with VDSL failover)  is probably a bit pointless, they’re probably both going back to the same exchange or along the some conduit waiting for a  single backhoe to take them both out at once.
  3. It’s kind of pointless if you don’t put this behind a UPS, otherwise you’ll still be offline when the power goes out. Strongly recommend having your entire comms cabinet on UPS so your wifi, routing and failover all continue to work during outages.
  4. If you failover, be careful about data usage. Your computers won’t know they’re on an expensive mobile connection with limited data and they’ll happily download updates, steam games, backups, etc…. One approach is using a firewall to whitelist select systems only for failover (eg IoT devices, alarm, cameras) and leaving other devices like laptops blocked to prevent too much billshock.
  5. Partial ISP outages are still a PITA. Eg, if routing is broken to some NZ ISPs, but international is fine, the failover checks from ap-southeast-2 won’t trigger. Additional ping scripts could help here (eg check various ISP gateways from the Pi), but that’s getting rather complex and tries to solve a problem that’s never completely fixable.
  6. Just buy a Raspberry Pi. Don’t waste time/effort trying to hack some ancient crap together it wastes far too much time and often falls flat. And don’t use an old laptop/desktop, there’s too much to fail on them like fans, HDDs, etc. The Pi is solid embedded electronics.
  7. Remember that your Pi is essentially a server attached to the public internet. Make sure you configure firewalls and automatic patching and any other hardening you deem appropriate for such a system. Lock down SSH to keys only, IP restrict, etc.

Detectatron

I recently installed security cameras around my house which are doing an awesome job of recording all the events that take place around my house and grounds (generally of the feline variety).

Unfortunately the motion capture tends to be overly trigger happy and I end up with heaps of recordings of trees waving, clouds moving or insects flying past. It’s not a problem from a security perspective as I’m not missing any events, but it makes it harder to check the feed for noteworthy events during the day.

I decided I’d like to write some logic for processing the videos being generated and decided to write a proof of concept that sucks video out of the Ubiquiti Unifi Video server and then analyses it with Amazon Web Services new AI product “Rekognition” to identify interesting videos worthy of note.

What this means, is that I can now filter out all the noise from my motion recordings by doing image recognition and flagging the specific videos that feature events I consider interesting, such as footage featuring people or cats doing crazy things.

I’ve got a 20 minute talk about this system which you can watch below, introducing it’s capabilities and how I’m using the AWS Rekognition service to solve this problem. The talk was for the Wellington AWS Users Group, so it focuses a bit more on the AWS aspects of Rekognition and AWS architecture rather than the Unifi video integration side of things.

The software I wrote has two parts – “Detectatron” which is the backend Java service for processing each video and storing it in S3 after processing and the connector I wrote for integration with the Unifi Video service. These can be found at:

https://github.com/jethrocarr/detectatron
https://github.com/jethrocarr/detectatron-connector-unifi

The code quality is rather poor right now – insufficient unit tests, bad structure and in need of a good refactor, but I wanted to get it up sooner rather than later… since perfection is always the enemy of just shipping something.

Note that whilst I’ve only added support for the product I use (Ubiquiti’s Unifi Video), I’ve designed it so that it’s pretty trivial to build other connectors for other platforms. I’d love to see contributions like connectors for Zone Minder and other popular open source or commercial platforms.

If you’re using Unifi Video, my connector will automatically mark any videos it deems as interesting as locked videos, for easy filtering using the native Unifi Video apps and web interface.

It also includes an S3 upload feature – given that I integrated with the Unifi Video software, it was a trivial step to extend it to also upload every video the system records into S3 within a few seconds for off-site retention. This performs really well, my on-prem NVR really struggled to keep up with uploads when using inotify + awscli to upload footage, but using my connector and Detectatron it has no issues keeping up with even high video rates.

Fairfax’s Cloud Journey at Auckland AWS Summit 2016

I recently presented at the 2016 AWS Summit Auckland about Fairfax’s cloud journey as part of the business stream “Key Steps for Setting up your AWS Journey for Success” alongside two excellent Amazon engineers. It’s a bit different from my usual talks, in that this one was specifically focused on a business audience, rather than a technical one.

My segment was just part of a talk full of excellent content from Amazon themselves, so you can checkout the full presentation here and all the other recorded presentations at the AWS Summit Auckland on-demand site.

Your cloud pricing isn’t webscale

Thankfully in 2015 most (but not all) proprietary software providers have moved away from the archaic ideology of software being licensed by the CPU core – a concept that reflected the value and importance of systems back when you were buying physical hardware, but rendered completely meaningless by cloud and virtualisation providers.

Taking it’s place came the subscription model, popularised by Software-as-a-Service (or “cloud”) products. The benefits are attractive – regular income via customer renewal payments, flexibility for customers wanting to change the level of product or number of systems covered and no CAPEX headaches in acquiring new products to use.

Clients win, vendors win, everyone is happy!

Or maybe not.


Whilst the horrible price-by-CPU model has died off, a new model has emerged – price by server. This model assumes that the more servers a customer has, the bigger they are and the more we should charge them.

The model makes some sense in a traditional virtualised environment (think VMWare) where boxes are sliced up and a client runs only as many as they need. You might only have a total of two servers for your enterprise application – primary and DR – each spec’ed appropriately to handle the max volume of user requests.

But the model fails horribly when clients start proper cloud adoption. Suddenly that one big server gets sliced up into 10 small servers which come and go by the hour as they’re needed to supply demand.

DevOps techniques such as configuration management suddenly turns the effort of running dozens of servers into the same as running a single machine, there’s no longer any reason to want to constrain yourself to a single machine.

It gets worse if the client decides to adopt microservices, where each application gets split off into it’s own server (or container aka Docker/CoreOS). And it’s going to get very weird when we start using compute-less computing more with services like Lambda and Hoist because who knows how many server licenses you need to run an application that doesn’t even run on a server that you control?


Really the per-server model for pricing is as bad as the per-core model, because it no longer has any reflection on the size of an organisation, the amount they’re using a product and most important, the value they’ve obtaining from the product.

So what’s the alternative? SaaS products tend to charge per-user, but the model doesn’t always work well for infrastructure tools. You could be running monitoring for a large company with 1,000 servers but only have 3 user accounts for a small sysadmin team, which doesn’t really work for the vendor.

Some products can charge based on volume or API calls, but even this is risky. A heavy micro-service architecture would result in large number of HTTP calls between applications, so you can hardly say an app with 10,000 req/min is getting 4x the value compared to a client with a 2,500 req/min application – it could be all internal API calls.


To give an example of how painful the current world of subscription licensing is with modern computing, let’s conduct a thought exercise and have a look at the current pricing model of some popular platforms.

Let’s go with creating a startup. I’m going to run a small SaaS app in my spare time, so I need a bit of compute, but also need business-level tools for monitoring and debugging so I can ensure quality as my startup grows and get notified if something breaks.

First up I need compute. Modern cloud compute providers *understand* subscription pricing. Their models are brilliantly engineered to offer a price point for everyone. Whether you want a random jump box for $2/month or a $2000/month massive high compute monster to crunch your big-data-peak-hipster-NoSQL dataset, they can deliver the product at the price point you want.

Let’s grab a basic Digital Ocean box. Well actually let’s grab 2, since we’re trying to make a redundant SaaS product. But we’re a cheap-as-chips startup, so let’s grab 2x $5/mo box.

Screen Shot 2015-11-03 at 21.46.40

Ok, so far we’ve spent $10/month for our two servers. And whilst Digital Ocean is pretty awesome our code is going to be pretty crap since we used a bunch of high/drunk (maybe both?) interns to write our PHP code. So we should get a real time application monitoring product, like Newrelic APM.

Screen Shot 2015-11-03 at 21.37.46

Woot! Newrelic have a free tier, that’s great news for our SaaS application – but actually it’s not really that useful, it can’t do much tracing and only keeps 24 hours history. Certainly not enough to debug anything more serious than my WordPress blog.

I’ll need the pro account to get anything useful, so let’s add a whopping $149/mo – but actually make that $298/mo since we have two servers. Great value really. :-/


Next we probably need some kind of paging for oncall when our app blows up horribly at 4am like it will undoubtably do. PagerDuty is one of the popular market leaders currently with a good reputation, let’s roll with them.

Screen Shot 2015-11-03 at 21.52.57

Hmm I guess that $9/mo isn’t too bad, although it’s essentially what I’m paying ($10/mo) for the compute itself. Except that it’s kinda useless since it’s USA and their friendly neighbour only and excludes us down under. So let’s go with the $29/mo plan to get something that actually works. $29/mo is a bit much for a $10/mo compute box really, but hey, it looks great next to NewRelic’s pricing…


Remembering that my SaaS app is going to be buggier than Windows Vista, I should probably get some error handling setup. That $298/mo Newrelic APM doesn’t include any kind of good error handler, so we should also go get another market leader, Raygun, for our error reporting and tracking.

Screen Shot 2015-11-03 at 22.00.54

For a small company this isn’t bad value really given you get 5 different apps and any number of muppets working with you can get onboard. But it’s still looking ridiculous compared to my $10/mo compute cost.

So what’s the total damage:

Compute: $10/month
Monitoring: $371/month

Ouch! Now maybe as a startup, I’ll churn up that extra money as an investment into getting a good quality product, but it’s a far cry from the day when someone could launch a new product on a shoestring budget in their spare time from their uni laptop.


Let’s look at the same thing from the perspective of a large enterprise. I’ve got a mission critical business application and it requires a 20 core machine with 64GB of RAM. And of course I need two of them for when Java inevitably runs out of heap because the business let muppets feed garbage from their IDE directly into the JVM and expected some kind of software to actually appear as a result.

That compute is going to cost me $640/mo per machine – so $1280/mo total. And all the other bits, Newrelic, Raygun, PagerDuty? Still that same $371/mo!

Compute: $1280/month
Monitoring: $371/month

It’s not hard to imagine that the large enterprise is getting much more value out of those services than the small startup and can clearly afford to pay for that in relation to the compute they’re consuming. But the pricing model doesn’t make that distinction.


So given that we know know that per-core pricing is terrible and per-server pricing is terrible and (at least for infrastructure tools) per-user pricing is terrible what’s the solution?

“Cloud Spend Licensing” [1]

[1] A term I’ve just made up, but sounds like something Gartner spits out.

With Cloud Spend Licensing, the amount charged reflects the amount you spend on compute – this is a much more accurate indicator of the size of an organisation and value being derived from a product than cores or servers or users.

But how does a vendor know what this spend is? This problem will be solving itself thanks to compute consumers starting to cluster around a few major public cloud players, the top three being Amazon (AWS), Microsoft (Azure) and Google (Compute Engine).

It would not be technically complicated to implement support for these major providers (and maybe a smattering of smaller ones like Heroku, Digital Ocean and Linode) to use their APIs to suck down service consumption/usage data and figure out a client’s compute spend in the past month.

For customers whom can’t (still on VMWare?) or don’t want to provide this data, there can always be the fallback to a more traditional pricing model, whether it be cores, servers or some other negotiation (“enterprise deal”).


How would this look?

In our above example, for our enterprise compute bill ($1280/mo) the equivalent amount spent on the monitoring products was 23% for Newrelic, 3% for Raygun and 2.2% for PagerDuty (total of 28.2%). Let’s make the assumption this pricing is reasonable for the value of the products gained for the sake of demonstration (glares at Newrelic).

When applied to our $10/month SaaS startup, the bill for this products would be an additional $2.82/month. This may seem so cheap there will be incentive to set a minimum price, but it’s vital to avoid doing so:

  • $2.82/mo means anyone starting up a new service uses your product. Because why not, it’s pocket change. That uni student working on the next big thing will use you. The receptionist writing her next mobile app success in her spare time will use you. An engineer in a massive enterprise will use you to quickly POC a future product on their personal credit card.
  • $2.82/mo might only just cover the cost of the service, but you’re not making any profit if they couldn’t afford to use it in the first place. The next best thing to profit is market share – provided that market share has a conversion path to profit in future (something some startups seem to forget, eh Twitter?).
  • $2.82/mo means IT pros use your product on their home servers for fun and then take their learning back to the enterprise. Every one of the providers above should have a ~ $10/year offering for IT pros to use and get hooked on their product, but they don’t. Newrelic is the closest with their free tier. No prizes if you guess which product I use on my personal servers. Definitely no prizes if you guess which product I can sell the benefits of the most to management at work.


But what about real earnings?

As our startup grows and gets bigger, it doesn’t matter if we add more servers, or upsize the existing ones to add bigger servers – the amount we pay for the related support applications is always proportionate.

It also caters for the emerging trend of running systems for limited hours or using spot prices – clients and vendor don’t have to worry about figuring out how it fits into the pricing model, instead the scale of your compute consumption sets the price of the servers.

Suddenly that $2.82/mo becomes $56.40/mo when the startup starts getting successful and starts running a few computers with actual specs. One day it becomes $371 when they’re running $1280/mo of compute tier like the big enterprise. And it goes up from there.


I’m not a business analyst and “Cloud Spend Licensing” may not be the best solution, but goddamn there has to be a more sensible approach than believing someone will spend $371/mo for their $10/mo compute setup. And I’d like to get to that future sooner rather than later please, because there’s a lot of cool stuff out there that I’d like to experiment with more in my own time – and that’s good for both myself and vendors.


Other thoughts:

  • I don’t want vendors to see all my compute spend details” – This would be easily solved by cloud provider exposing the right kind of APIs for this purpose eg, “grant vendor XYZ ability to see sum compute cost per month, but no details on what it is“.
  • I’ll split my compute into lots of accounts and only pay for services where I need it to keep my costs low” – Nothing different to the current situation where users selectively install agents on specific systems.
  • This one client with an ultra efficient, high profit, low compute app will take advantage of us.” – Nothing different to the per-server/per-core model then other than the min spend. Your client probably deserves the cheaper price as a reward for not writing the usual terrible inefficient code people churn out.
  • “This doesn’t work for my app” – This model is very specific to applications that support infrastructure, I don’t expect to see it suddenly being used for end user products/services.